--
:
--
:
--
K8s环境持续部署
最后更新于:
K8s环境持续部署

目录
[toc]
推荐文章
https://www.yuque.com/xyy-onlyone/aevhhf?# 《玩转Typora》
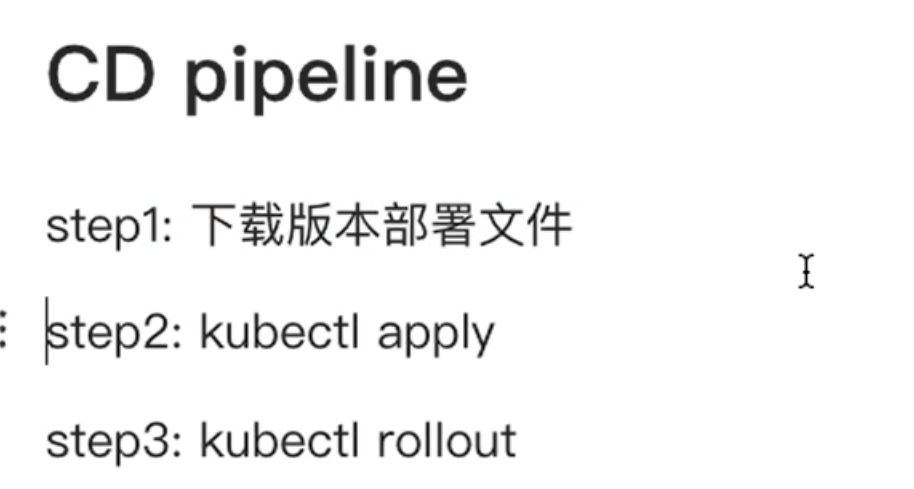
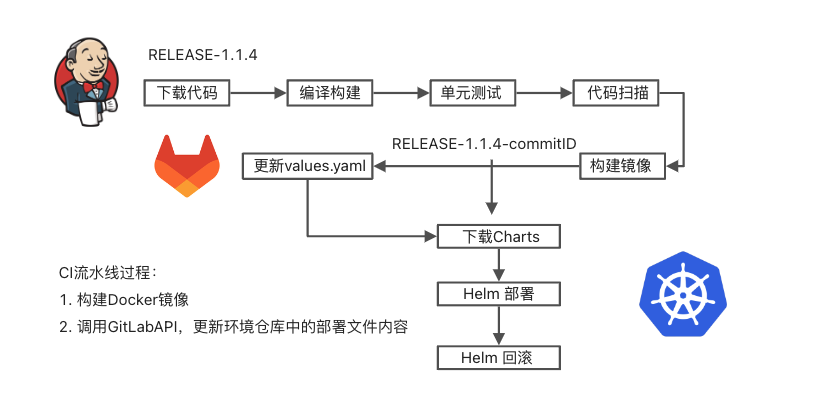
1、Kubectl 发布流水线
CI流水线:
- 下载代码
- 构建单元测试
- 代码扫描
- 构建镜像
- 更新发布文件
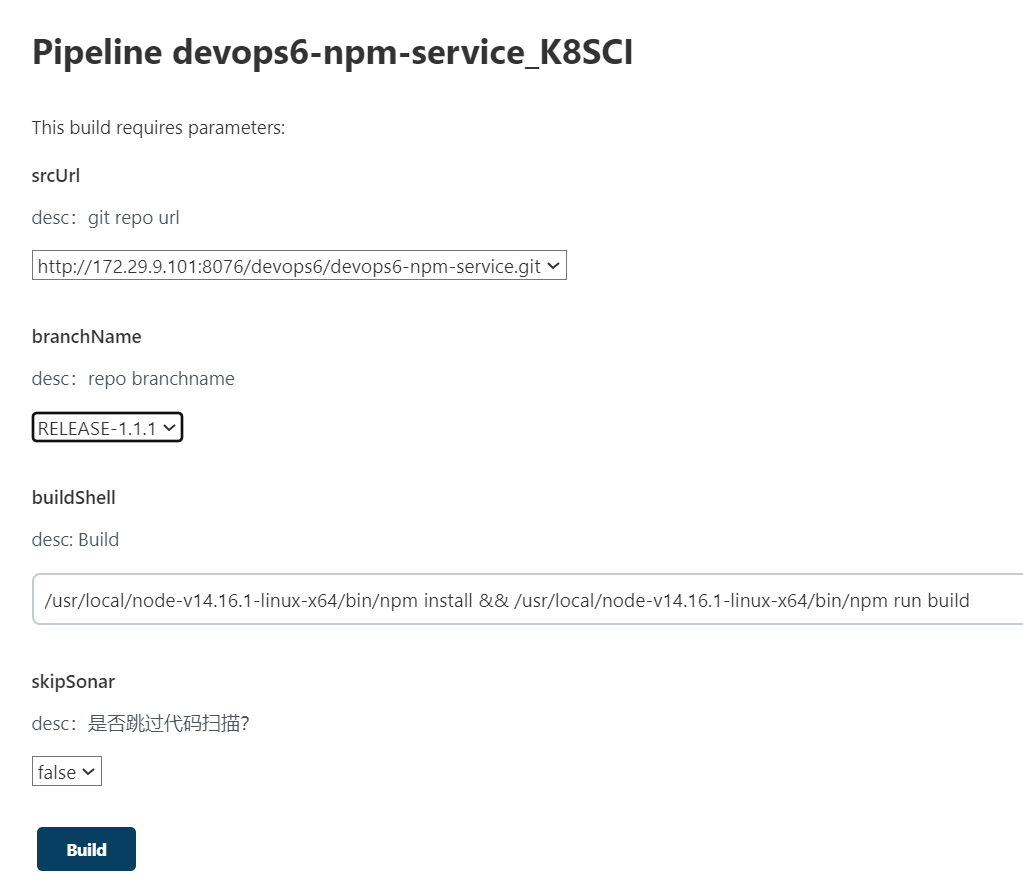
CD流水线:
- 输入版本,从git下载部署文件;
- 使用kubectl发布;
- 使用kubectl回滚;
环境准备
jenkins
gitlab
sonarQube
harbor
使用之前的npm项目
- 使用之前的npm项目
devops6-npm-service
如何构建,请看npm构建项目部分。
- 新建
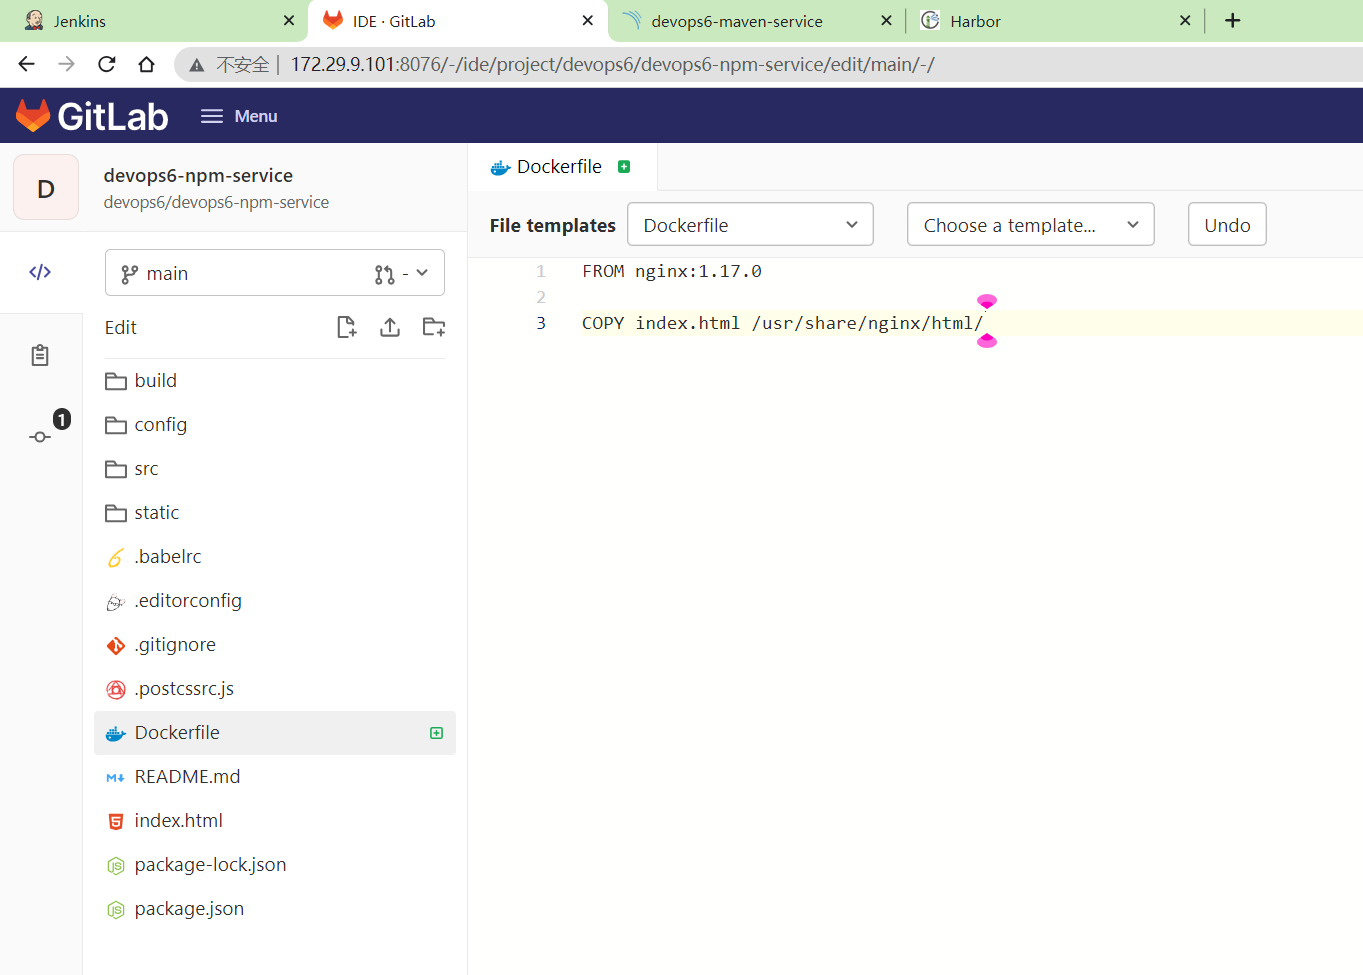
Dockerfile
1FROM nginx:1.17.0
2
3COPY index.html /usr/share/nginx/html/
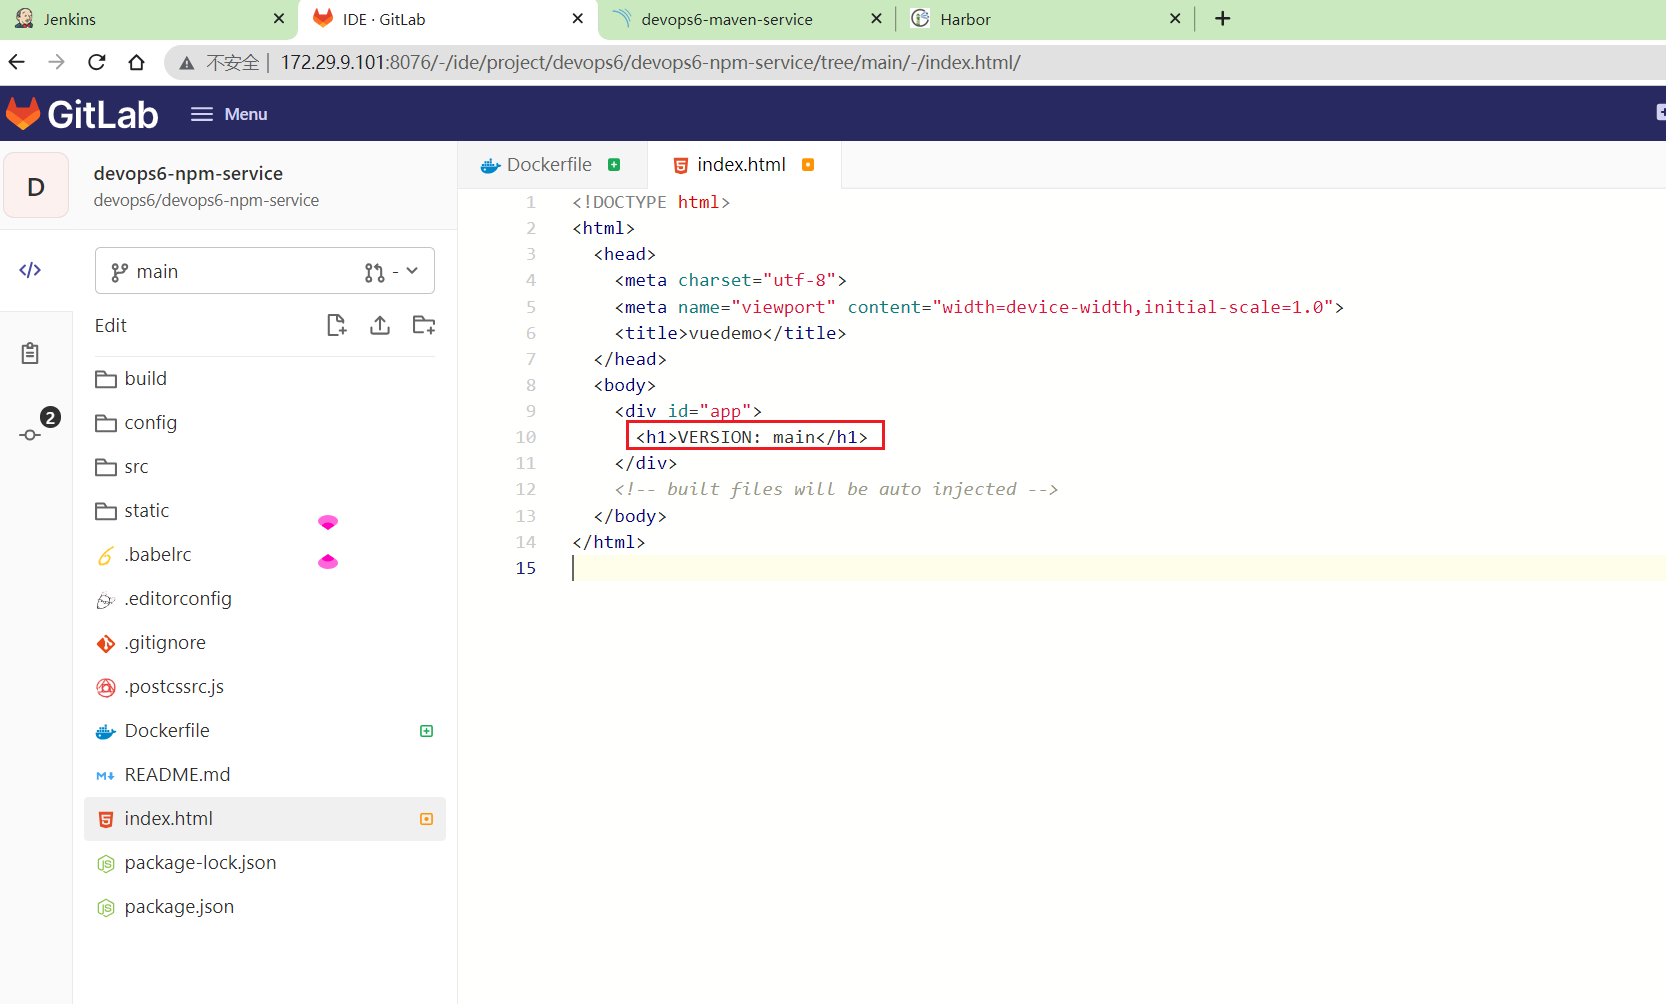
- 编辑
index.html文件
1<h1>VERSION: main</h1>
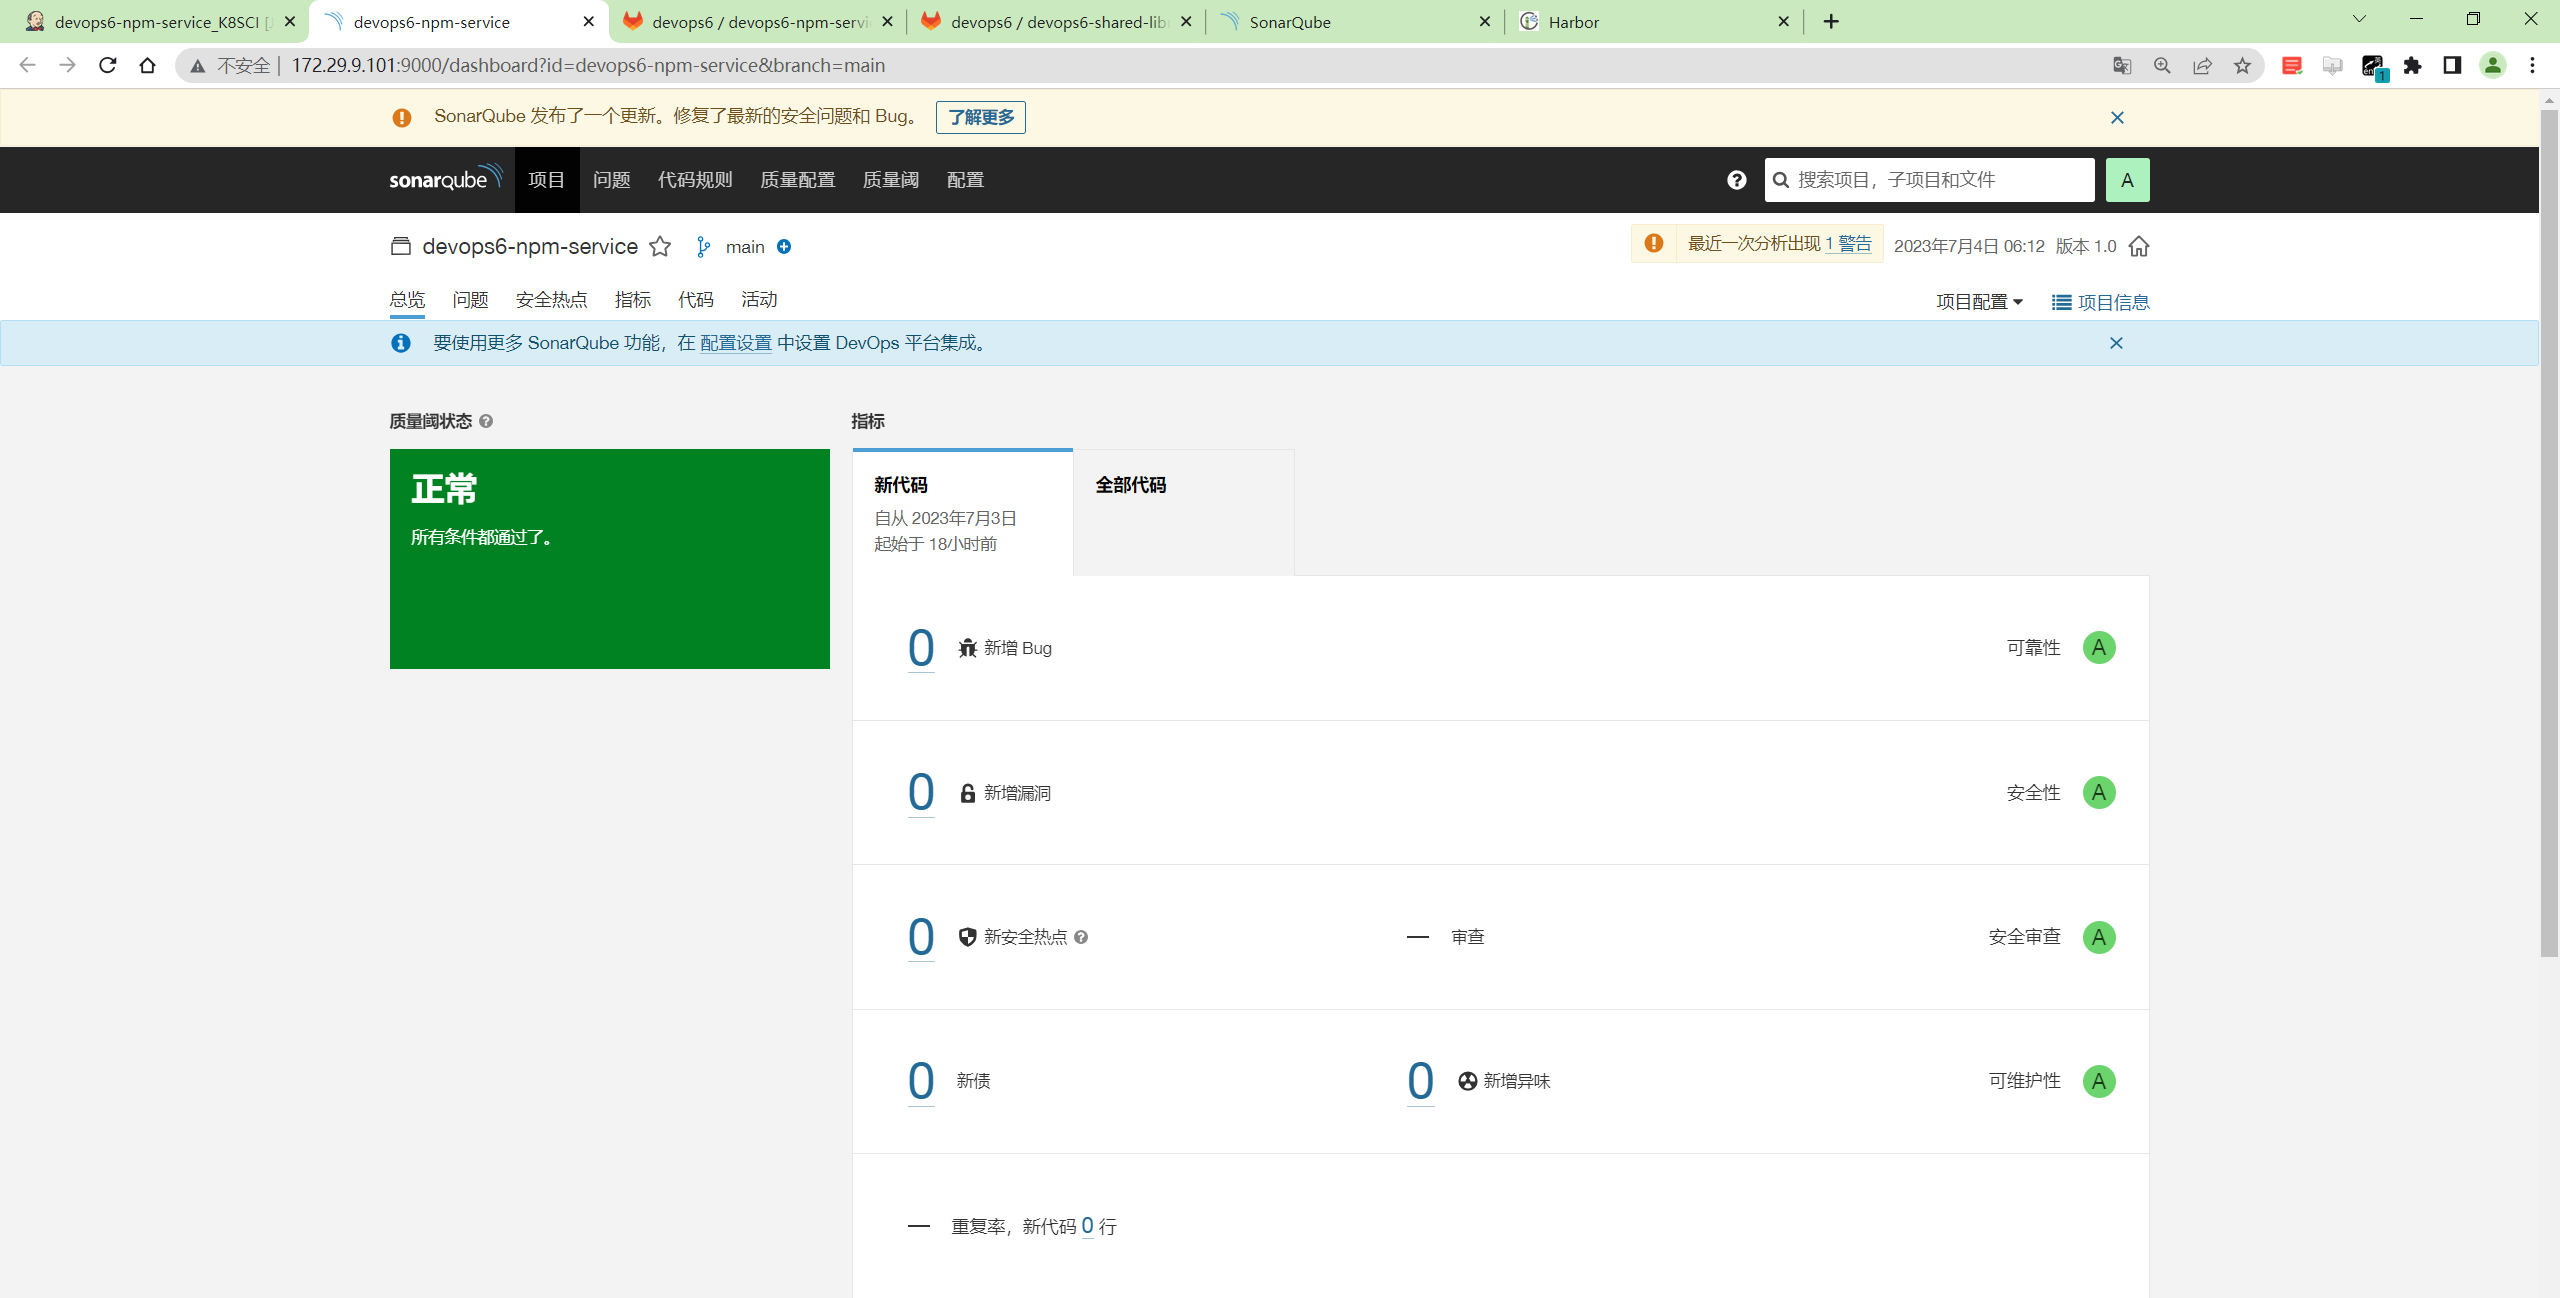
- 配置好sonar参数
创建sonar-project.properties文件
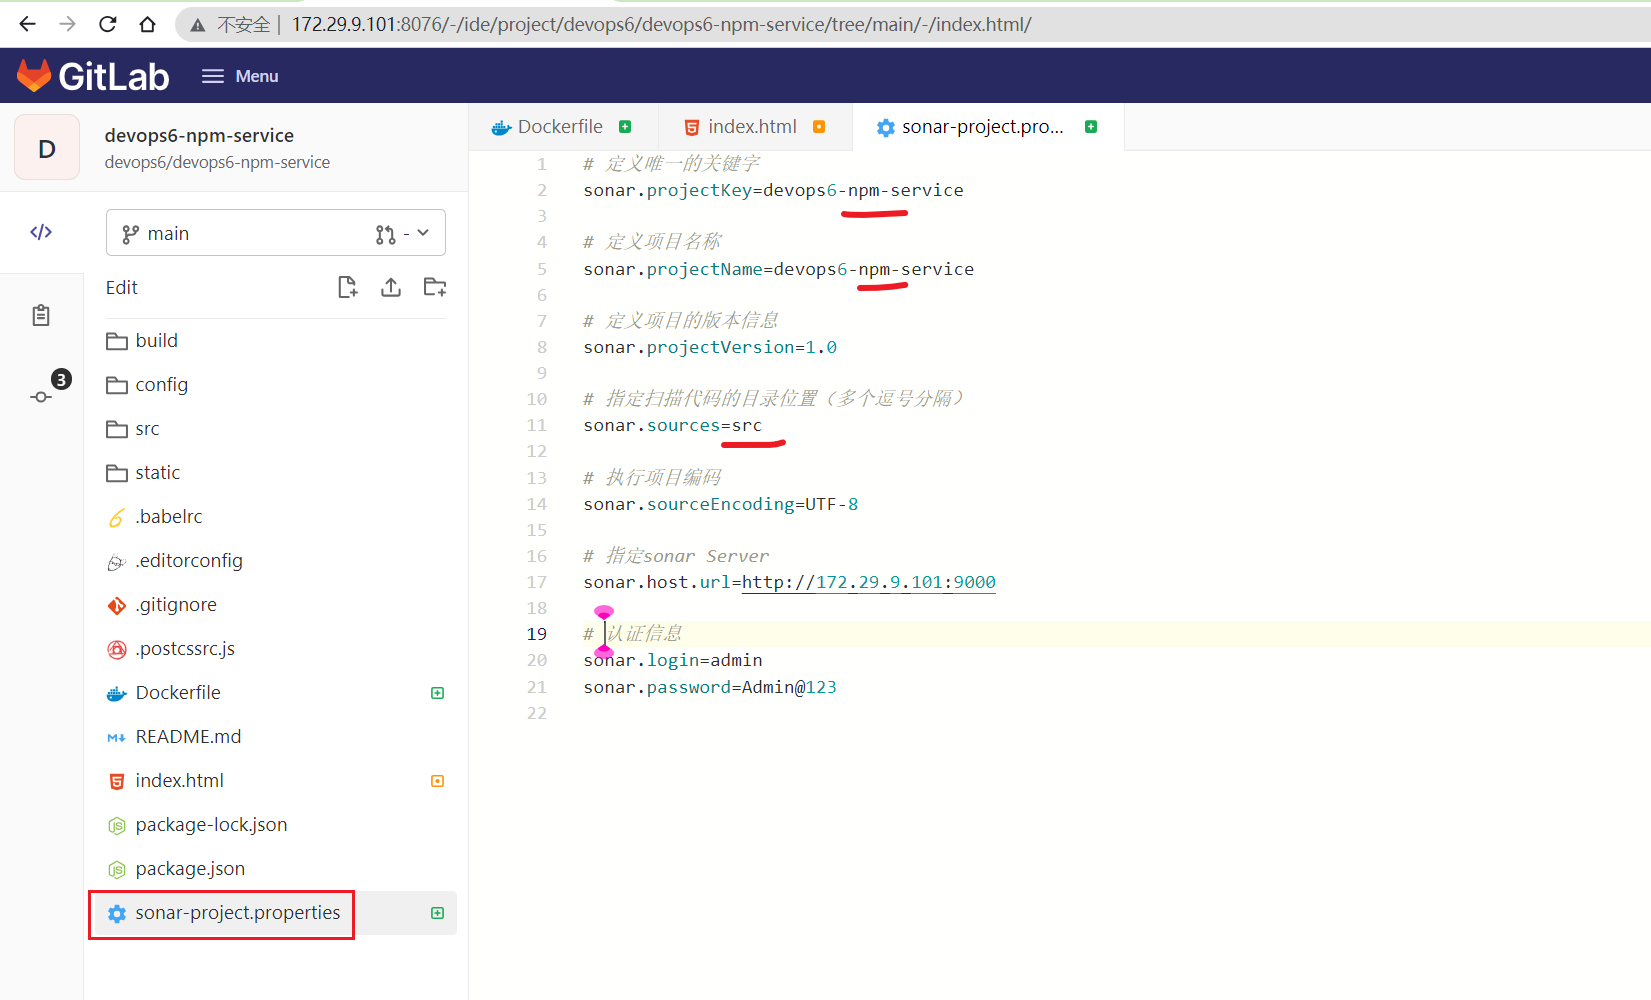
 1# 定义唯一的关键字
 2sonar.projectKey=devops6-npm-service
 3
 4# 定义项目名称
 5sonar.projectName=devops6-npm-service
 6
 7# 定义项目的版本信息
 8sonar.projectVersion=1.0
 9
10# 指定扫描代码的目录位置(多个逗号分隔)
11sonar.sources=src
12
13# 执行项目编码
14sonar.sourceEncoding=UTF-8
15
16# 指定sonar Server
17sonar.host.url=http://172.29.9.101:9000
18
19# 认证信息
20sonar.login=admin
21sonar.password=Admin@123
然后提交项目代码。
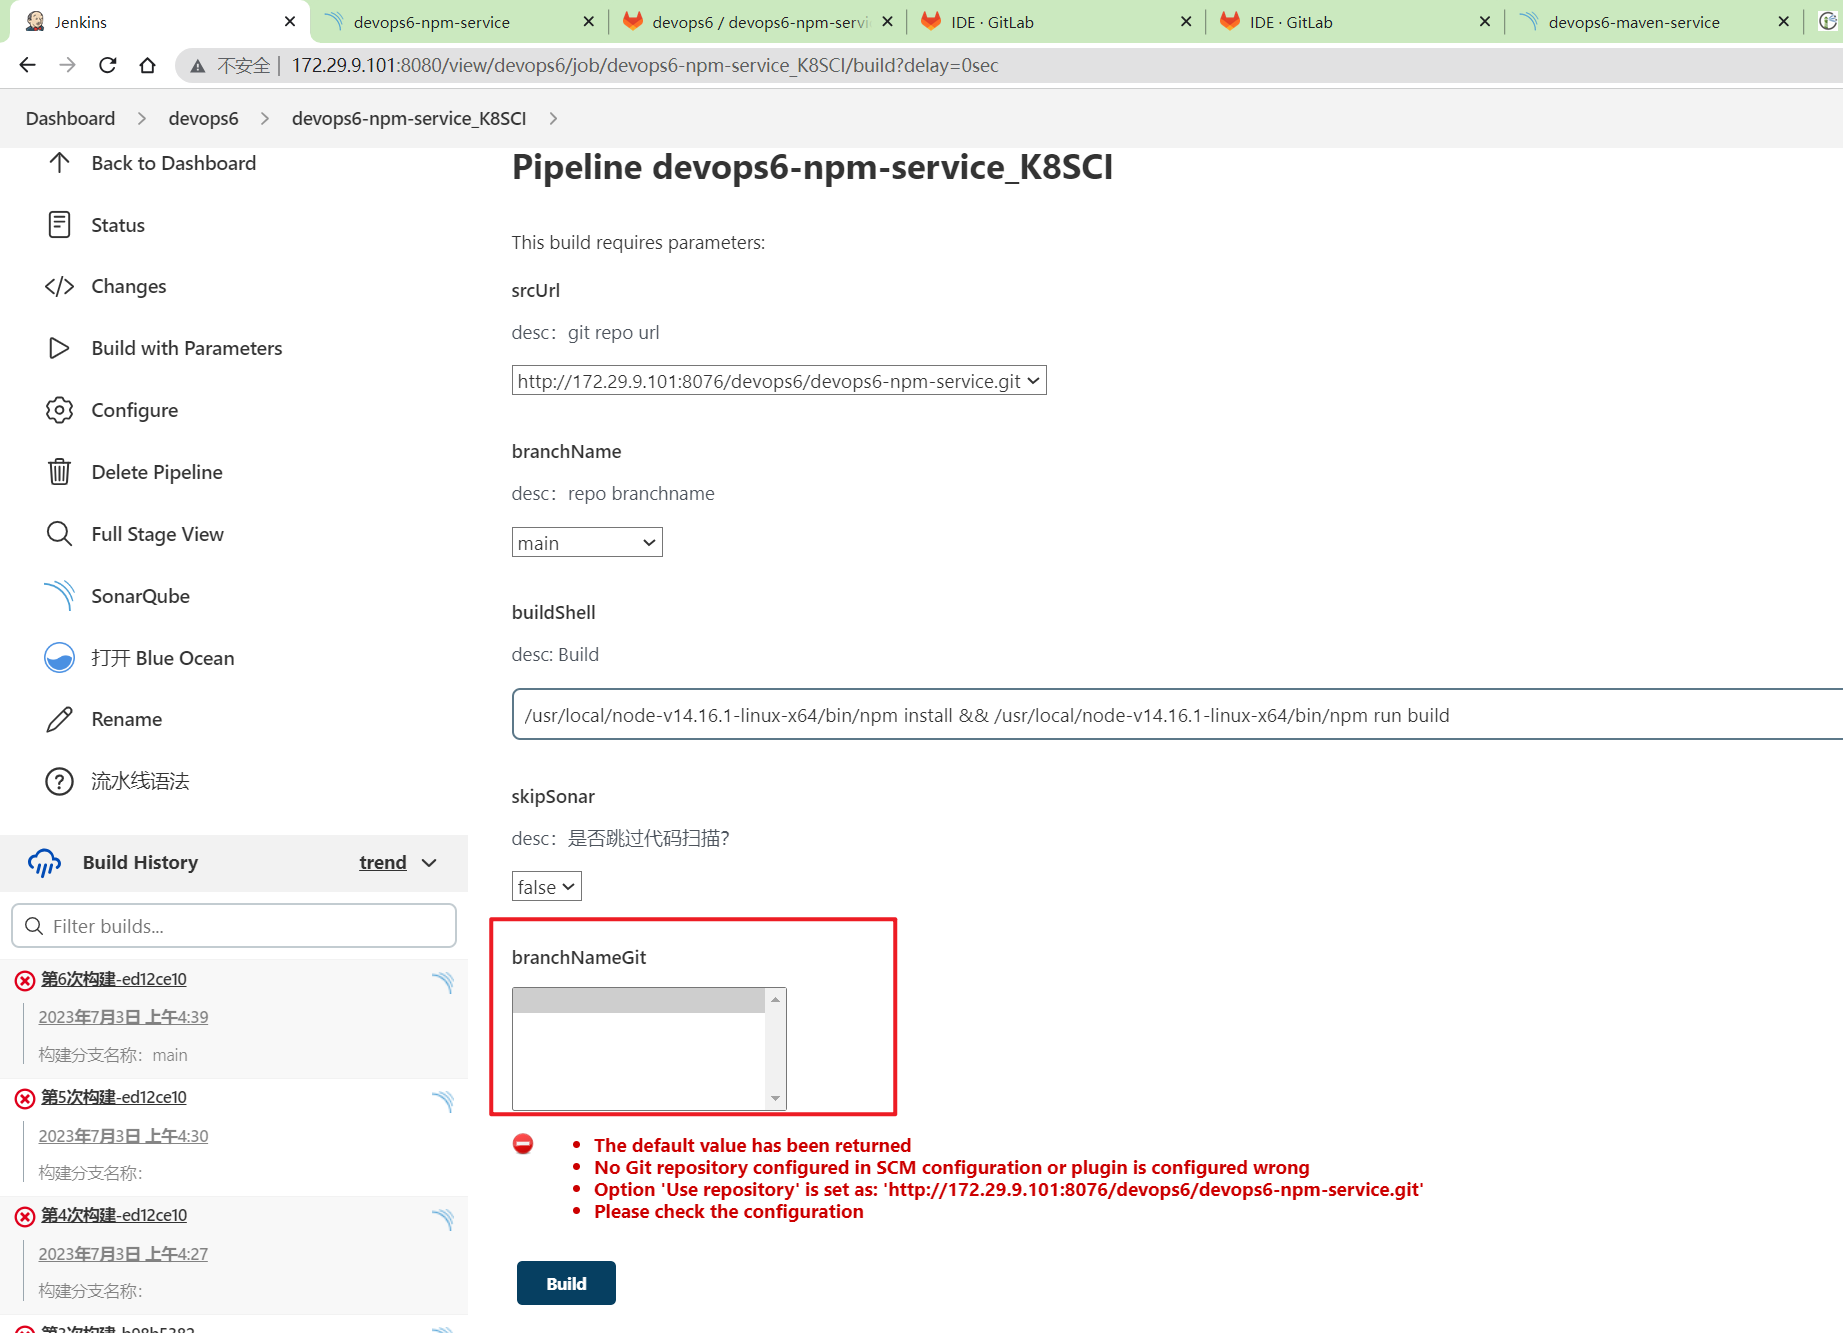
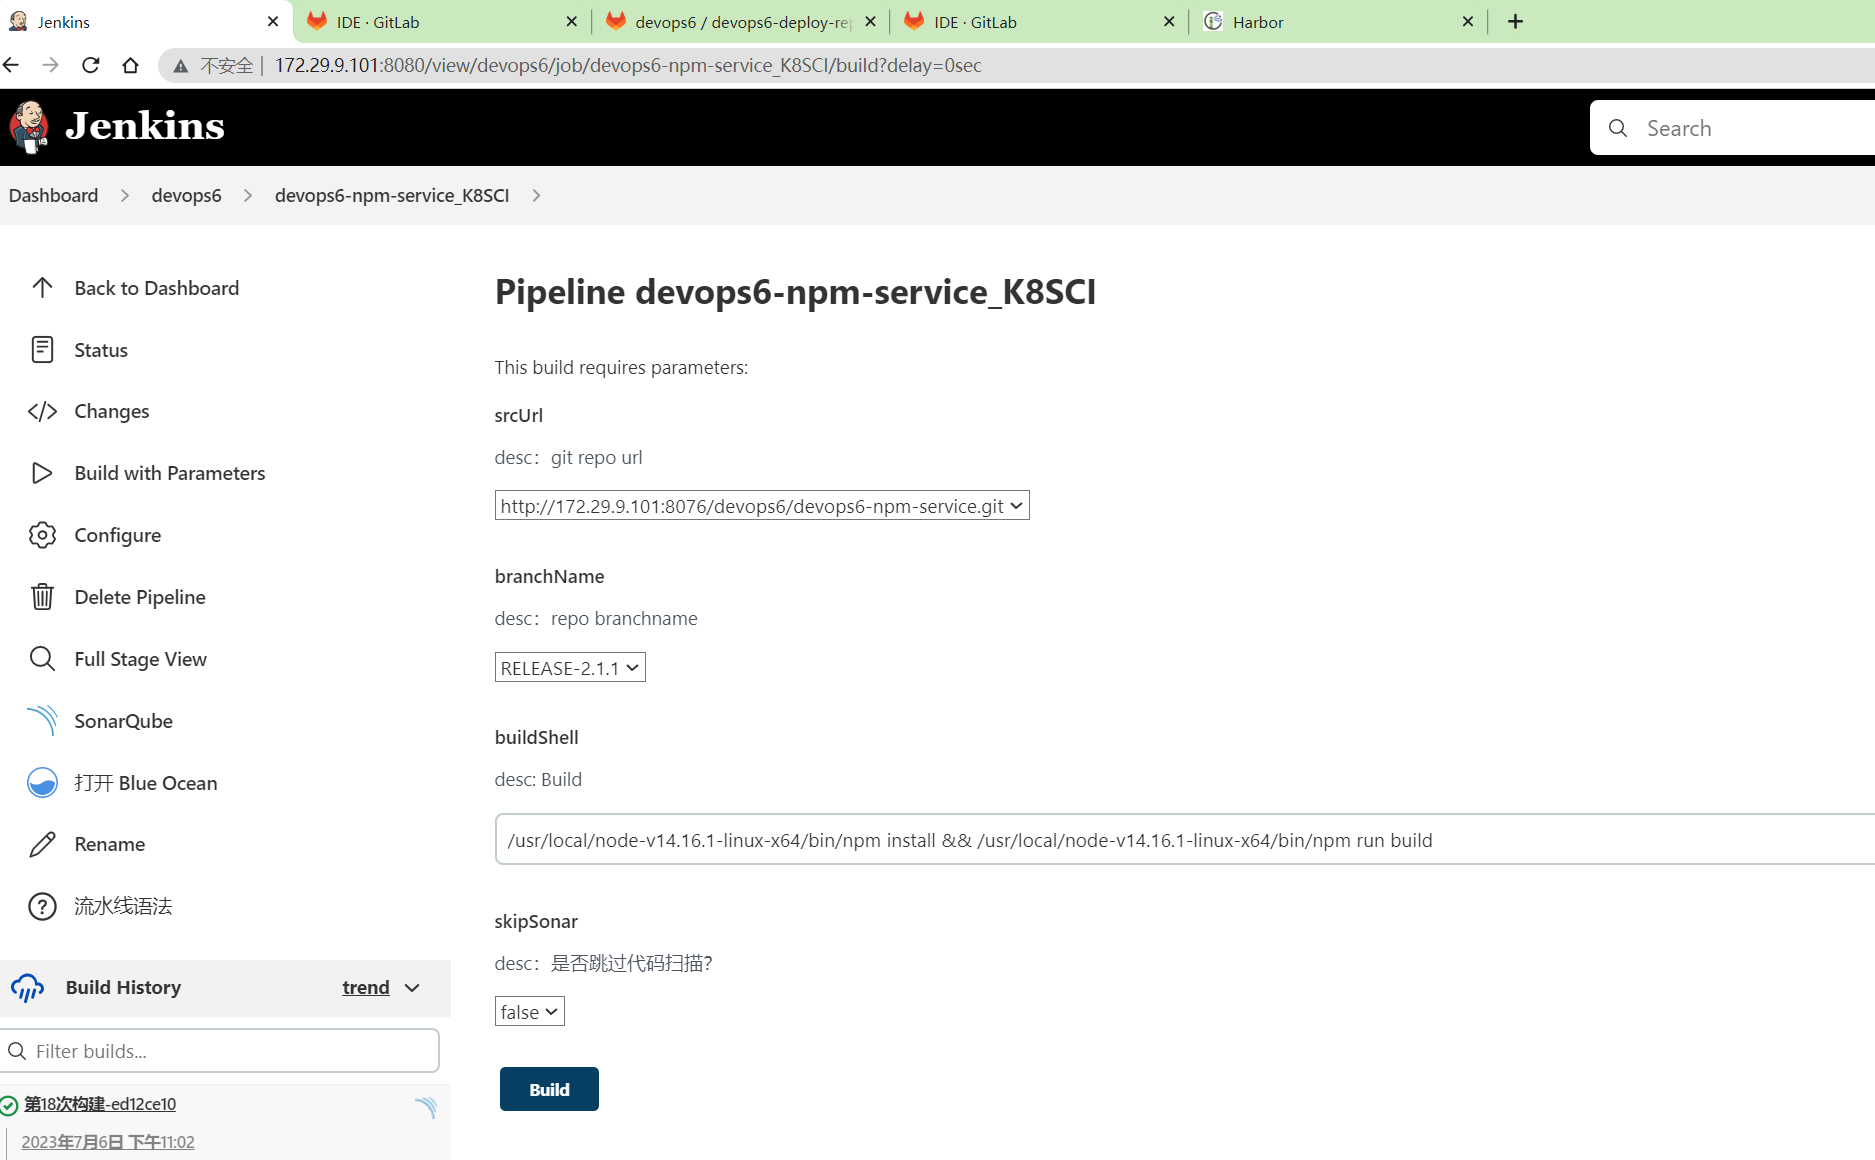
创建一条新pipeline
- 以原
devops6-maven-service_CI为基础拷贝一条新流水线devops6-npm-service_K8SCI:
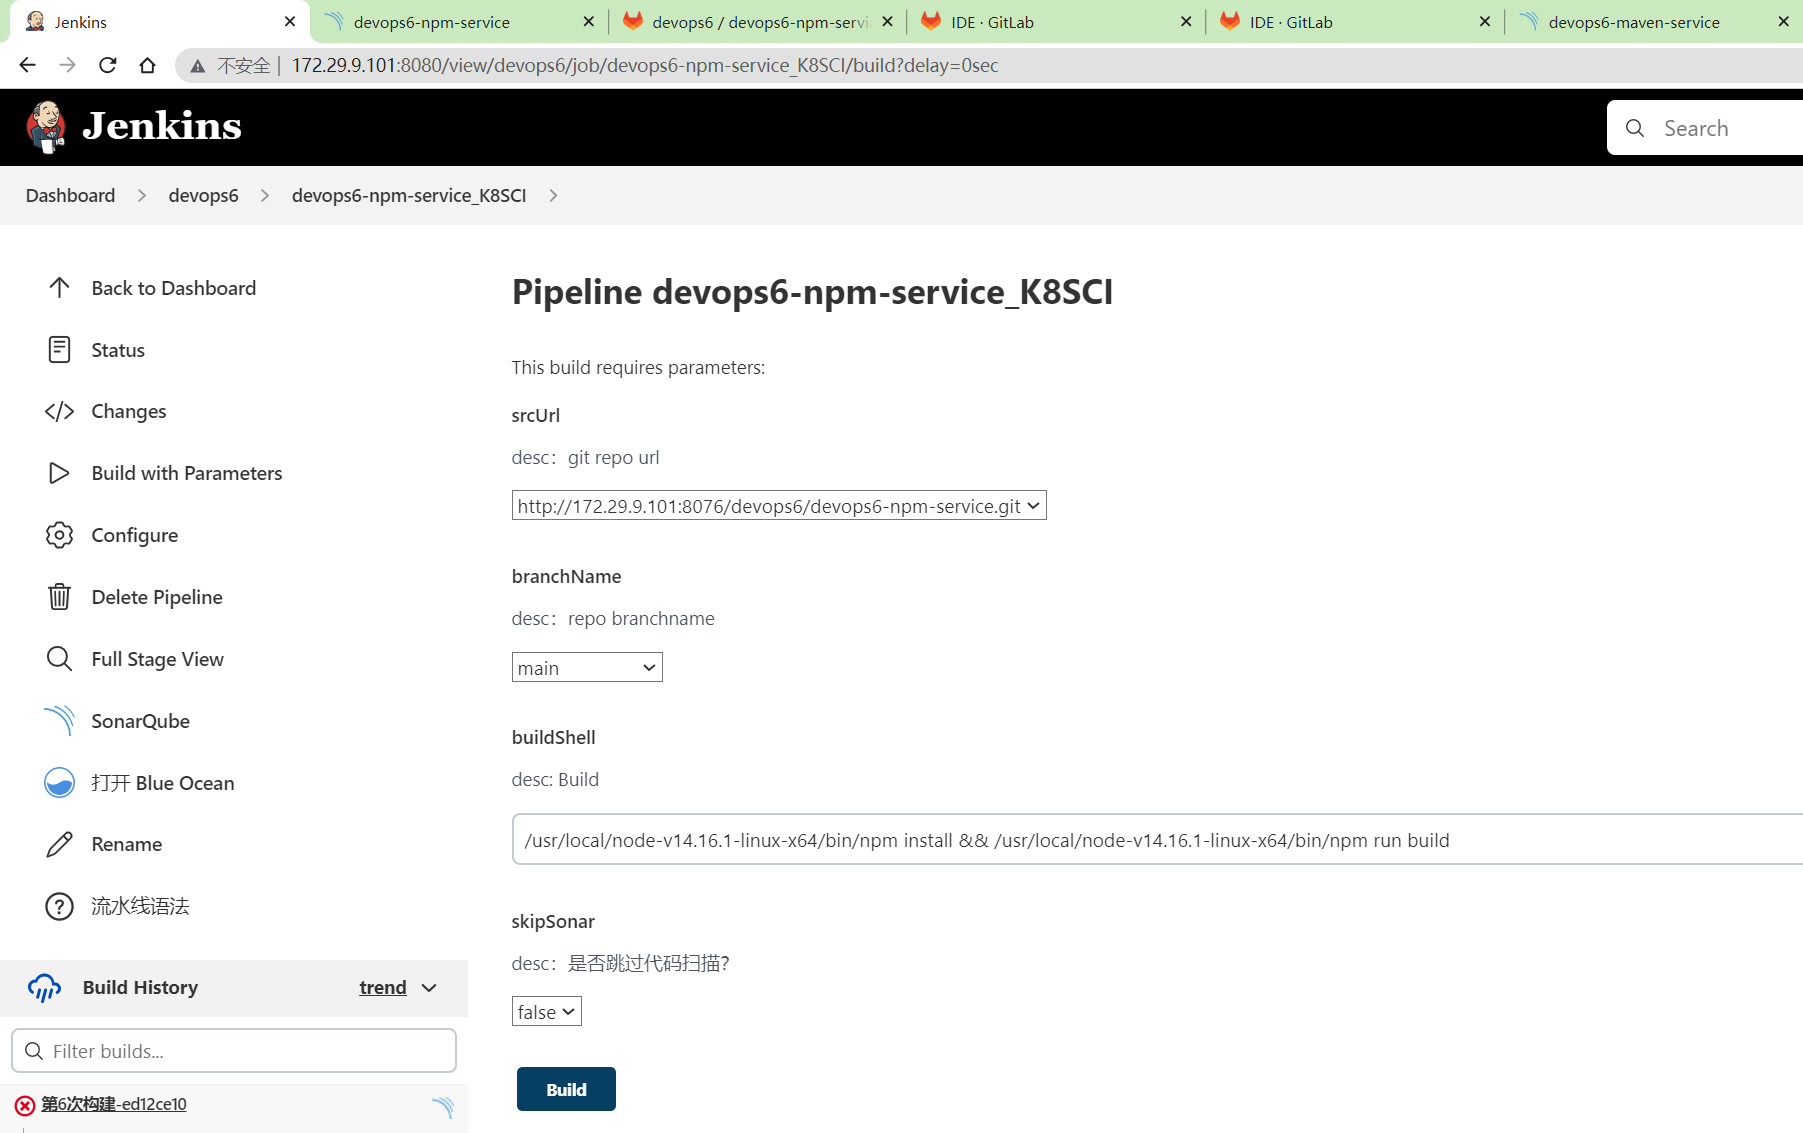
⚠️ 注意:但是这里的Git选项参数一直没效果,测试不出来,很奇怪。。。因此,就直接用默认的选项参数就好。
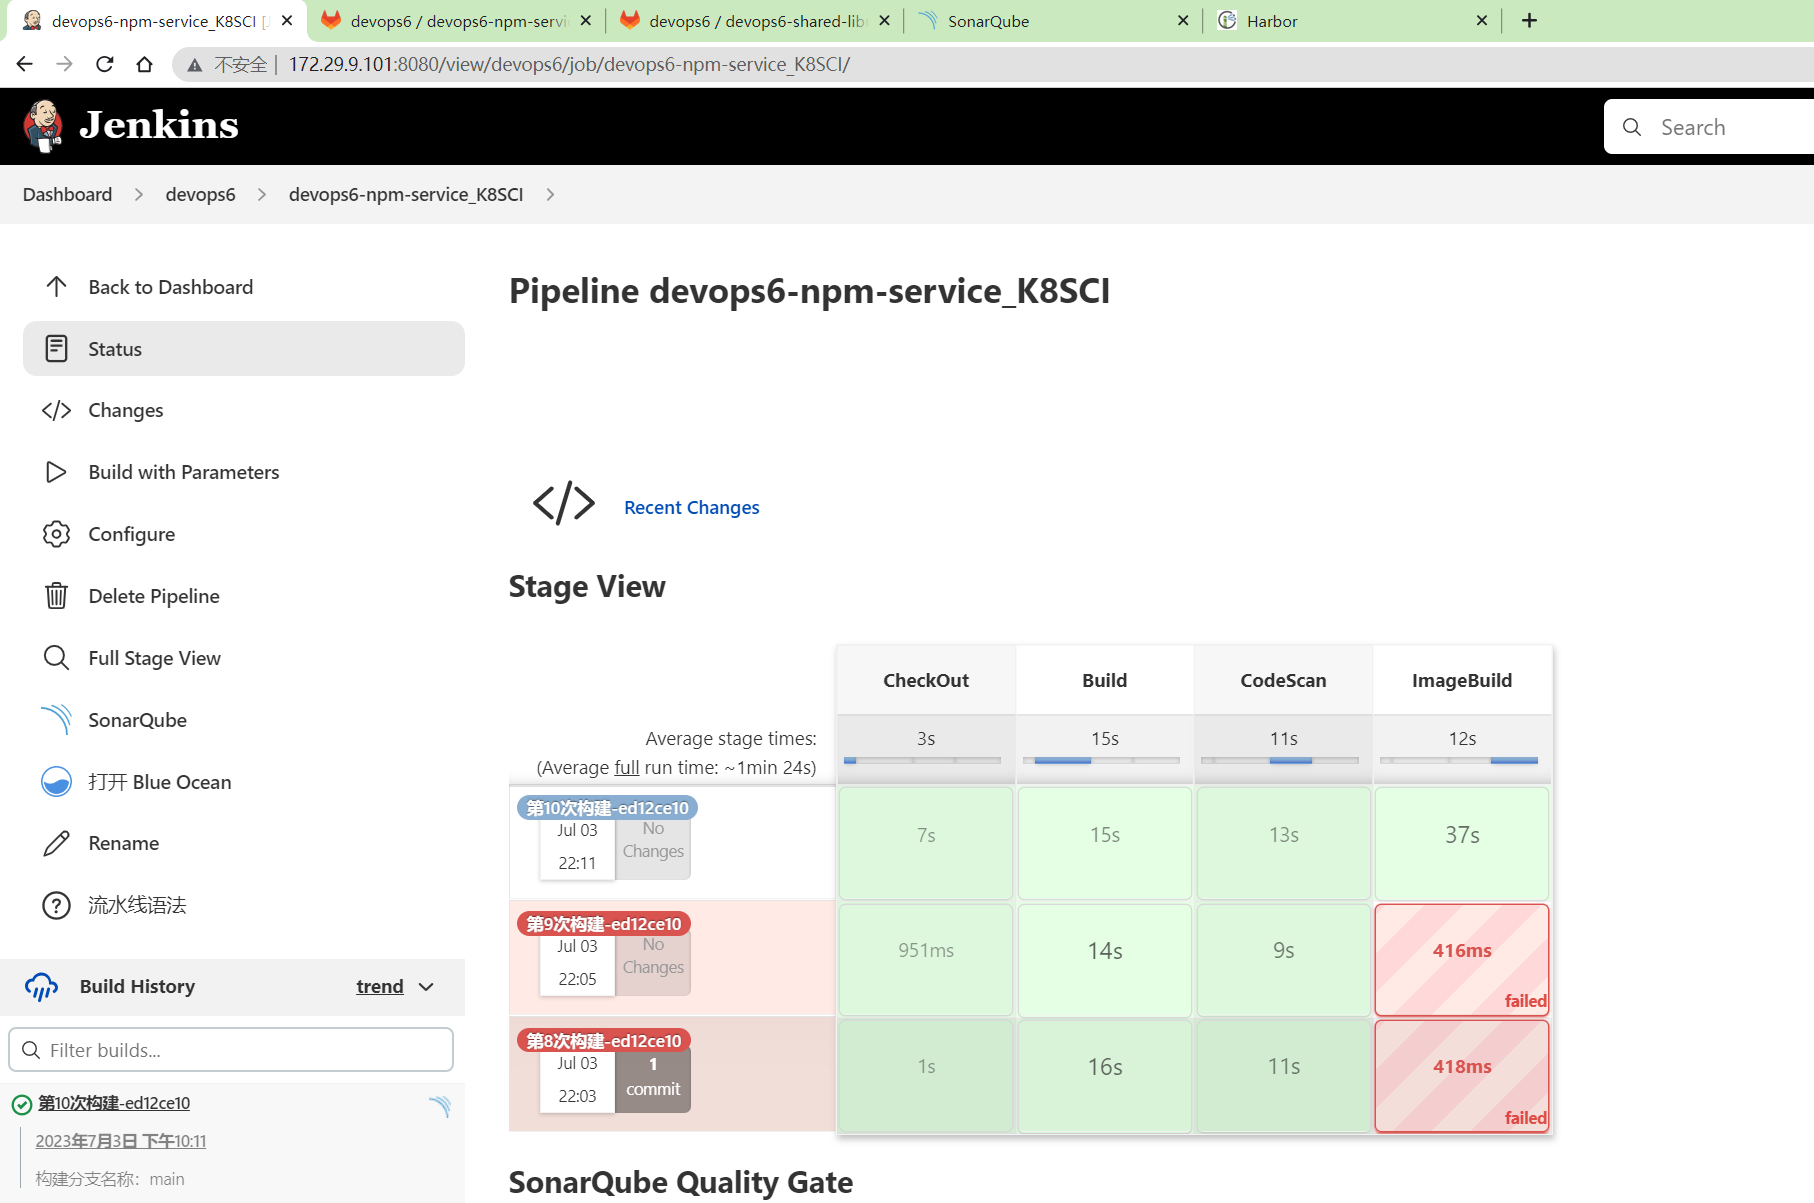
- 开始进行构建
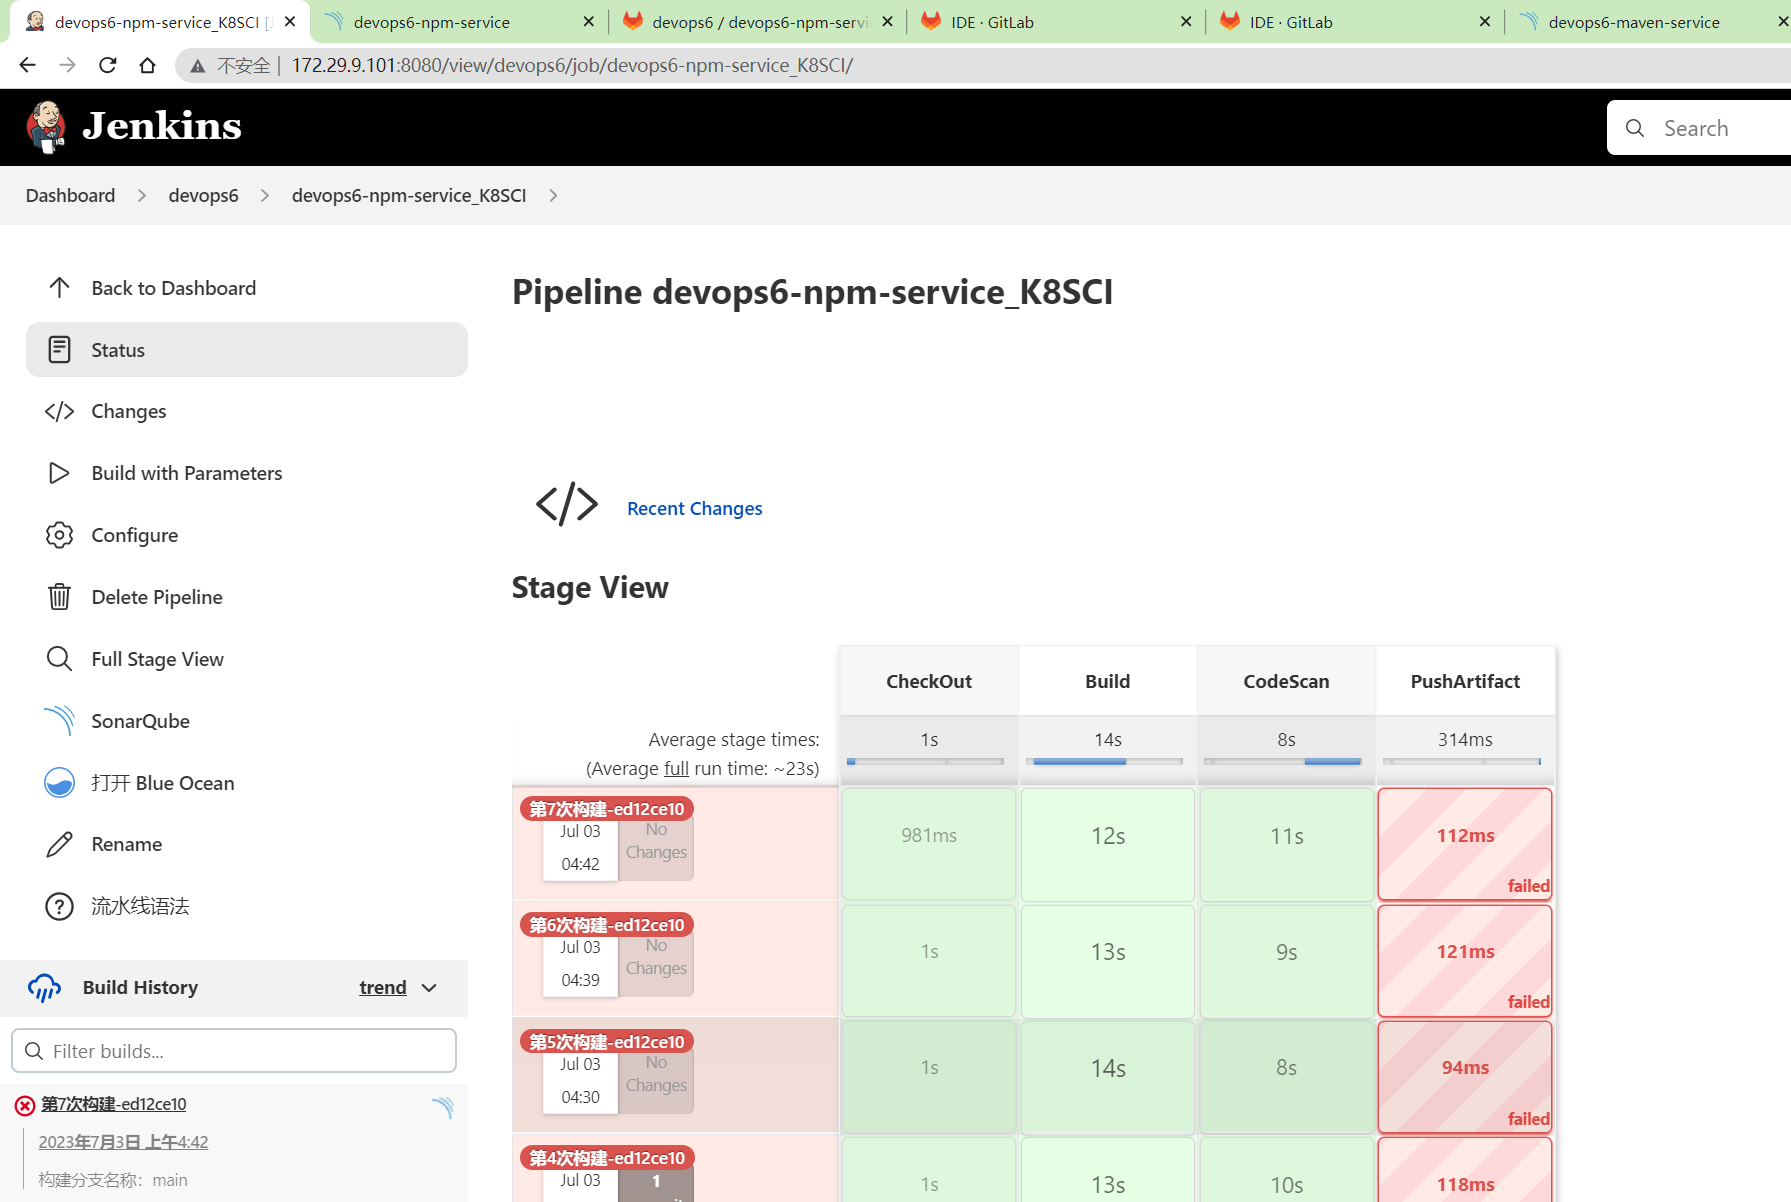
可以看待,前面几个过程都是ok的,这里上传制品过程,不需要。
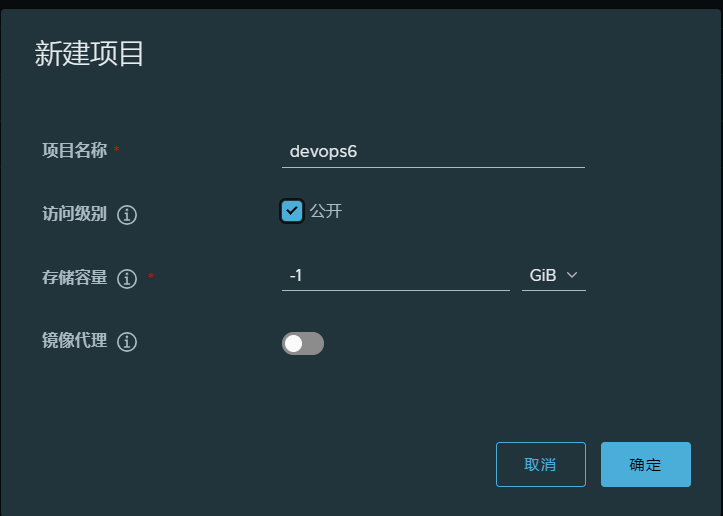
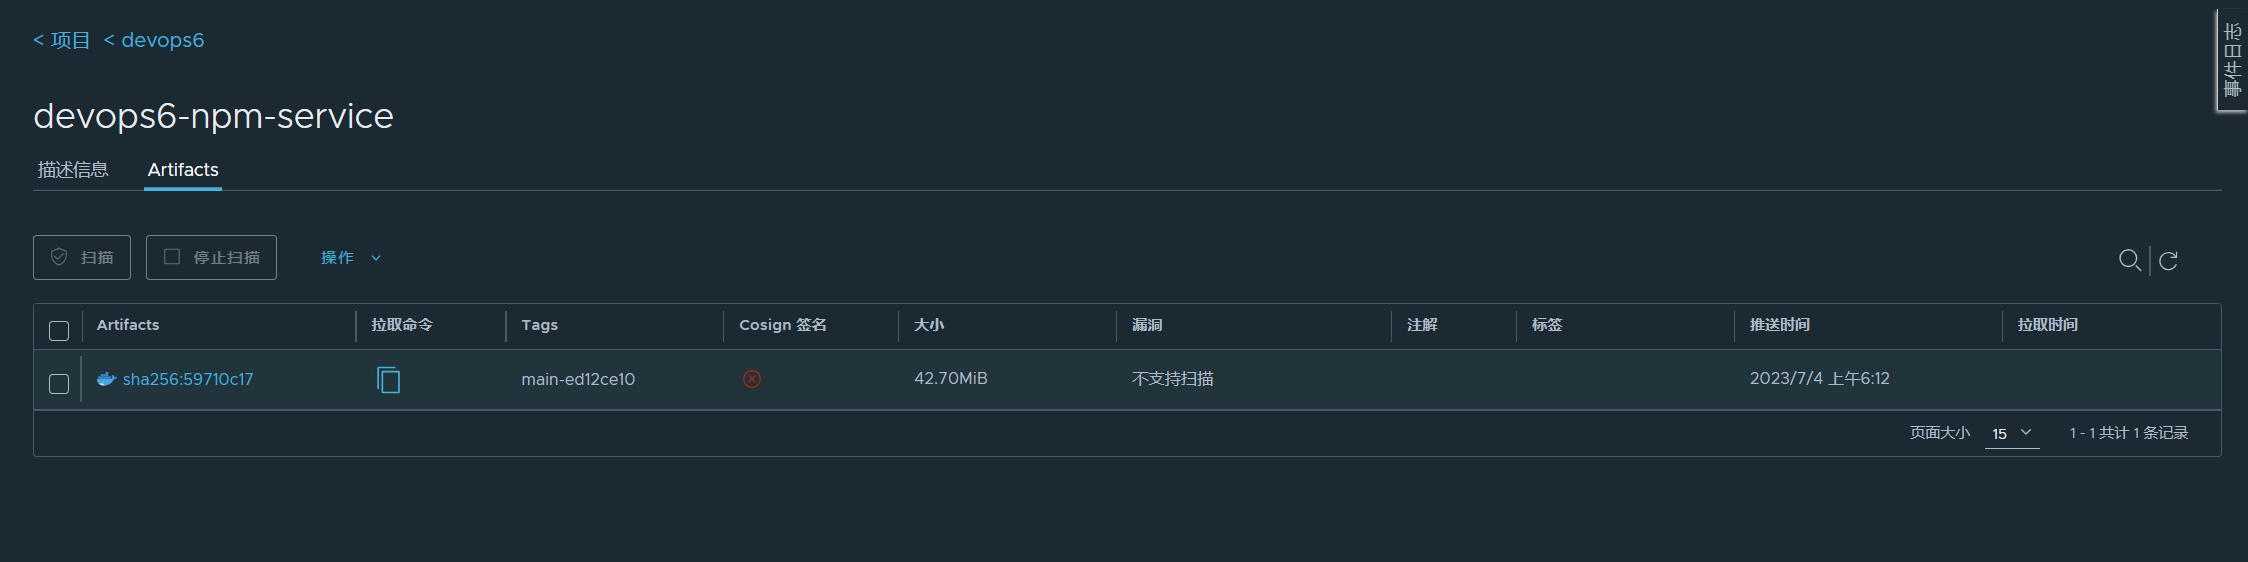
创建harbor仓库
- 镜像命名规范:

- 创建仓库
- 修改本地 docker 服务使用 http 协议和私有仓库通信(否则会报错)
1#配置可信任(如果仓库是HTTPS访问不用配置)
2#在 daemon.json 中添加以下参数
3[root@harbor ~]# vim /etc/docker/daemon.json #创建此文件,并写入以下内容
4{
5"insecure-registries": ["172.29.9.120"]
6}
7
8#重启docker 服务
9[root@harbor ~]# systemctl daemon-reload && systemctl restart docker


编写CI pipeline
- 创建
k8sci.jenkinsfile
 1@Library("devops06@main") _
 2
 3//import src/org/devops/xxx.groovy
 4def checkout = new org.devops.CheckOut()
 5def build = new org.devops.Build()
 6def sonar = new org.devops.Sonar()
 7
 8
 9//使用git 参数需要格式化
10env.branchName = "${env.branchName}" - "origin/"
11println(env.branchName)
12
13pipeline {
14    agent {label "build"}
15
16    //跳过默认的代码检出功能
17    options {
18        skipDefaultCheckout true
19    }
20
21
22    stages{
23        stage("CheckOut"){
24            steps{
25                script{
26                    checkout.CheckOut()
27
28                    //获取commitID
29                    env.commitID = checkout.GetCommitID()
30                    println("commitID: ${env.commitID}")
31
32                    // Jenkins构建显示信息
33                    currentBuild.displayName = "第${BUILD_NUMBER}次构建-${env.commitID}"
34                    currentBuild.description = "构建分支名称:${env.branchName}"
35                    //currentBuild.description = "Trigger by user jenkins \n branch: ${env.branchName}"
36                }
37            }
38        }
39
40        stage("Build"){
41            steps{
42                script{
43                    build.Build()
44                }
45            }
46
47        }
48
49        stage("CodeScan"){
50            // 是否跳过代码扫描?
51            when {
52                environment name: 'skipSonar', value: 'false'
53            }
54
55            steps{
56                script{
57                    sonar.SonarScannerByPlugin()
58
59                }
60            }
61        }
62
63         stage("ImageBuild"){
64            steps{
65                script{
66                    //PushArtifactByPlugin()
67                    //PushArtifactByPluginPOM()
68
69                    // init package info
70                    appName = "${JOB_NAME}".split('_')[0] //devops6-maven-service_CI
71                    repoName = appName.split('-')[0]   //devops6
72
73                    imageName = "${repoName}/${appName}"
74                    imageTag = "${env.branchName}-${env.commitID}"
75                    sh """
76                        #登录镜像仓库
77                        docker login -u admin -p Harbor12345 172.29.9.120
78
79                        # 构建镜像
80                        docker build -t 172.29.9.120/${imageName}:${imageTag} .
81
82                        # 上传镜像
83                        docker push 172.29.9.120/${imageName}:${imageTag}
84
85                        # 删除镜像
86                        sleep 2
87                        docker rmi 172.29.9.120/${imageName}:${imageTag}
88                    """
89                }
90            }
91
92        }
93
94    }
95}
- 在回放里运行
- 然后将代码提交到共享库里。
==准备k8s环境==
- 启动好k8s环境
- 在devops06机器上安装kubectl工具
 1cat > /etc/yum.repos.d/kubernetes.repo << EOF
 2[kubernetes]
 3name=Kubernetes
 4baseurl=https://mirrors.aliyun.com/kubernetes/yum/repos/kubernetes-el7-x86_64
 5enabled=1
 6gpgcheck=0
 7repo_gpgcheck=0
 8gpgkey=https://mirrors.aliyun.com/kubernetes/yum/doc/yum-key.gpg https://mirrors.aliyun.com/kubernetes/yum/doc/rpm-package-key.gpg
 9EOF
10
11[root@Devops6 ~]#yum install -y kubectl-1.20.0 --disableexcludes=kubernetes
- 然后把k8s集群master节点下的
~/.kube/config文件拷贝到devops6机器~/.kube/目录下
- 然后在k8s的2个节点先配置好 修改本地 docker 服务使用 http 协议和私有仓库通信(否则会报错)
1#配置可信任(如果仓库是HTTPS访问不用配置)
2#在 daemon.json 中添加以下参数
3[root@harbor ~]# vim /etc/docker/daemon.json #创建此文件,并写入以下内容
4{
5"insecure-registries": ["172.29.9.120"]
6}
7
8#重启docker 服务
9[root@harbor ~]# systemctl daemon-reload && systemctl restart docker
记得:只需要在node1 node2上配置就行。
- 自己k8s集群需不是一个ingress-controller。
这里之前已经部署好ingress-controller了。
- 配置下kubectl的自动补全
1#安装软件包
2yum install -y epel-release bash-completion
3
4#执行命令
5source /usr/share/bash-completion/bash_completion
6
7source <(kubectl completion bash)
8echo "source <(kubectl completion bash)" >> ~/.bashrc
9source ~/.bashrc
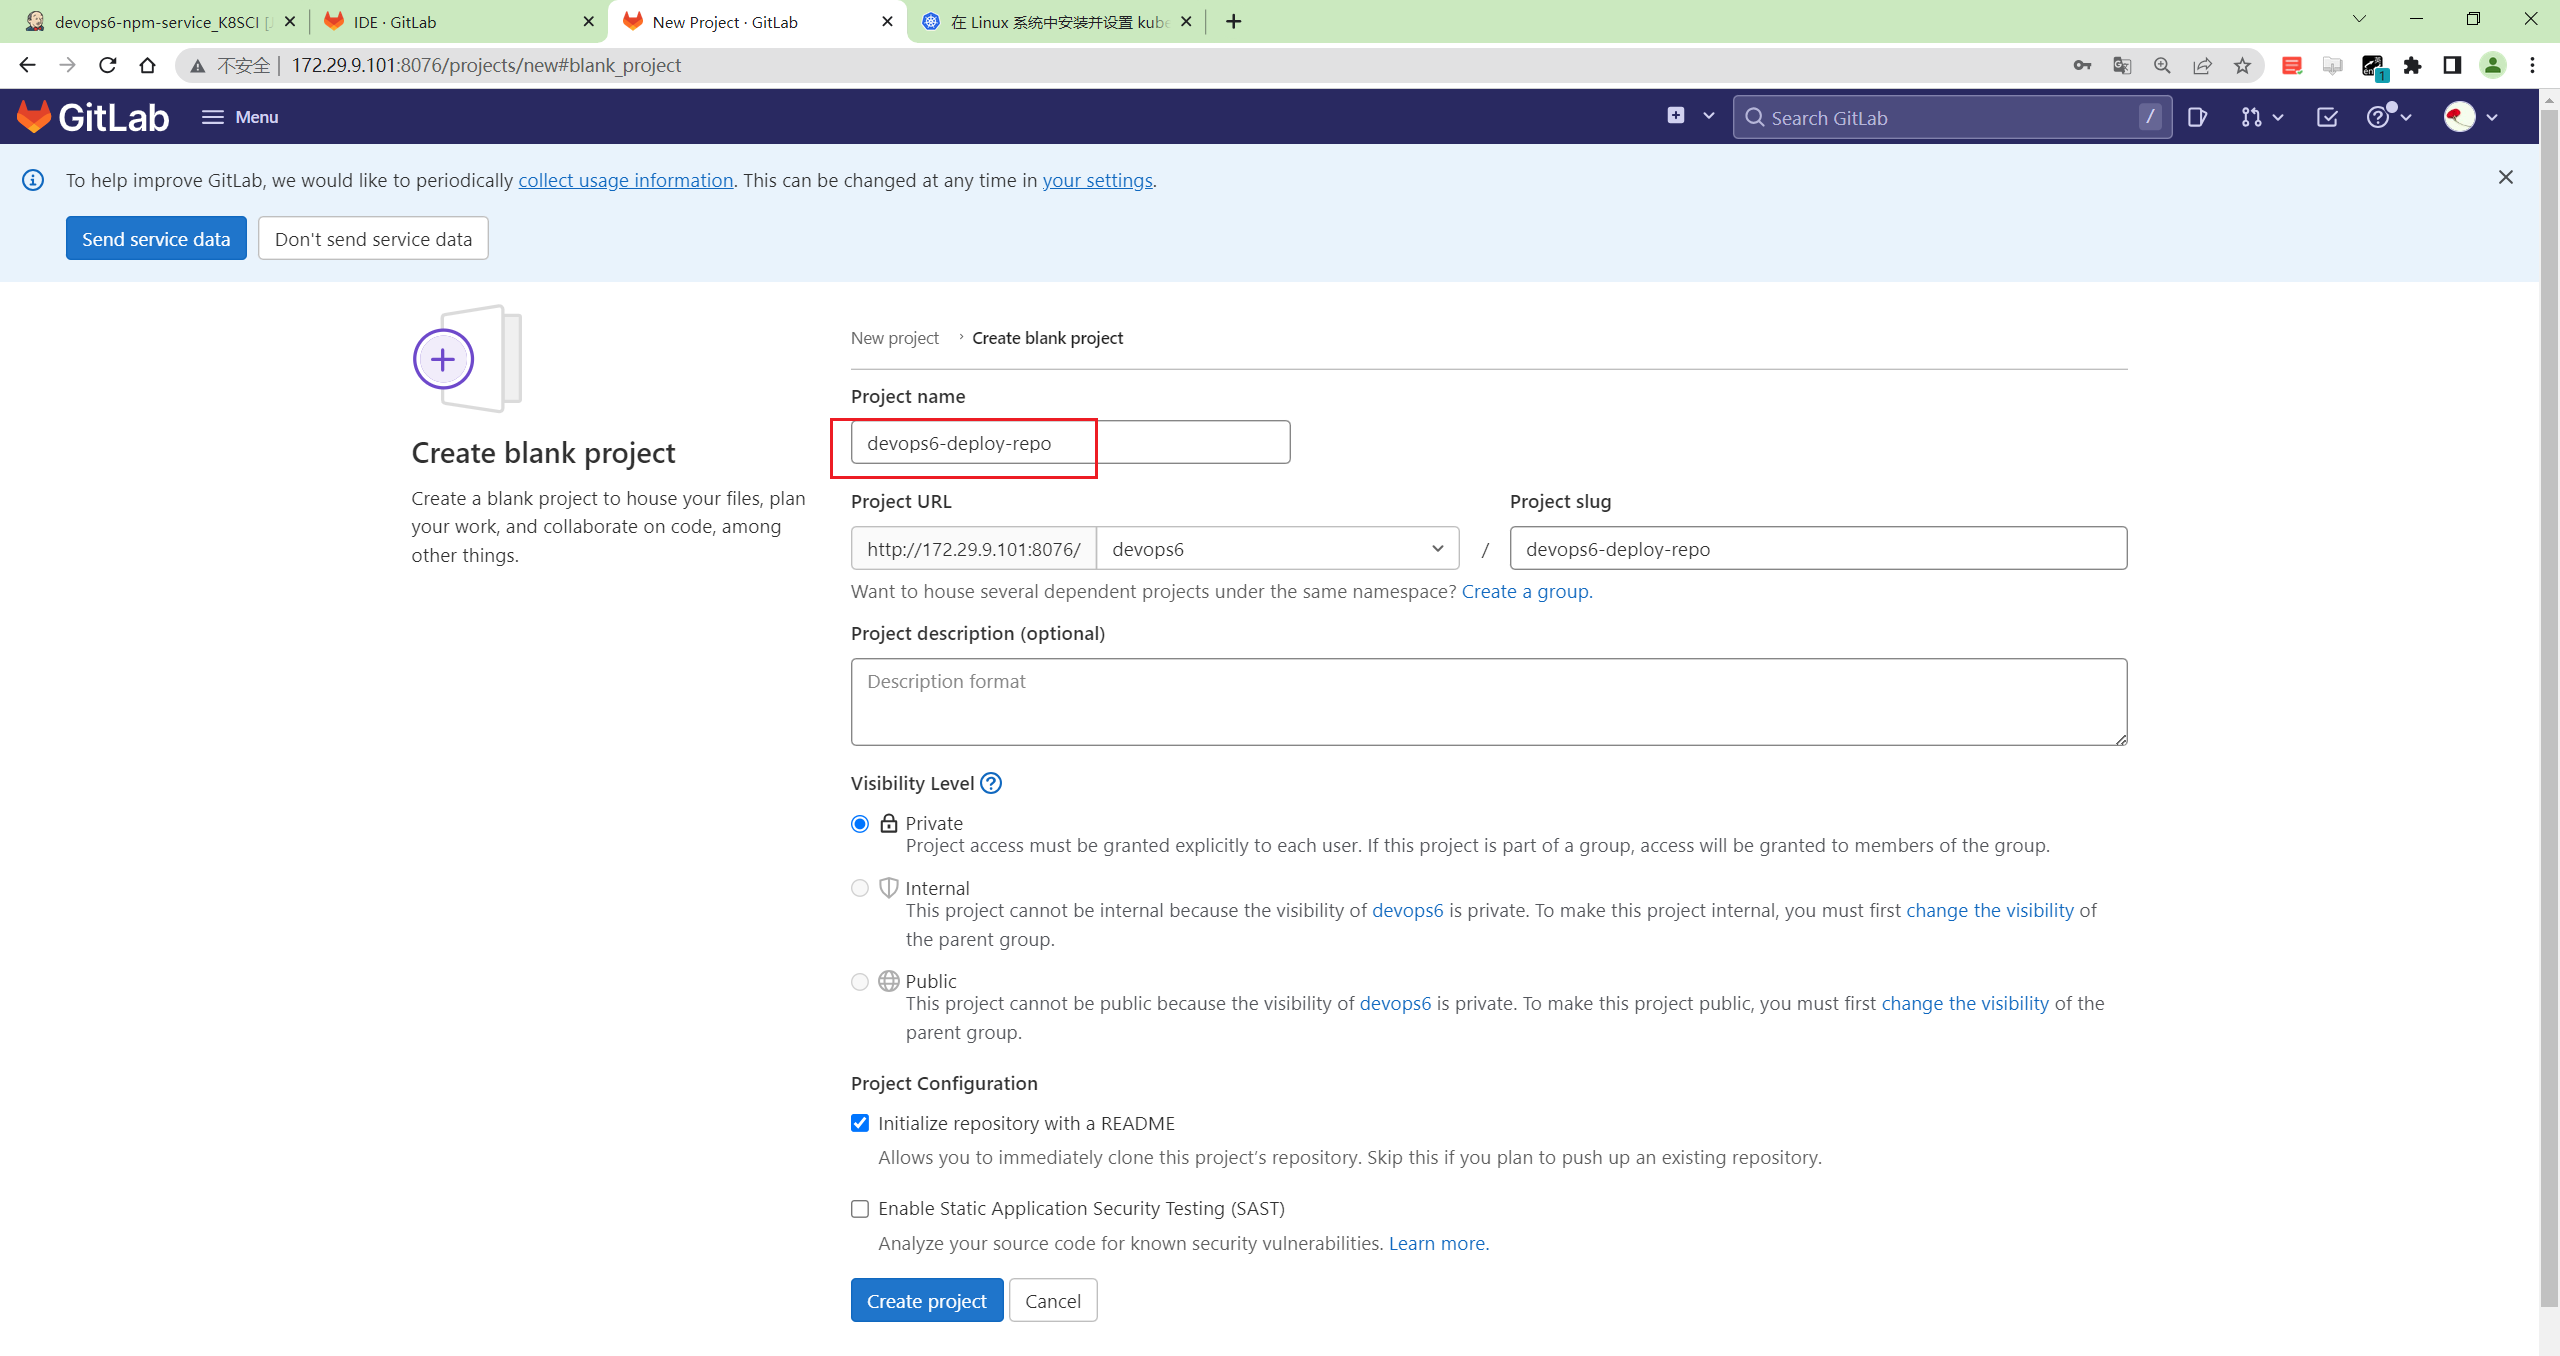
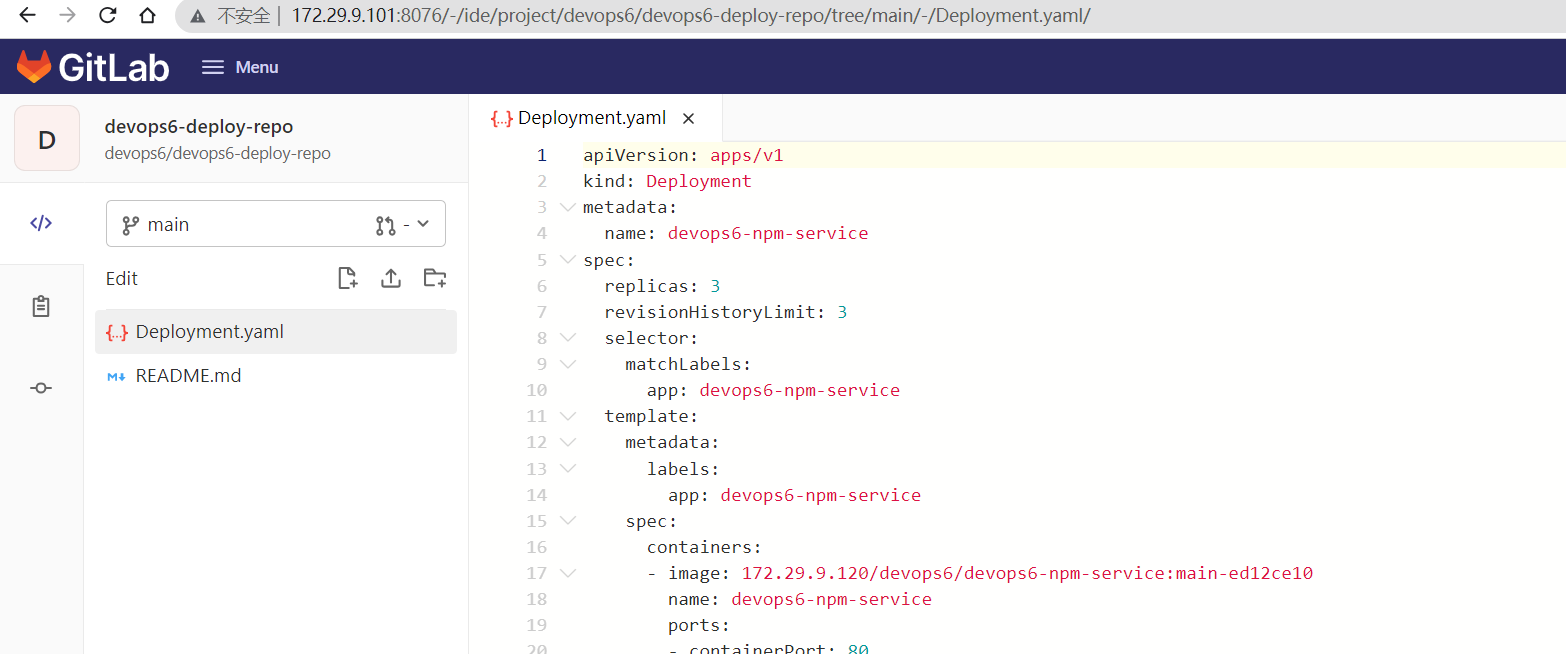
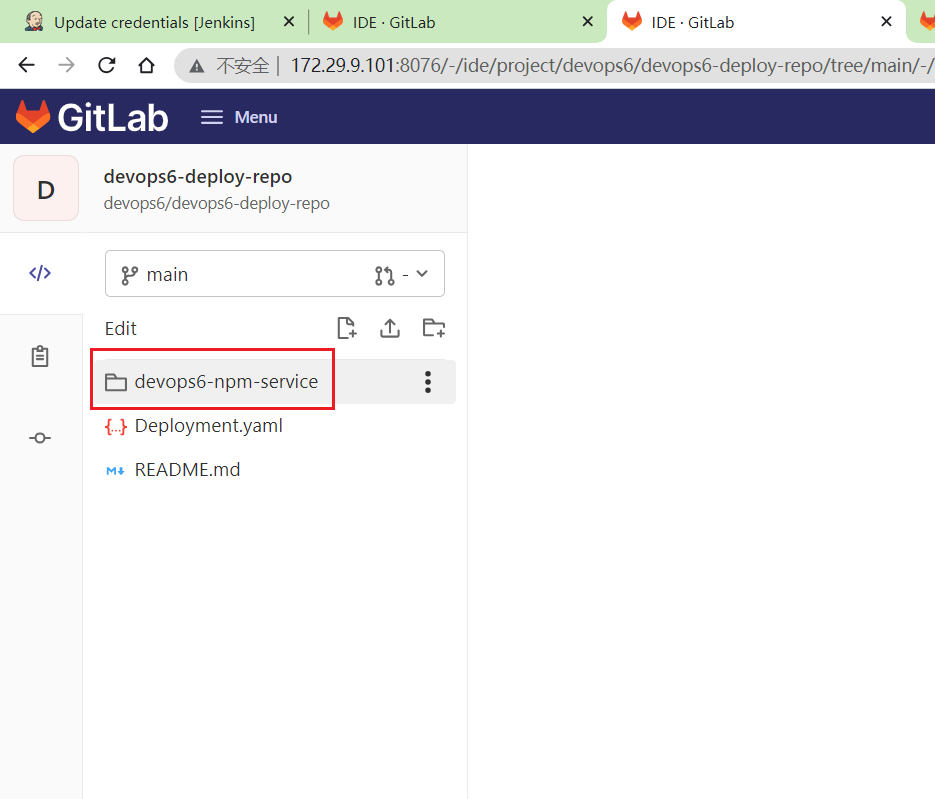
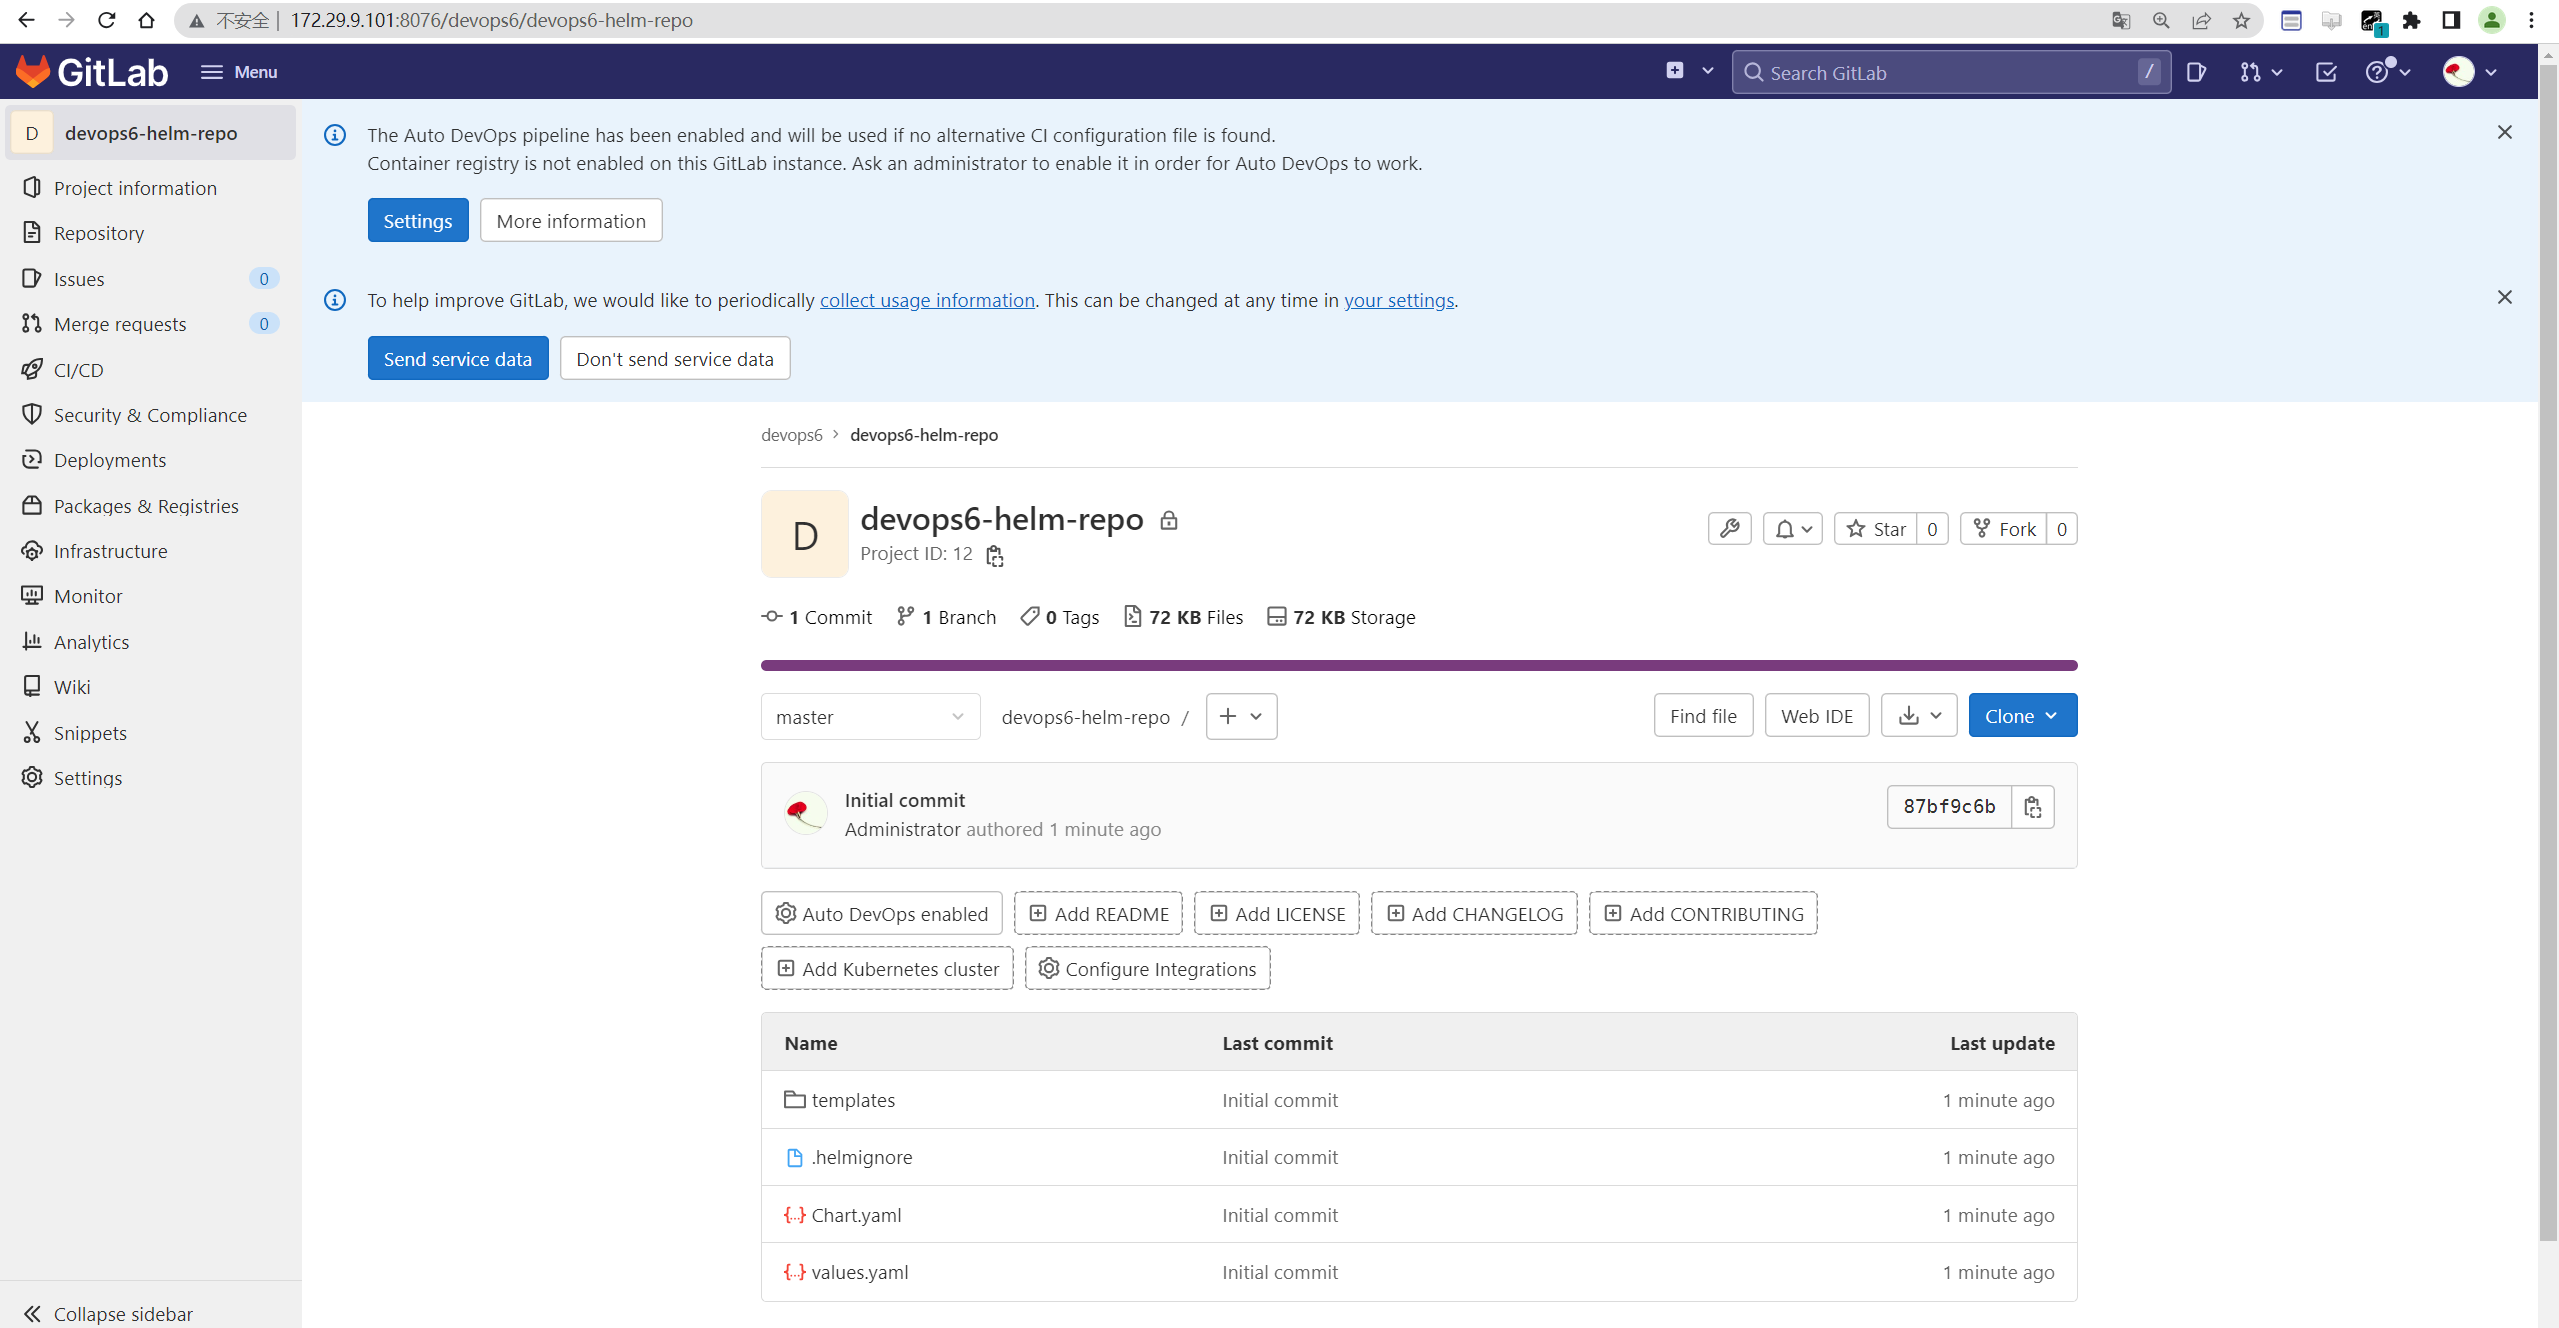
==创建一个devops6-deploy-repo仓库==
- 创建
Deployment.yaml
 1apiVersion: apps/v1
 2kind: Deployment
 3metadata:
 4  name: devops6-npm-service
 5spec:
 6  replicas: 3
 7  revisionHistoryLimit: 3
 8  selector:
 9    matchLabels:
10      app: devops6-npm-service
11  template:
12    metadata:
13      labels:
14        app: devops6-npm-service
15    spec:
16      containers:
17      - image: 172.29.9.120/devops6/devops6-npm-service:main-ed12ce10
18        name: devops6-npm-service
19        ports:
20        - containerPort: 80
21---
22apiVersion: v1
23kind: Service
24metadata:
25  name: devops6-npm-service
26spec:
27  type: ClusterIP
28  selector:
29    app: devops6-npm-service
30  ports:
31    - name: http
32      protocol: TCP
33      port: 80
34      targetPort: 80
35---
36apiVersion: networking.k8s.io/v1
37kind: Ingress
38metadata:
39  name: devops6-npm-service
40  annotations:
41    kubernetes.io/ingress.class: nginx
42spec:
43  rules:
44  - host: devops.test.com
45    http:
46      paths:
47      - path: /
48        pathType: Prefix
49        backend:
50          service:
51            name: devops6-npm-service
52            port:
53              name: http
- 自己部署应用测试
创建新命名空间devops6
1[root@Devops6 ~]#kubectl create ns devops6
部署应用:
1[root@Devops6 ~]#kubectl  -n  devops6 apply -f Deployment.yaml
2deployment.apps/devops6-npm-service created
3service/devops6-npm-service created
4ingress.networking.k8s.io/devops6-npm-service created
注意:这里直接加上命名空间后,应用就会直接被部署到此命名空间了。
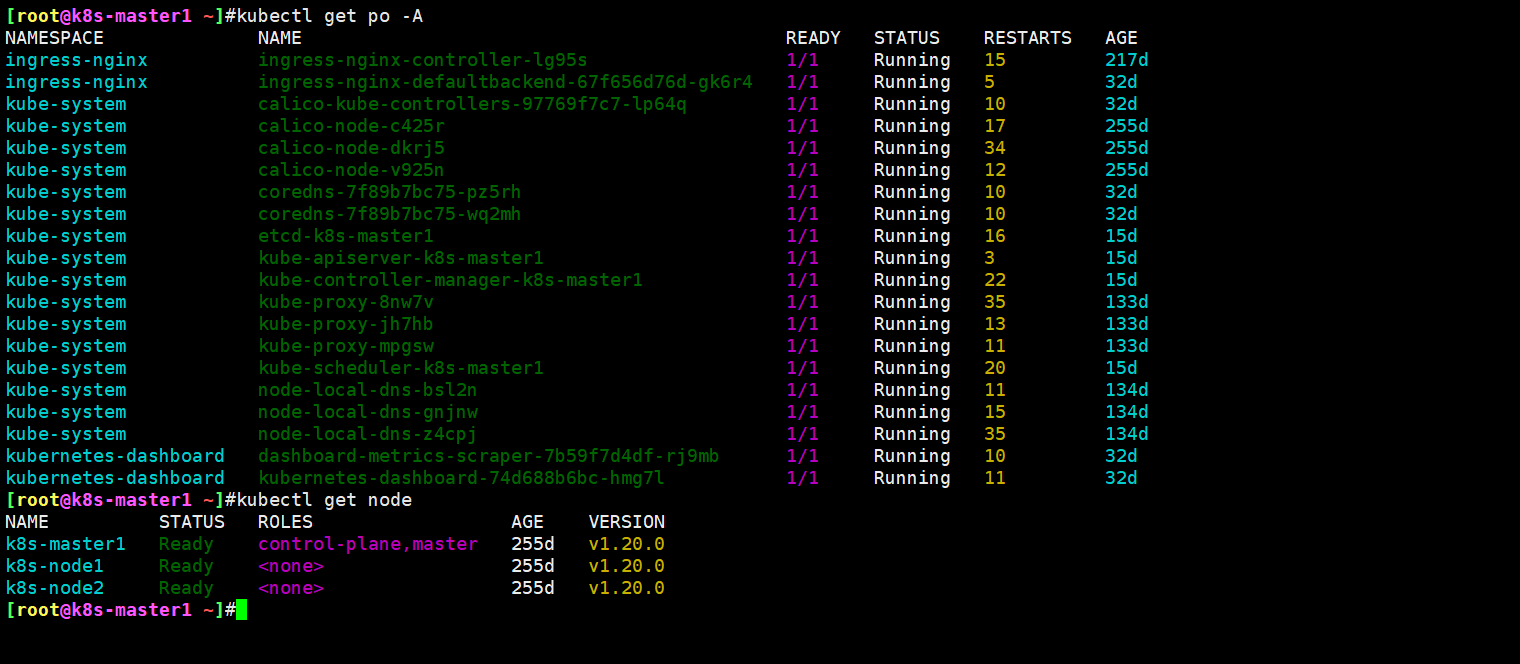
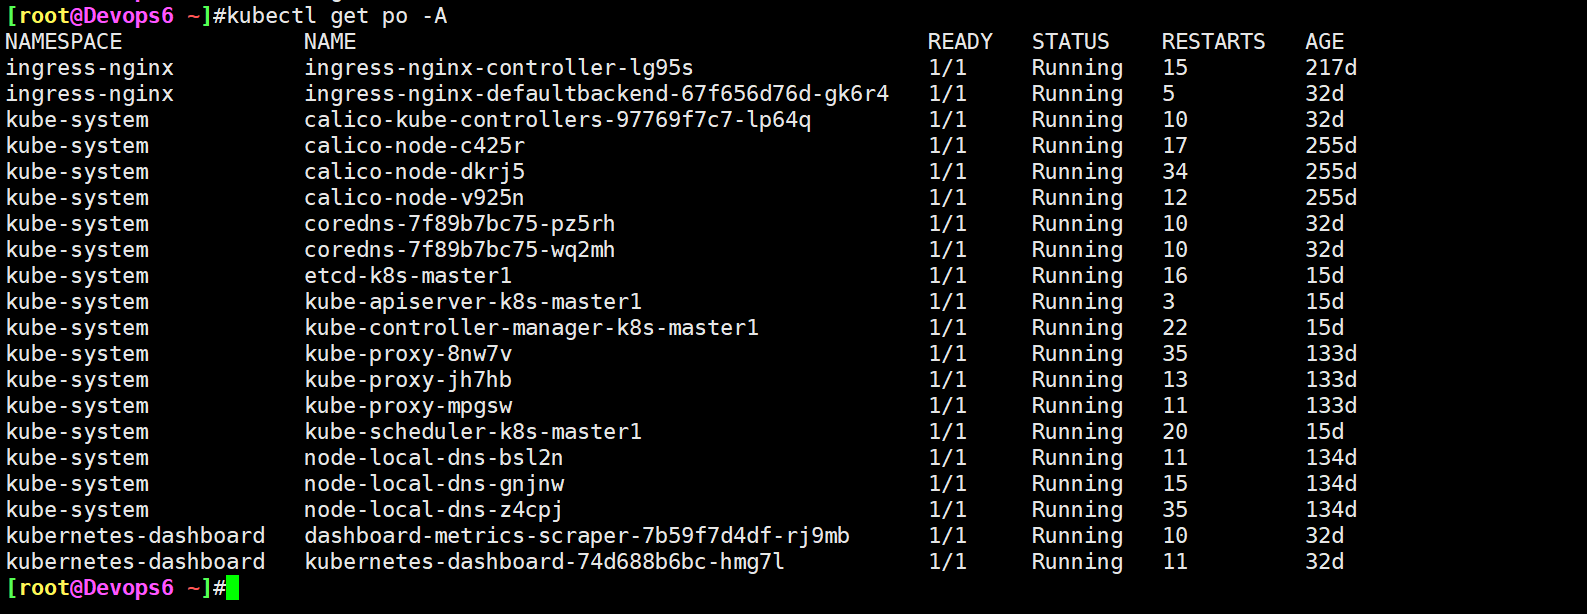
1[root@Devops6 ~]#kubectl get po -ndevops6
2NAME                                  READY   STATUS    RESTARTS   AGE
3devops6-npm-service-bd4978ff9-27bpp   1/1     Running   0          32s
4devops6-npm-service-bd4978ff9-clkhm   1/1     Running   0          32s
5devops6-npm-service-bd4978ff9-x2sw8   1/1     Running   0          32s
配置ingress域名解析:
1[root@Devops6 ~]#vim /etc/hosts
2172.29.9.31 devops.test.com
3
4[root@Devops6 ~]#kubectl get ingress -ndevops6
5NAME                  CLASS    HOSTS             ADDRESS       PORTS   AGE
6devops6-npm-service   <none>   devops.test.com   172.29.9.31   80      8m11s
测试效果:
 1[root@Devops6 ~]#curl devops.test.com
 2<!DOCTYPE html>
 3<html>
 4  <head>
 5    <meta charset="utf-8">
 6    <meta name="viewport" content="width=device-width,initial-scale=1.0">
 7    <title>vuedemo</title>
 8  </head>
 9  <body>
10    <div id="app">
11      <h1>VERSION: main</h1>
12    </div>
13    <!-- built files will be auto injected -->
14  </body>
15</html>
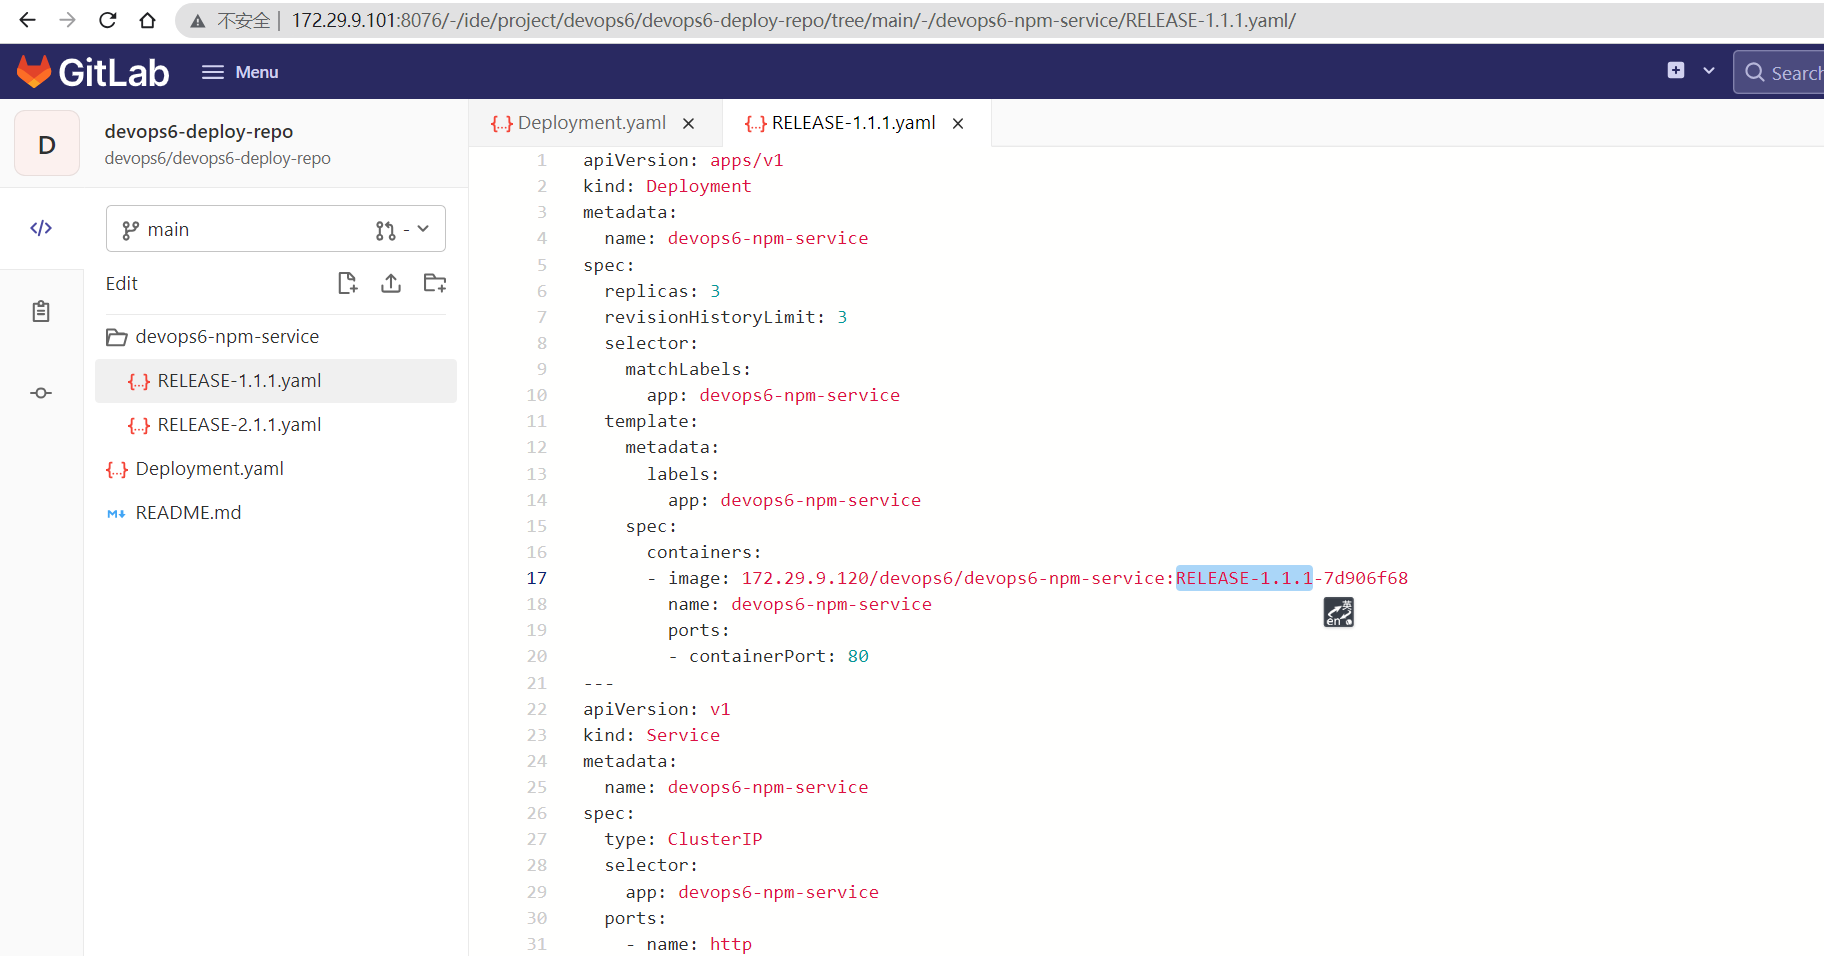
==新建devops6-npm-service版本分支,特性分支==
- 以main为基础新建
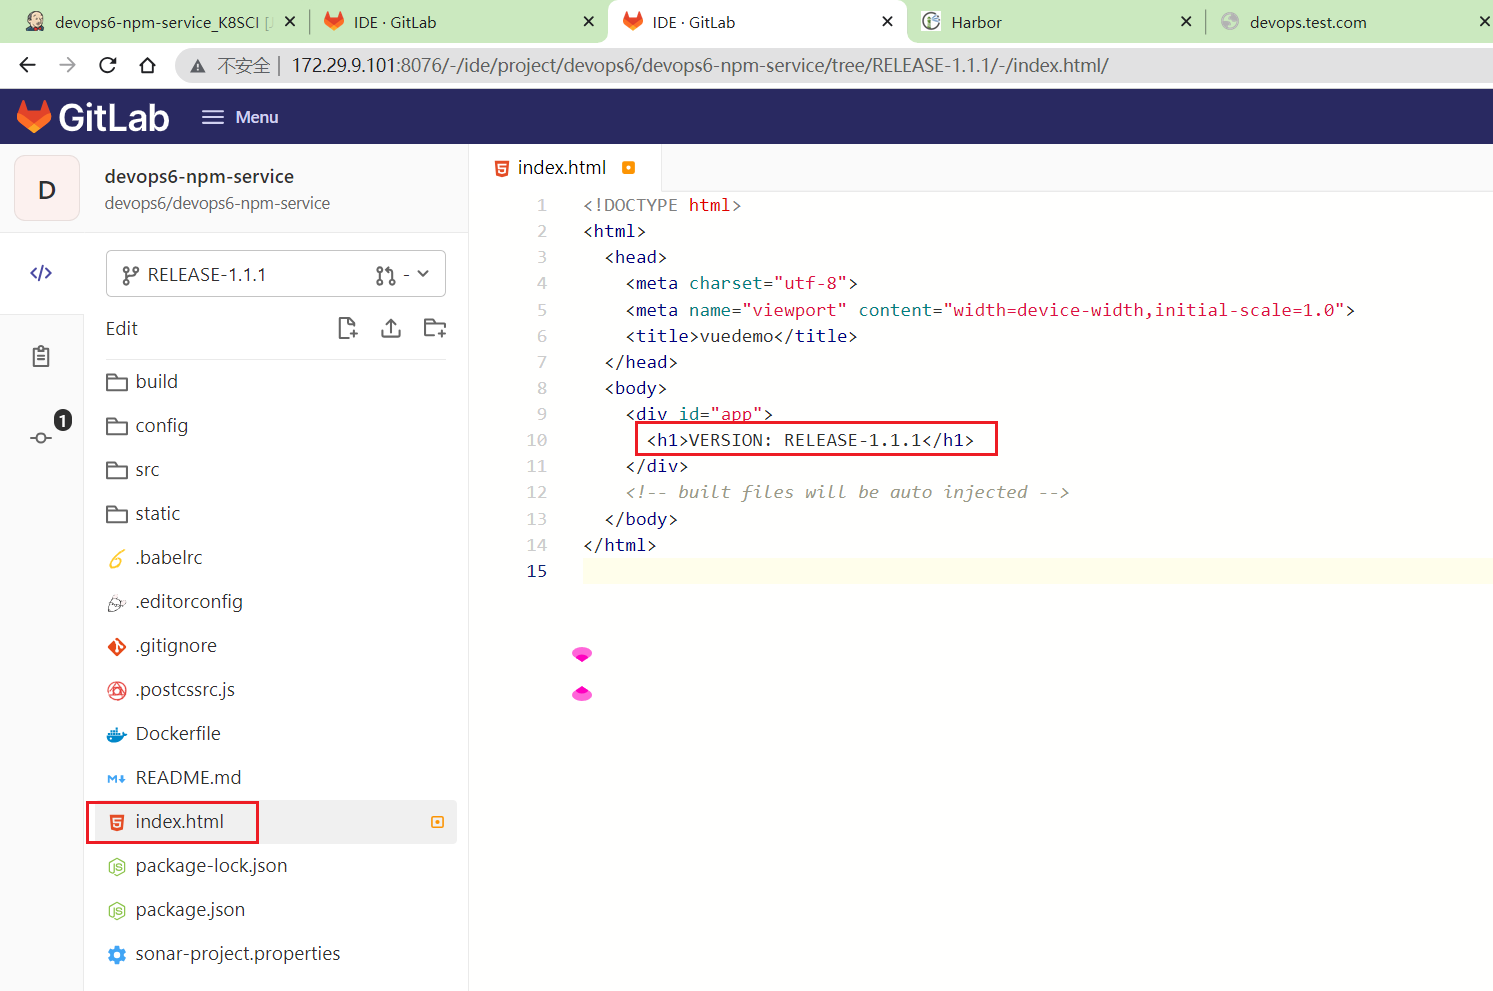
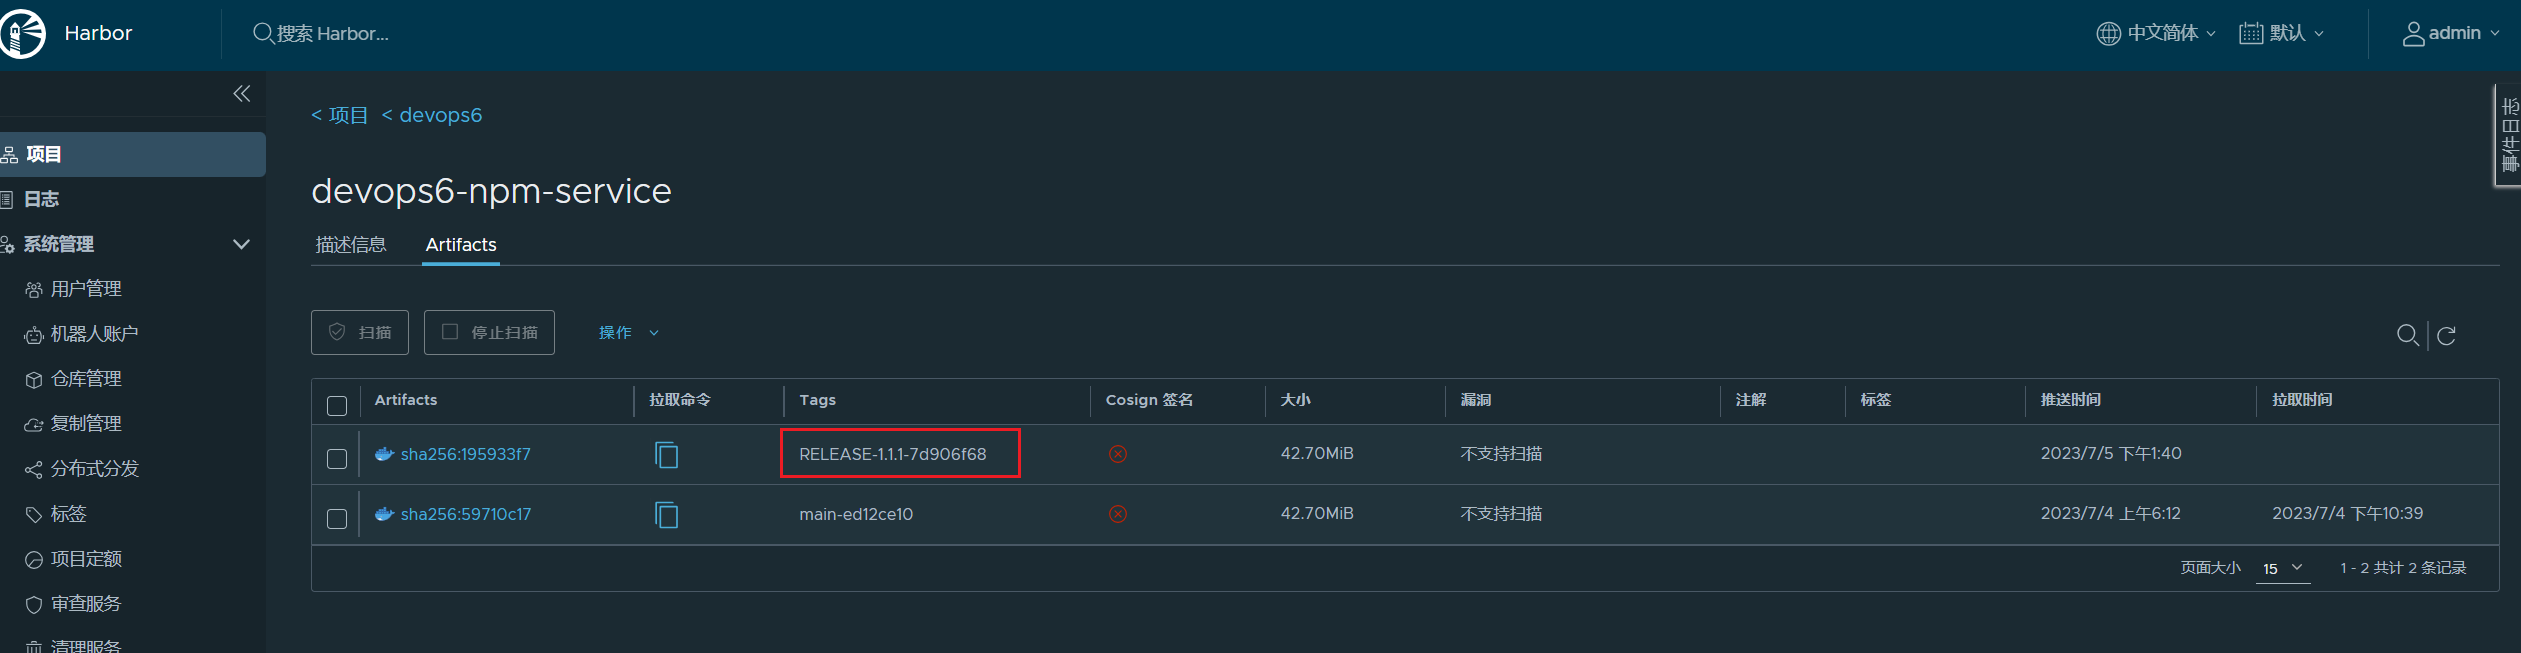
devops6-npm-service版本分支RELEASE-1.1.1
修改index.html的内容为RELEASE-1.1.1。
- 运行一次CI流水线
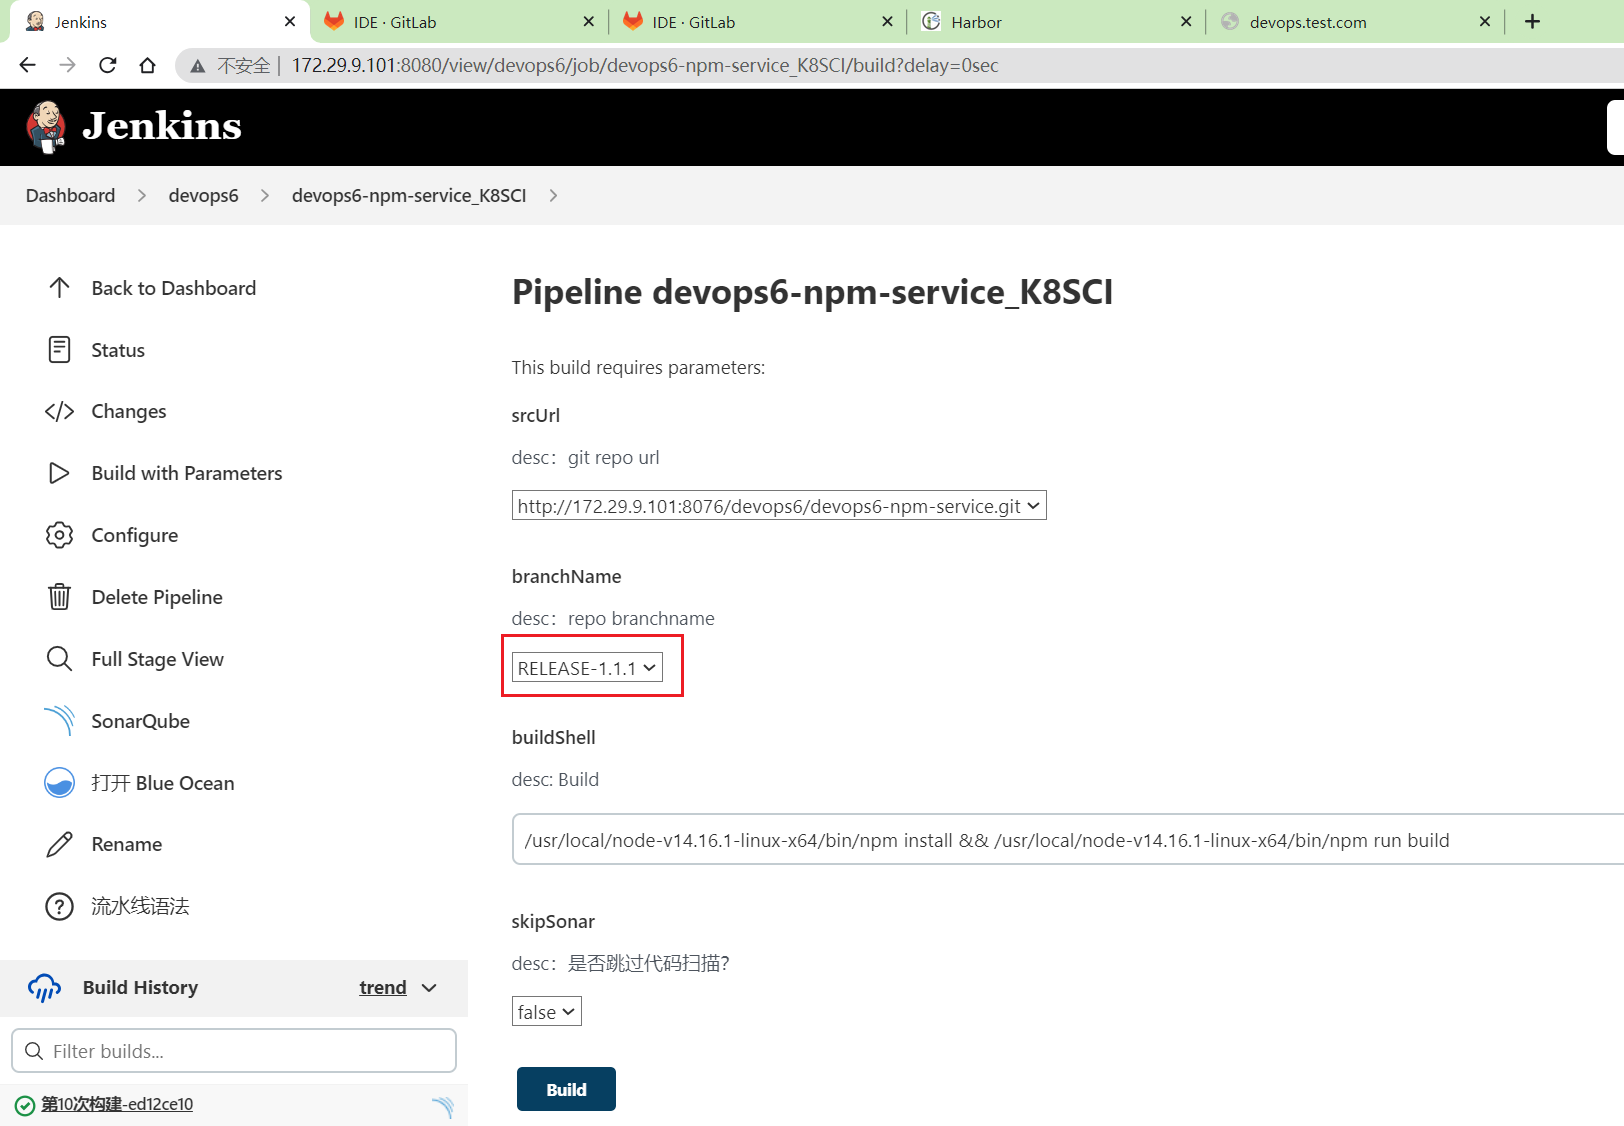
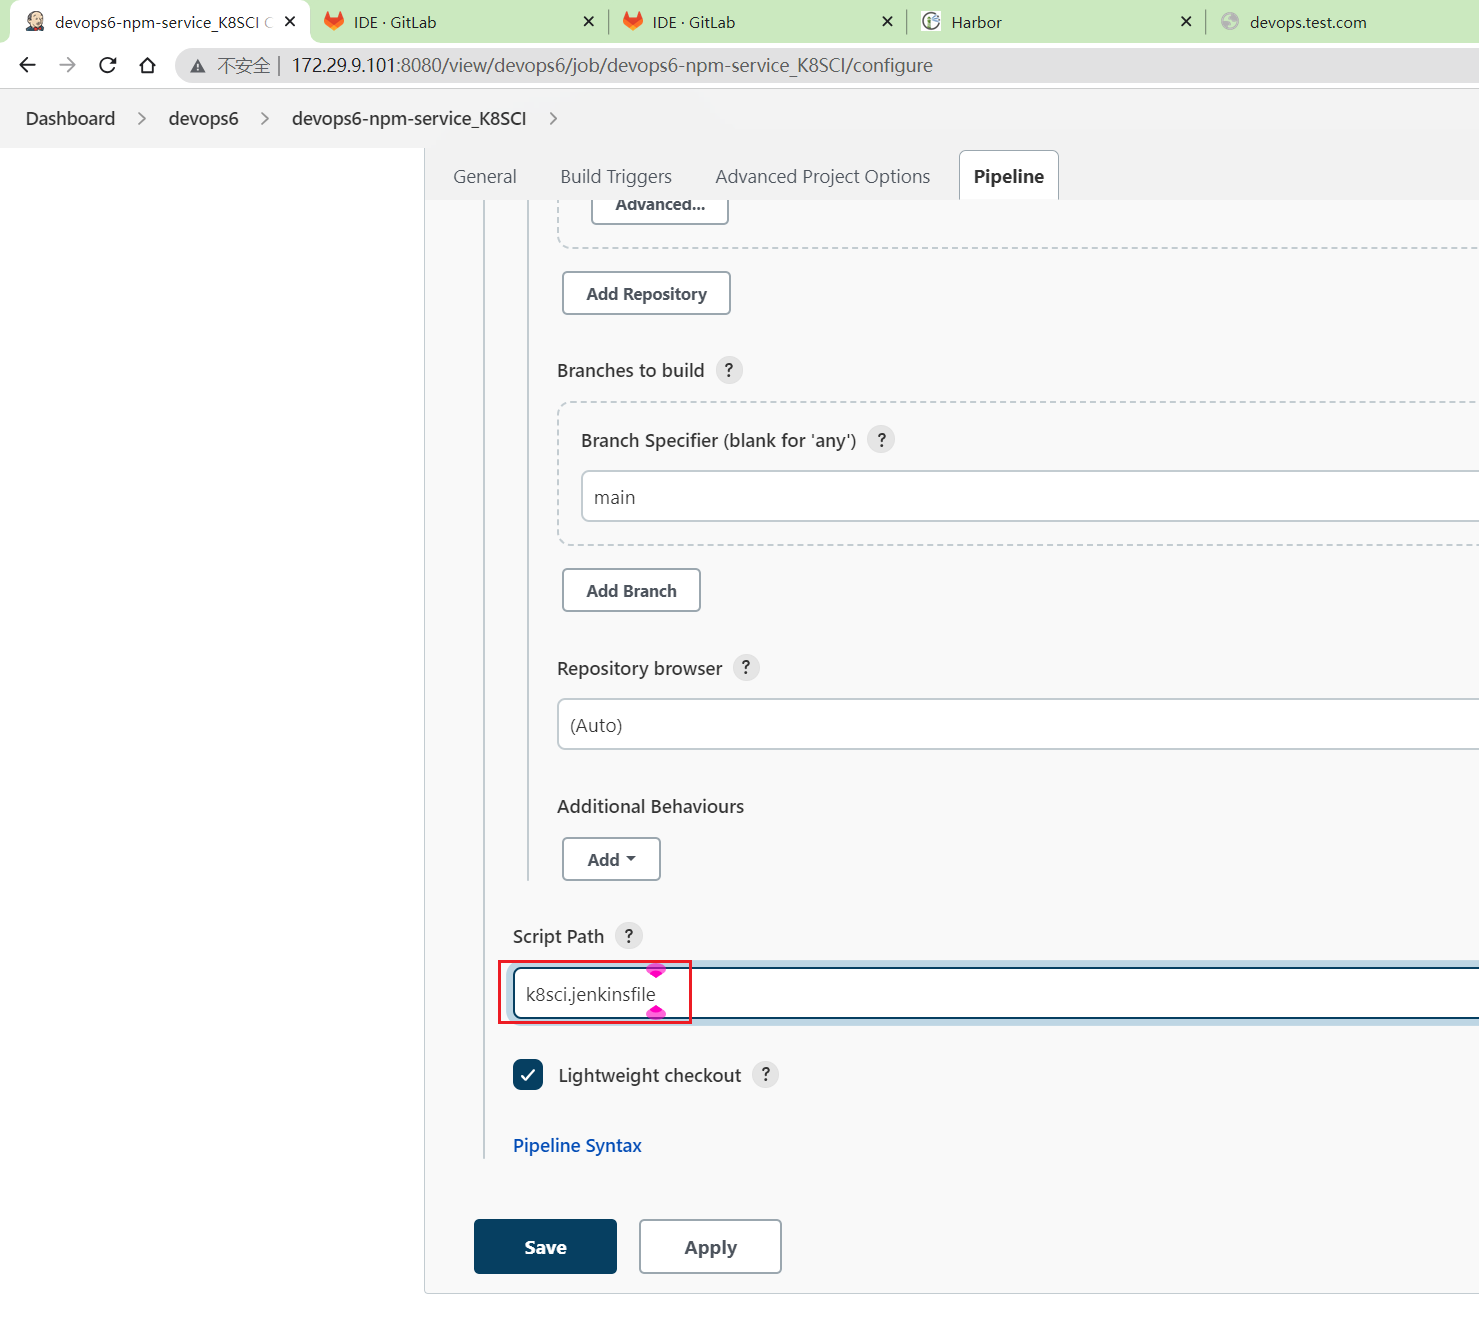
要记得改下这里的jenkinsfile文件:
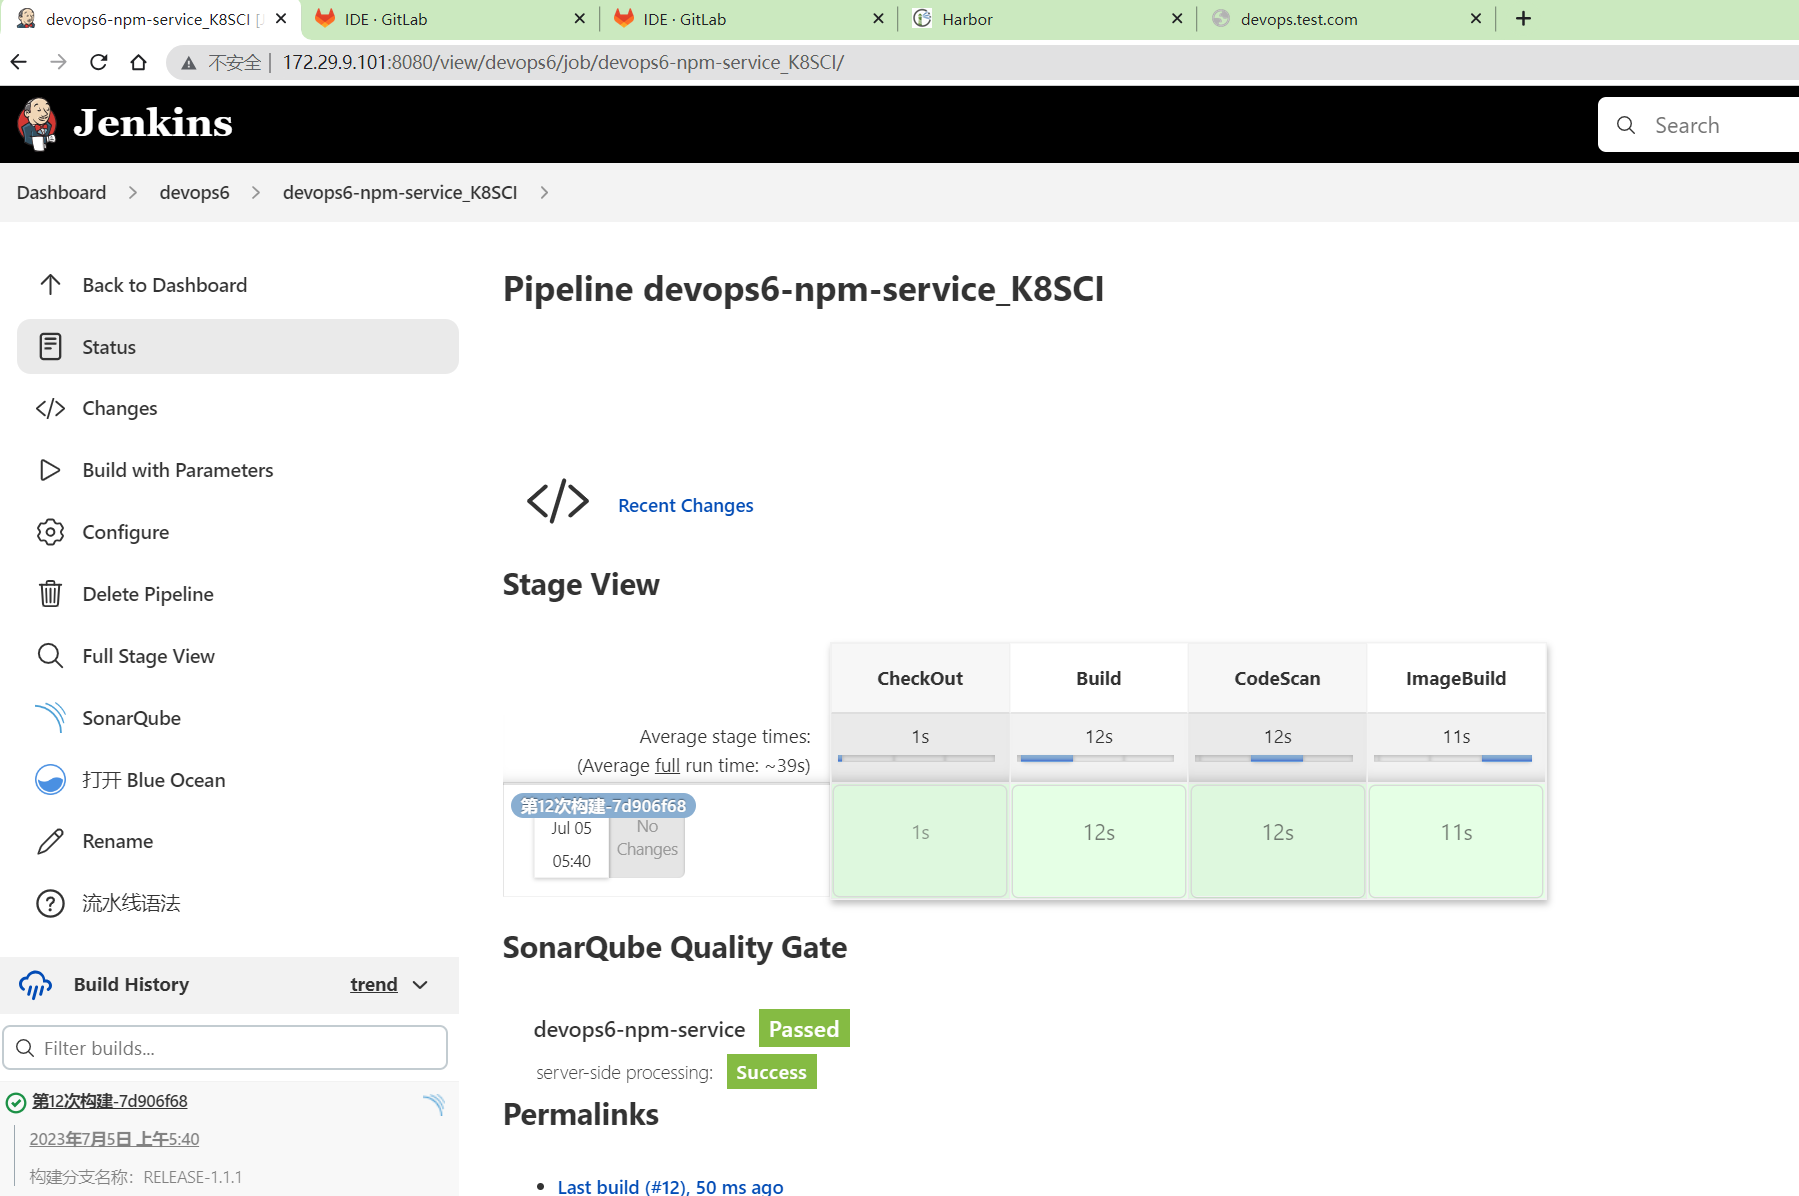
成功生成镜像:
- 我们再来更新一个版本的应用程序看下
1[root@Devops6 ~]#vim Deployment.yaml
2将
3- image: 172.29.9.120/devops6/devops6-npm-service:main-ed12ce10
4替换为
5172.29.9.120/devops6/devops6-npm-service:RELEASE-1.1.1-7d906f68
6
7#然后部署应用:
8[root@Devops6 ~]#kubectl apply -f Deployment.yaml -ndevops6
9
10#验证
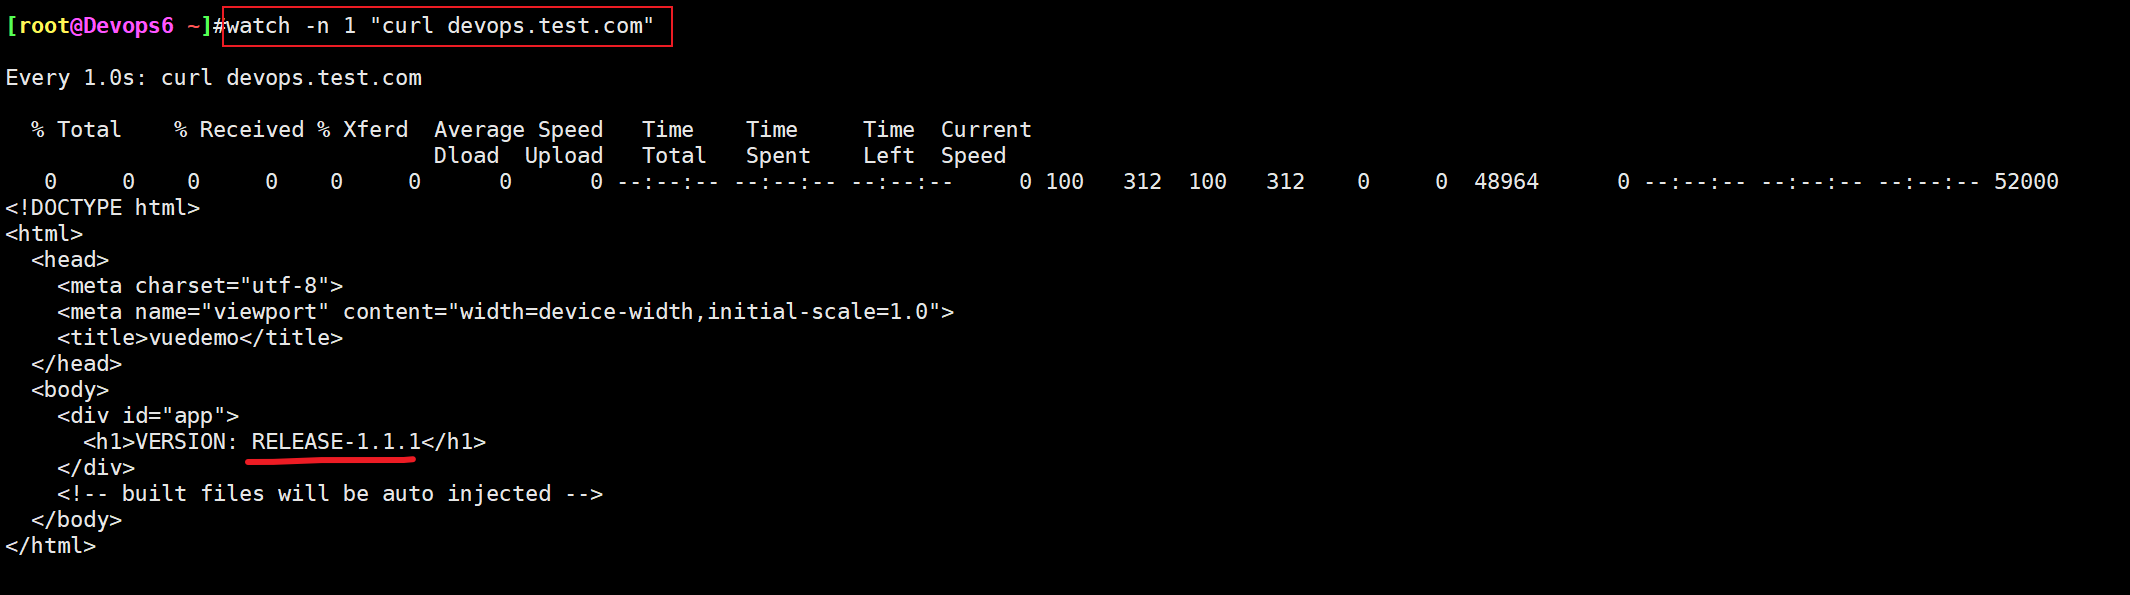
11[root@Devops6 ~]#curl devops.test.com
12<!DOCTYPE html>
13<html>
14 <head>
15 <meta charset="utf-8">
16 <meta name="viewport" content="width=device-width,initial-scale=1.0">
17 <title>vuedemo</title>
18 </head>
19 <body>
20 <div id="app">
21 <h1>VERSION: RELEASE-1.1.1</h1>
22 </div>
23 <!-- built files will be auto injected -->
24 </body>
25</html>
26#可以看到,已经更新成功了。
- 我们来测试下回滚
回滚命令:
 1## 查看历史
 2kubectl rollout history deployment/anyops-devopsdocker-ui
 3
 4## 查看具体某一个历史版本信息
 5kubectl rollout history deployment/anyops-devopsdocker-ui --revision=2
 6
 7## 回滚上个版本
 8kubectl rollout undo deployment/anyops-devopsdocker-ui -n anyops
 9
10## 回滚指定版本
11kubectl rollout undo deployment/nginx --to-revision=2
查看当前应用版本:
1[root@Devops6 ~]#kubectl rollout history deployment devops6-npm-service -ndevops6
2deployment.apps/devops6-npm-service
3REVISION  CHANGE-CAUSE
41         <none>
52         <none>
6#可以看到有2个历史版本
我们打算回滚到上个历史版本:
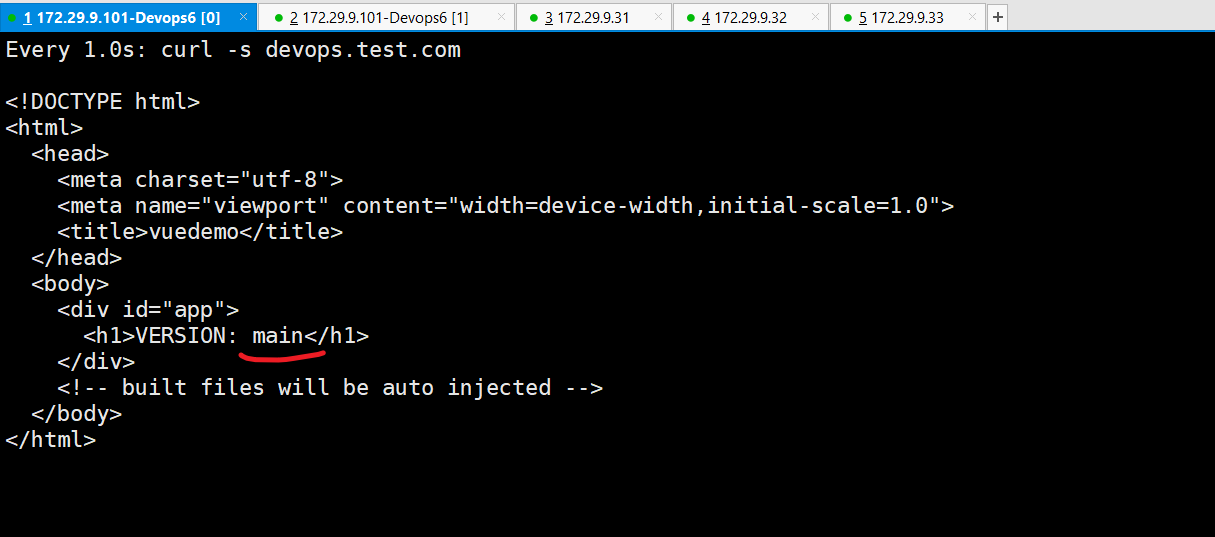
先来查看下当前应用版本:
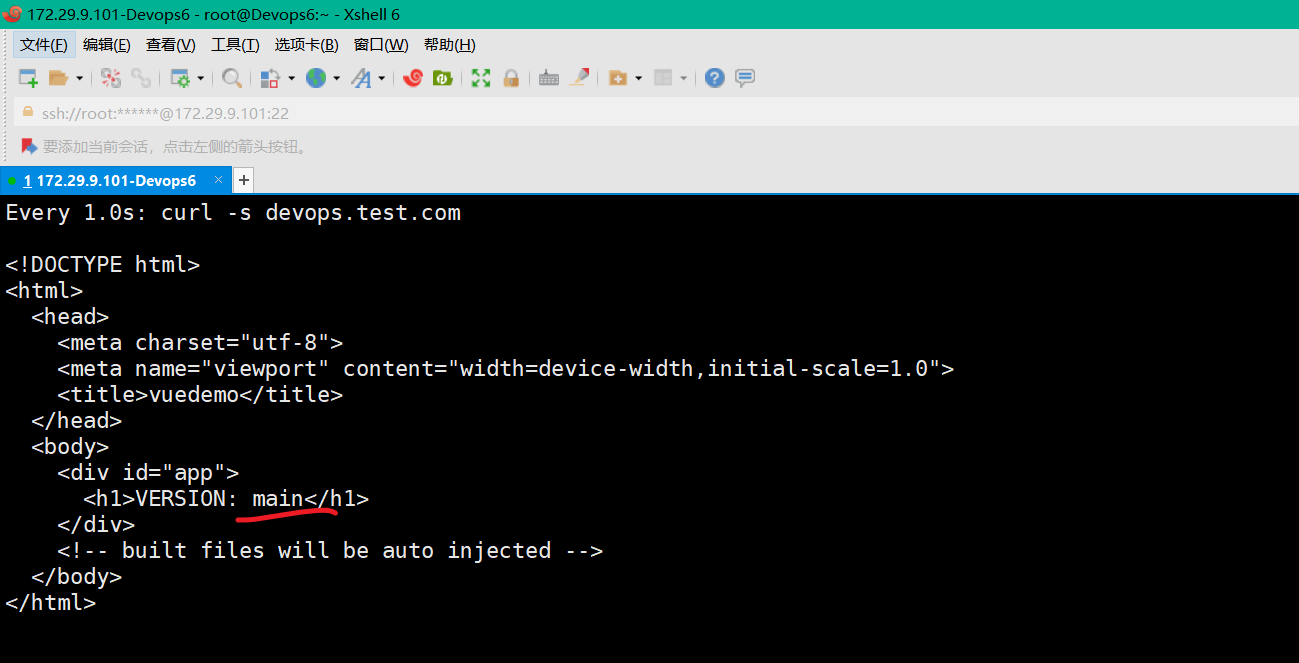
1watch -n 1 "curl devops.test.com"
1watch -n 1 "curl -s devops.test.com"
开始回滚:
1[root@Devops6 ~]#kubectl rollout undo deployment devops6-npm-service -ndevops6
2deployment.apps/devops6-npm-service rolled back
回滚结果:

回滚成功。
- 这里调的是gitlab的api
调用gitlab api自动更新配置文件。
- jenkins装一个插件
HTTP Request

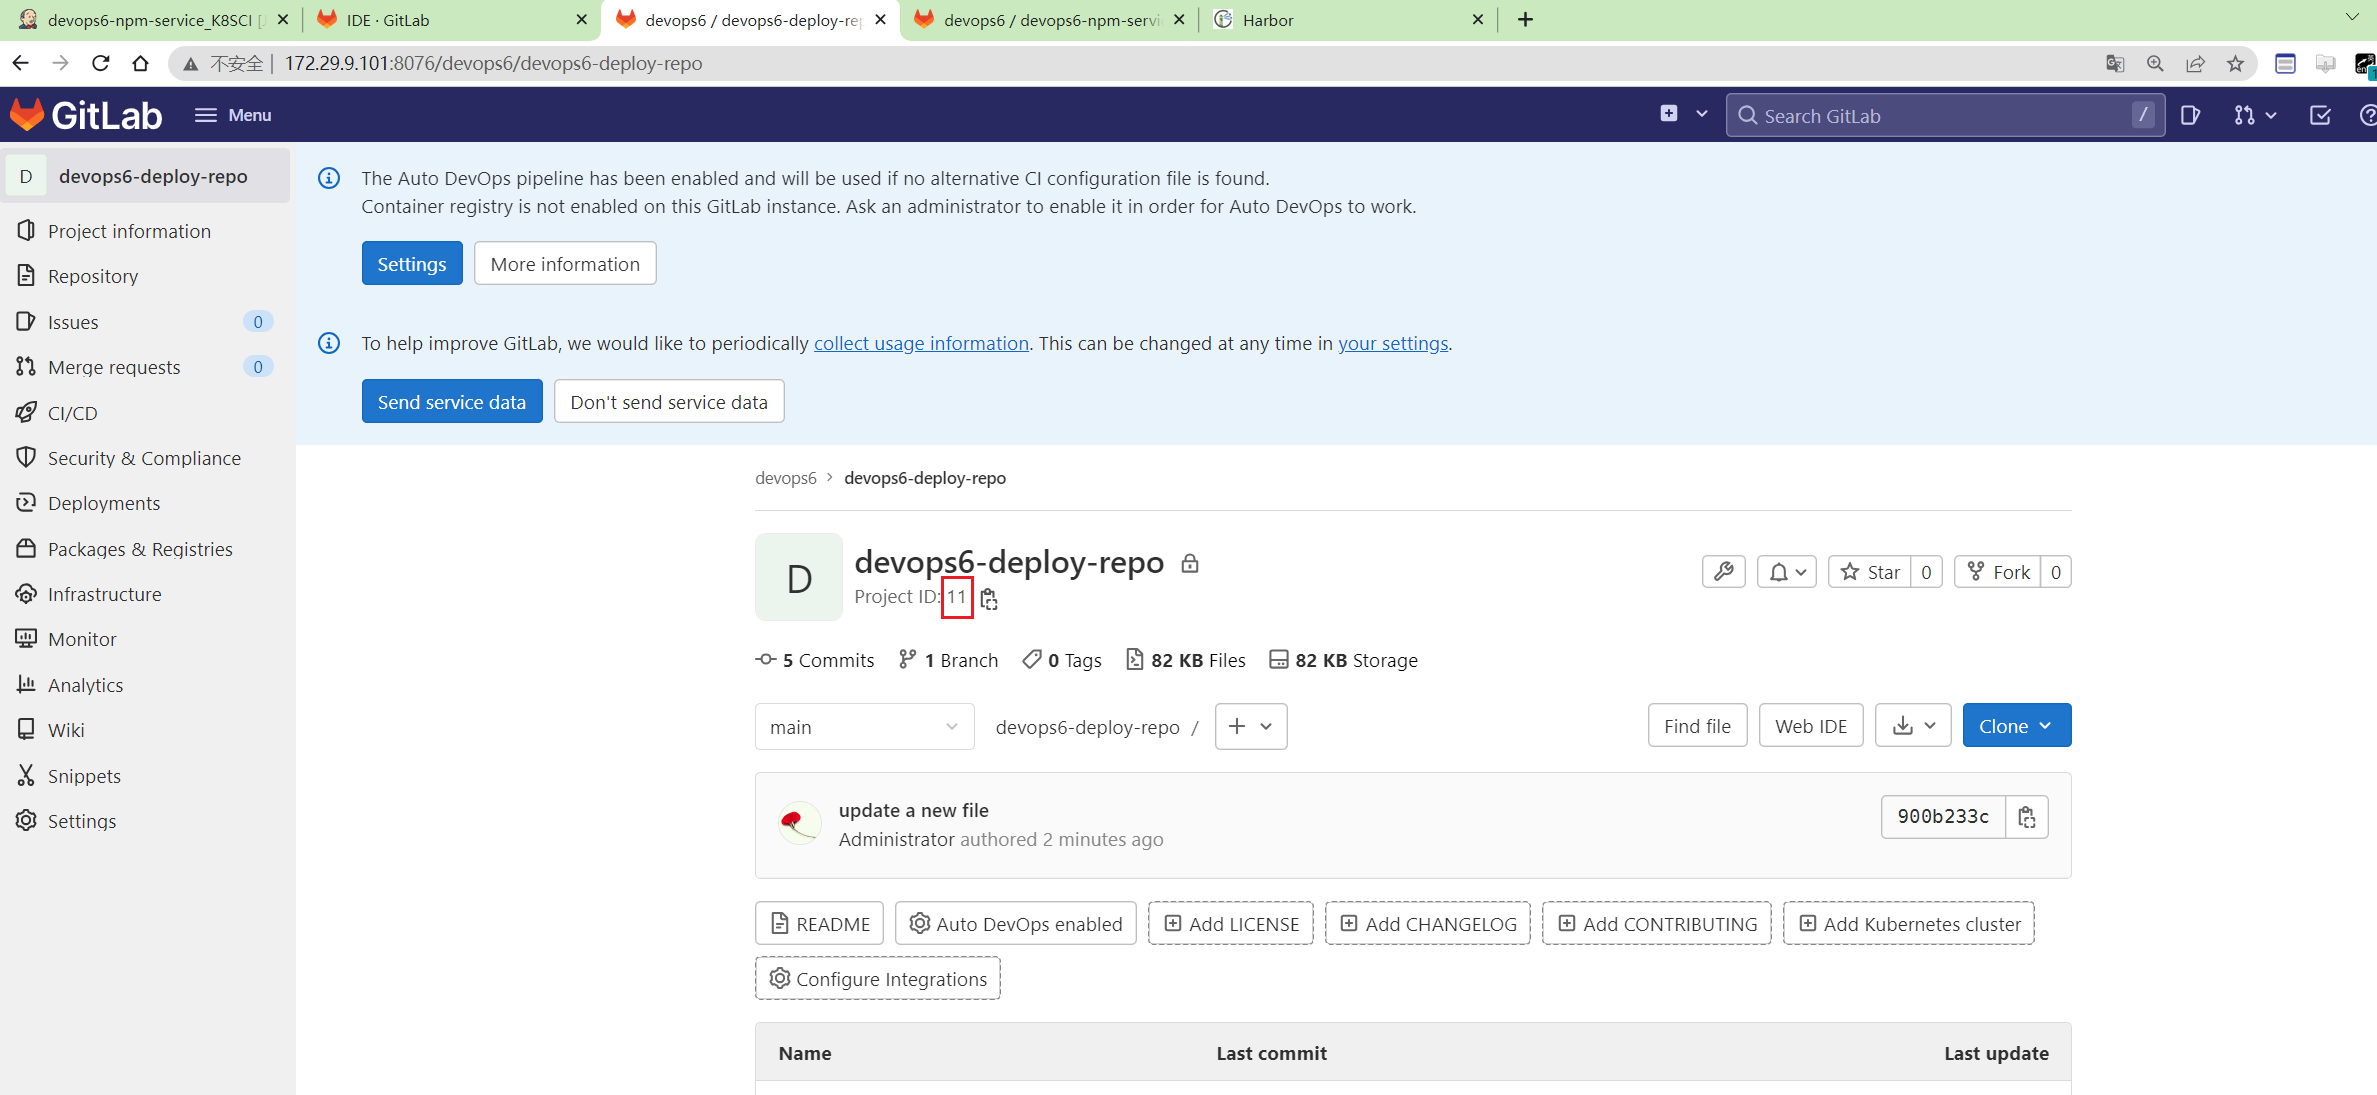
devops6-npm-service项目ProjectID为11。
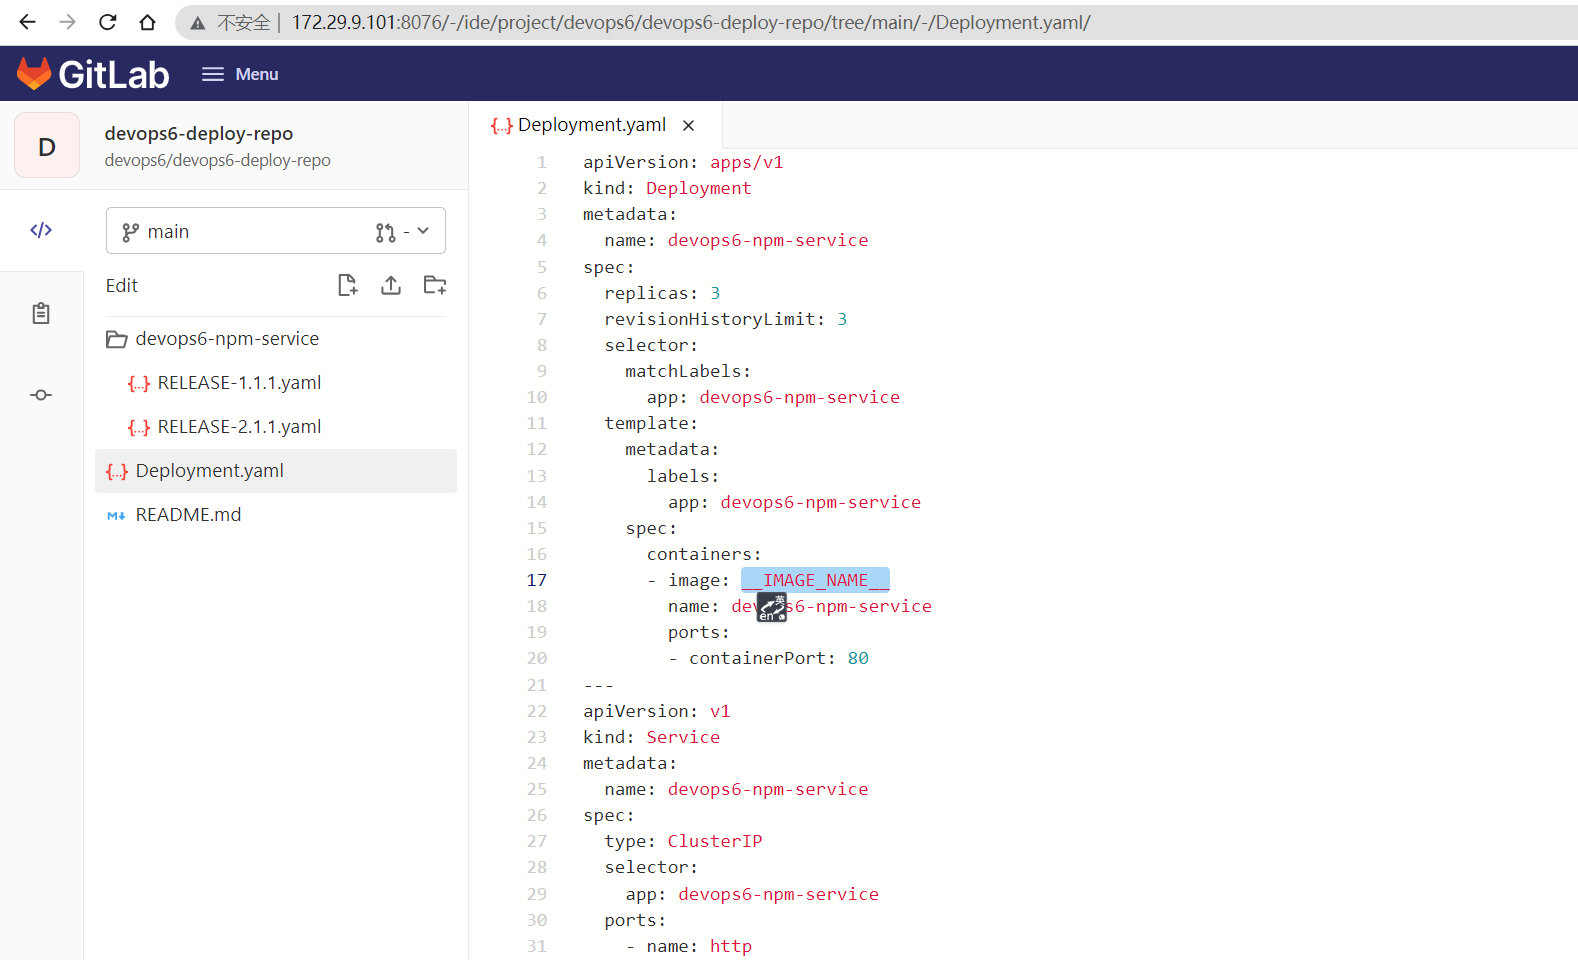
- 创建
devops6-npm-service目录
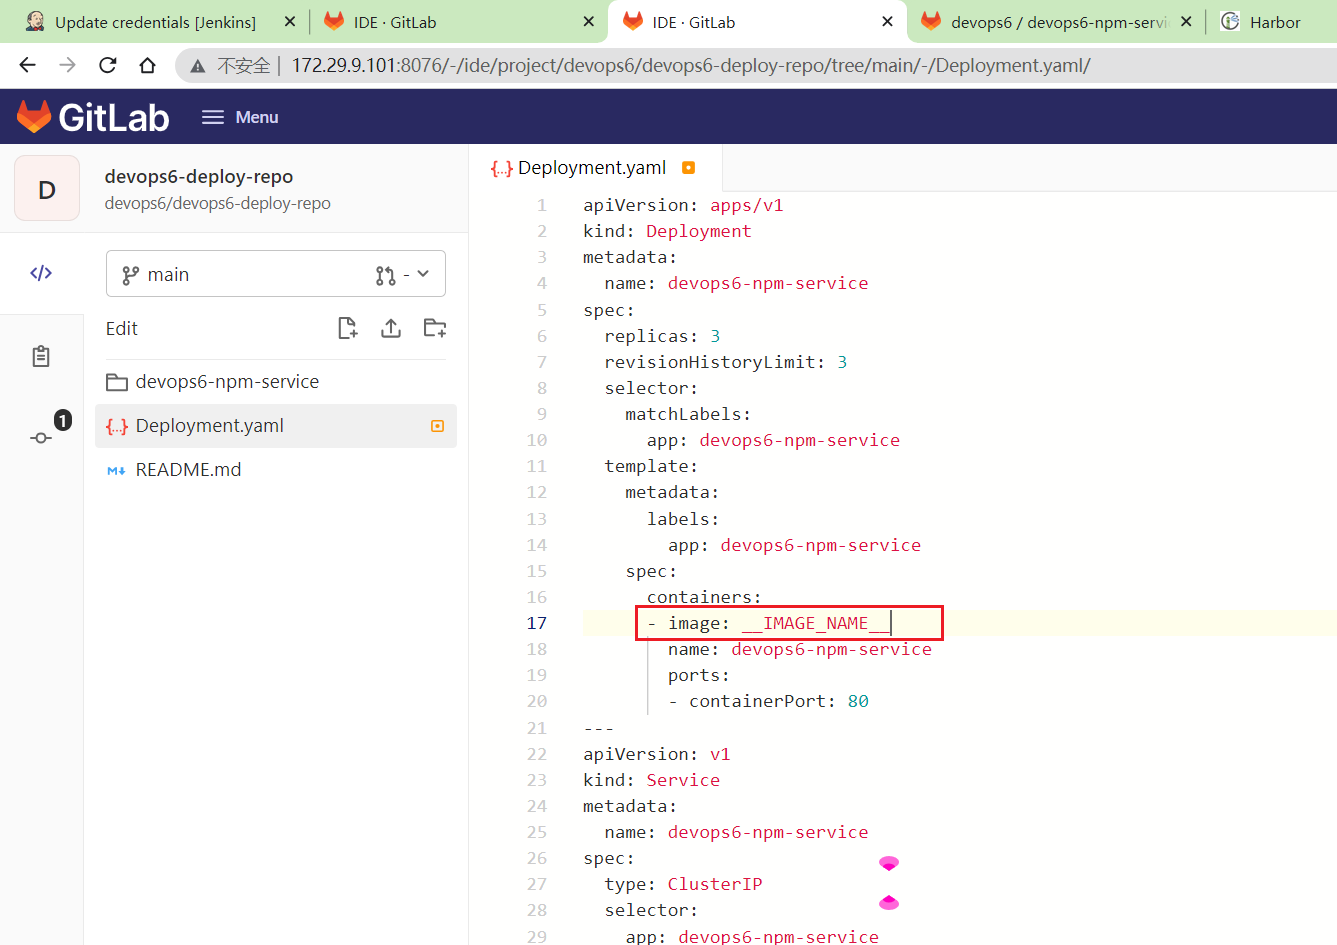
将Deployment.yaml里的image改为__IMAGE_NAME__
- pipeline代码
Gitlab.groovy
 1package org.devops
 2
 3//获取文件内容
 4def GetRepoFile(projectId,filePath,branchName){
 5   //GET /projects/:id/repository/files/:file_path/raw
 6   apiUrl = "/projects/${projectId}/repository/files/${filePath}/raw?ref=${branchName}"
 7   response = HttpReq('GET', apiUrl)
 8   return response
 9}
10
11//更新文件内容
12def UpdateRepoFile(projectId,filePath,fileContent, branchName){
13    apiUrl = "projects/${projectId}/repository/files/${filePath}"
14    reqBody = """{"branch": "${branchName}","encoding":"base64", "content": "${fileContent}", "commit_message": "update a new file"}"""
15    response = HttpReqByPlugin('PUT',apiUrl,reqBody)
16    println(response)
17
18}
19
20//创建文件
21def CreateRepoFile(projectId,filePath,fileContent, branchName){
22    apiUrl = "projects/${projectId}/repository/files/${filePath}"
23    reqBody = """{"branch": "${branchName}","encoding":"base64", "content": "${fileContent}", "commit_message": "update a new file"}"""
24    response = HttpReqByPlugin('POST',apiUrl,reqBody)
25    println(response)
26
27}
28
29// 封装HTTP
30def HttpReqByPlugin(reqType, reqUrl,reqBody ){
31    def gitServer = "http://172.29.9.101:8076/api/v4"
32    withCredentials([string(credentialsId: '5782c77d-ce9d-44e5-b9ba-1ba2097fc31d',
33                            variable: 'GITLABTOKEN')]) {
34        response = httpRequest acceptType: 'APPLICATION_JSON_UTF8',
35                    consoleLogResponseBody: true,
36                    contentType: 'APPLICATION_JSON_UTF8',
37                    customHeaders: [[maskValue: false, name: 'PRIVATE-TOKEN', value: "${GITLABTOKEN}"]],
38                    httpMode: "${reqType}",
39                    url: "${gitServer}/${reqUrl}",
40                    wrapAsMultipart: false,
41                    requestBody: "${reqBody}"
42
43    }
44    return response
45}
46
47
48
49//发起HTTP请求
50//调用gitlab api
51def HttpReq(method, apiUrl){
52
53    withCredentials([string(credentialsId: '5782c77d-ce9d-44e5-b9ba-1ba2097fc31d', variable: 'gitlabtoken')]) {
54        response = sh  returnStdout: true,
55        script: """
56        curl --location --request ${method} \
57        http://172.29.9.101:8076/api/v4/${apiUrl} \
58        --header "PRIVATE-TOKEN: ${gitlabtoken}"
59        """
60    }
61
62    //新增这段代码
63    try {
64        response = readJSON text: response - "\n" //json数据的读取方式
65    } catch(e){
66        println(e)
67    }
68    return response
69}
70
71//获取ProjectID
72def GetProjectIDByName(projectName, groupName){
73    apiUrl = "projects?search=${projectName}"
74    response = HttpReq("GET", apiUrl)
75    if (response != []){
76        for (p in response) {
77            if (p["namespace"]["name"] == groupName){
78                return response[0]["id"]
79            }
80        }
81    }
82}
83
84//获取分支CommitID
85def GetBranchCommitID(projectID, branchName){
86    apiUrl = "projects/${projectID}/repository/branches/${branchName}"
87    response = HttpReq("GET", apiUrl)
88    return response.commit.short_id
89}
k8sci.jenkinsfile
1@Library("devops06@main") _
2
3//import src/org/devops/xxx.groovy
4def checkout = new org.devops.CheckOut()
5def build = new org.devops.Build()
6def sonar = new org.devops.Sonar()
7def mygit = new org.devops.Gitlab()
8
9
10//使用git 参数需要格式化
11env.branchName = "${env.branchName}" - "origin/"
12println(env.branchName)
13
14pipeline {
15 agent {label "build"}
16
17 //跳过默认的代码检出功能
18 options {
19 skipDefaultCheckout true
20 }
21
22
23 stages{
24 stage("CheckOut"){
25 steps{
26 script{
27 checkout.CheckOut()
28
29 //获取commitID
30 env.commitID = checkout.GetCommitID()
31 println("commitID: ${env.commitID}")
32
33 // Jenkins构建显示信息
34 currentBuild.displayName = "第${BUILD_NUMBER}次构建-${env.commitID}"
35 currentBuild.description = "构建分支名称:${env.branchName}"
36 //currentBuild.description = "Trigger by user jenkins \n branch: ${env.branchName}"
37 }
38 }
39 }
40
41 stage("Build"){
42 steps{
43 script{
44 build.Build()
45 }
46 }
47
48 }
49
50 stage("CodeScan"){
51 // 是否跳过代码扫描?
52 when {
53 environment name: 'skipSonar', value: 'false'
54 }
55
56 steps{
57 script{
58 sonar.SonarScannerByPlugin()
59
60 }
61 }
62 }
63
64 stage("ImageBuild"){
65 steps{
66 script{
67 //PushArtifactByPlugin()
68 //PushArtifactByPluginPOM()
69
70 // init package info
71 appName = "${JOB_NAME}".split('_')[0] //devops6-maven-service_CI
72 repoName = appName.split('-')[0] //devops6
73
74 imageName = "${repoName}/${appName}"
75 imageTag = "${env.branchName}-${env.commitID}"
76 env.fullImageName = "172.29.9.120/${imageName}:${imageTag}"
77 sh """
78 #登录镜像仓库
79 docker login -u admin -p Harbor12345 172.29.9.120
80
81 # 构建镜像
82 docker build -t ${env.fullImageName} .
83
84 # 上传镜像
85 docker push ${env.fullImageName}
86
87 # 删除镜像
88 sleep 2
89 docker rmi ${env.fullImageName}
90 """
91 }
92 }
93
94 }
95
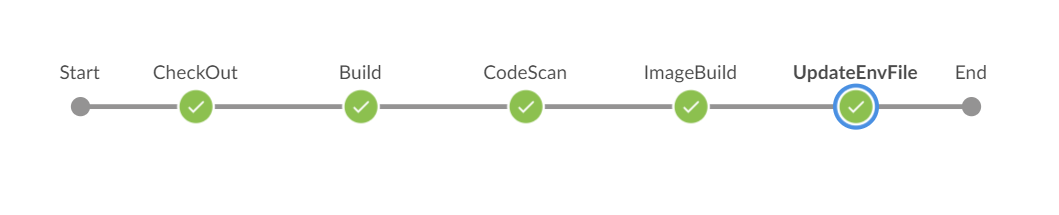
96 stage("UpdateEnvFile"){
97 steps{
98 script {
99 // 更新部署文件
100
101 projectId = 11
102 fileName = "Deployment.yaml" //模板文件
103 branchName = "main"
104
105 //下载模板文件
106 fileData = mygit.GetRepoFile(projectId,fileName,branchName)
107 sh "rm -fr ${fileName}"
108
109 //模板文件内容保存到本地
110 writeFile file: fileName , text: fileData
111 env.deployFile = fileName
112 //替换镜像
113 sh "sed -i 's#__IMAGE_NAME__#${env.fullImageName}#g' ${env.deployFile} "
114 sh "ls -l ; cat ${fileName}"
115
116 //创建/更新发布文件
117 newYaml = sh returnStdout: true, script: "cat ${env.deployFile}"
118 println(newYaml)
119
120 //更新gitlab文件内容
121 base64Content = newYaml.bytes.encodeBase64().toString()
122
123 appName = "${JOB_NAME}".split('_')[0] //devops6-npm-service
124 env.groupName = appName.split('-')[0] //devops6
125 env.projectName = appName
126
127 // 会有并行问题,同时更新报错
128 try {
129 mygit.UpdateRepoFile(projectId,"${env.projectName}%2f${env.branchName}.yaml",base64Content, "main")
130 } catch(e){
131 mygit.CreateRepoFile(projectId,"${env.projectName}%2f${env.branchName}.yaml",base64Content, "main")
132 }
133 }
134 }
135 }
136
137 }
138}
- 再次新建版本分支
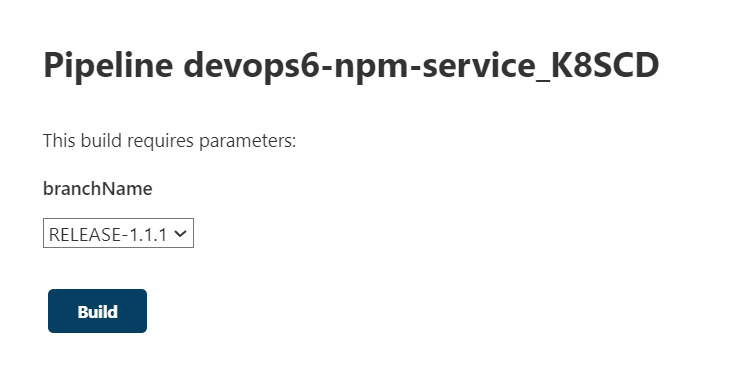
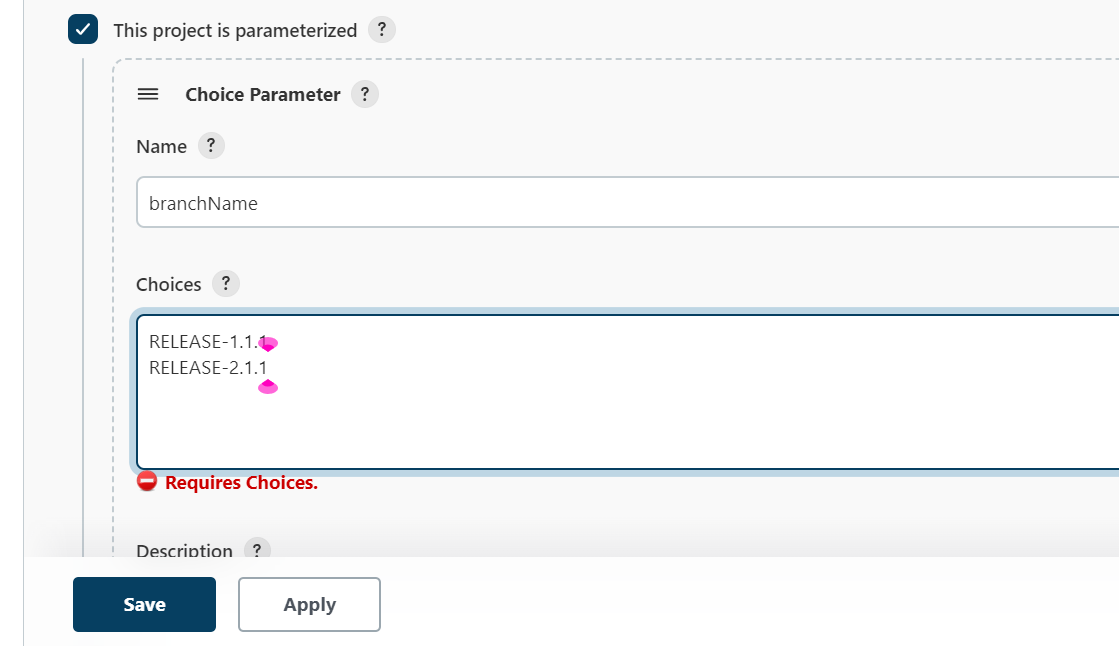
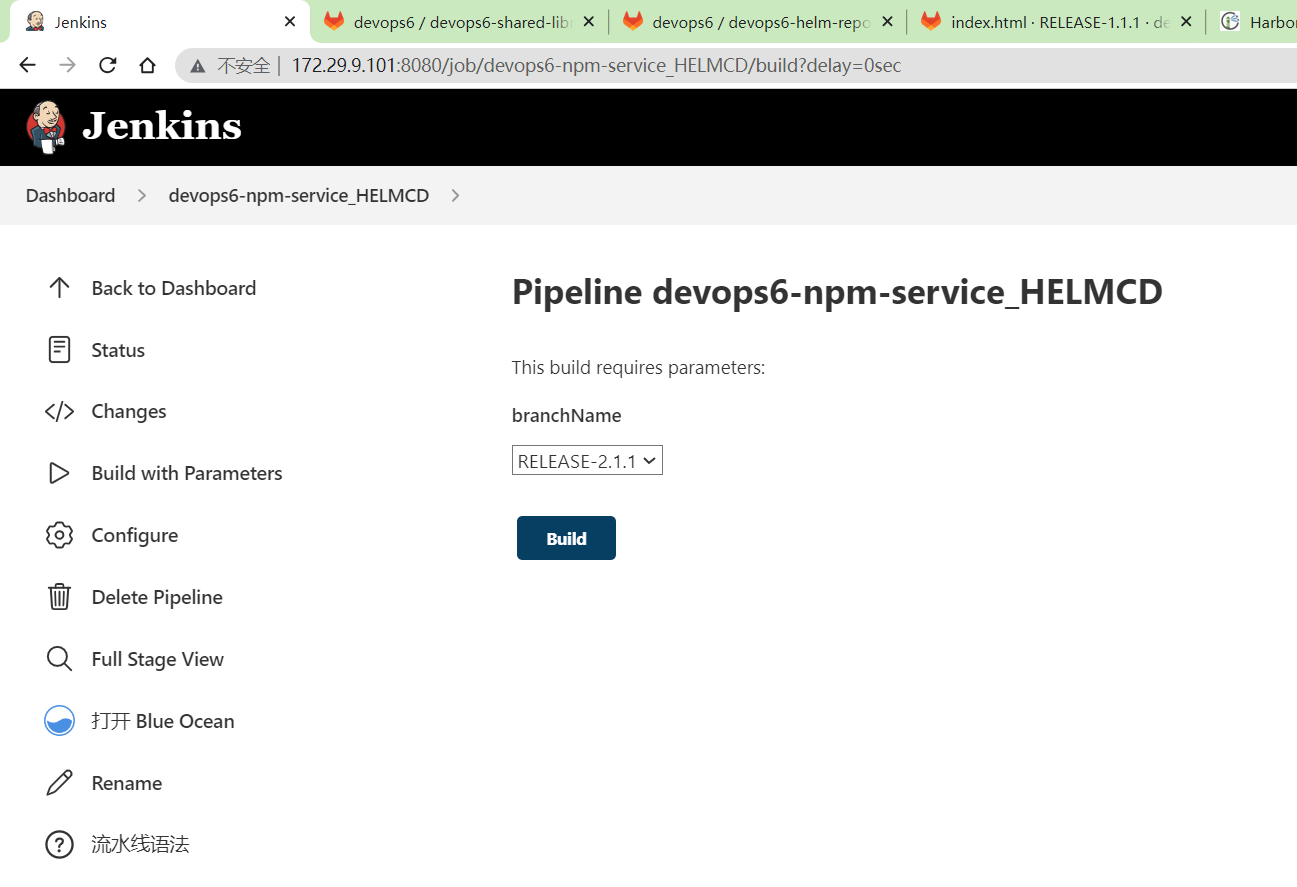
RELEASE-2.1.1,jenkins里记得配置下该分支名。

- 运行
点击approve
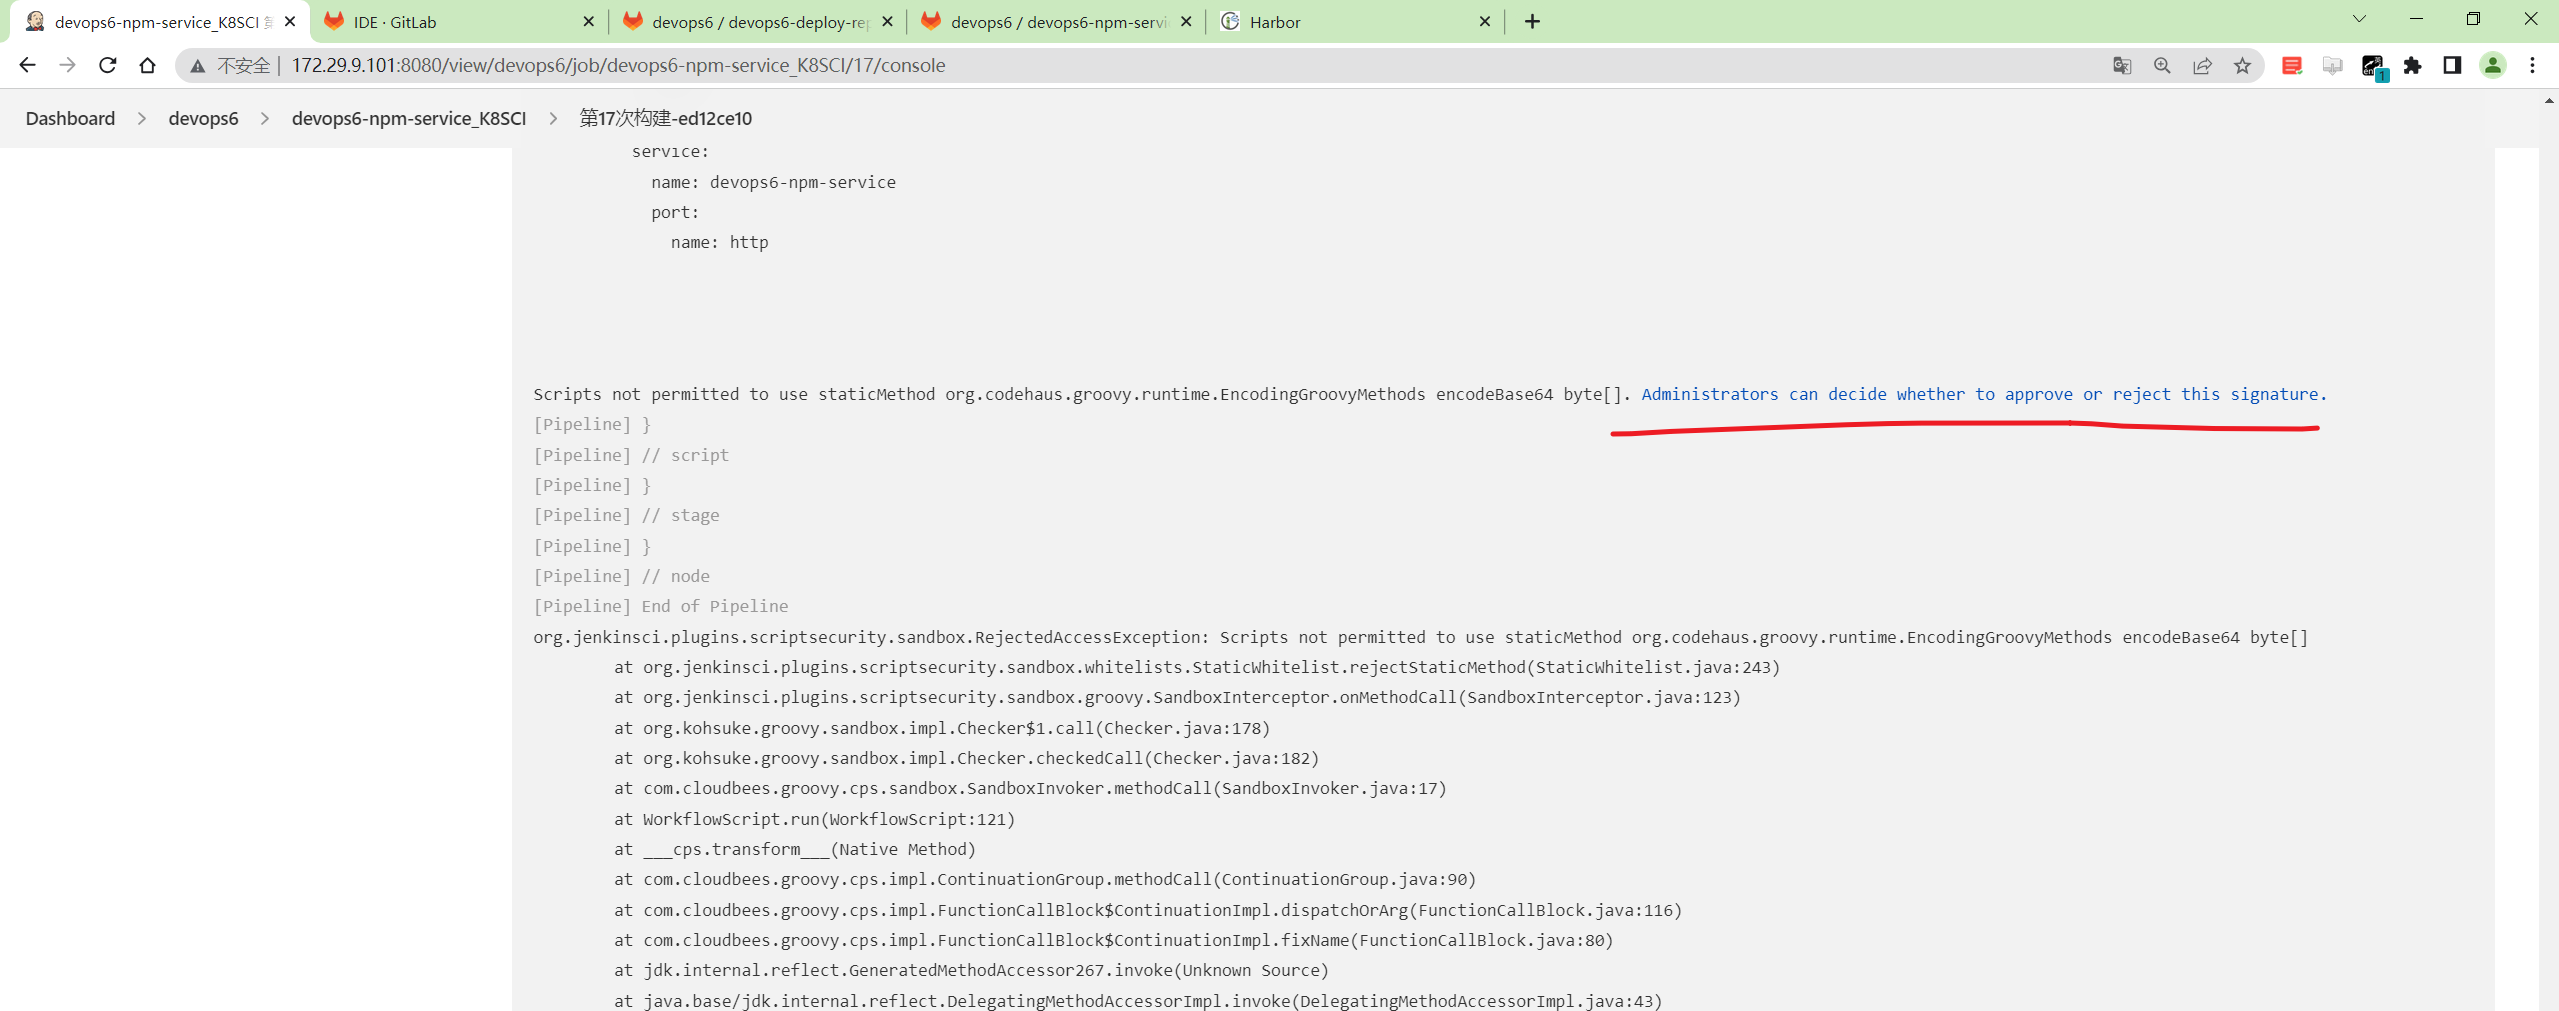
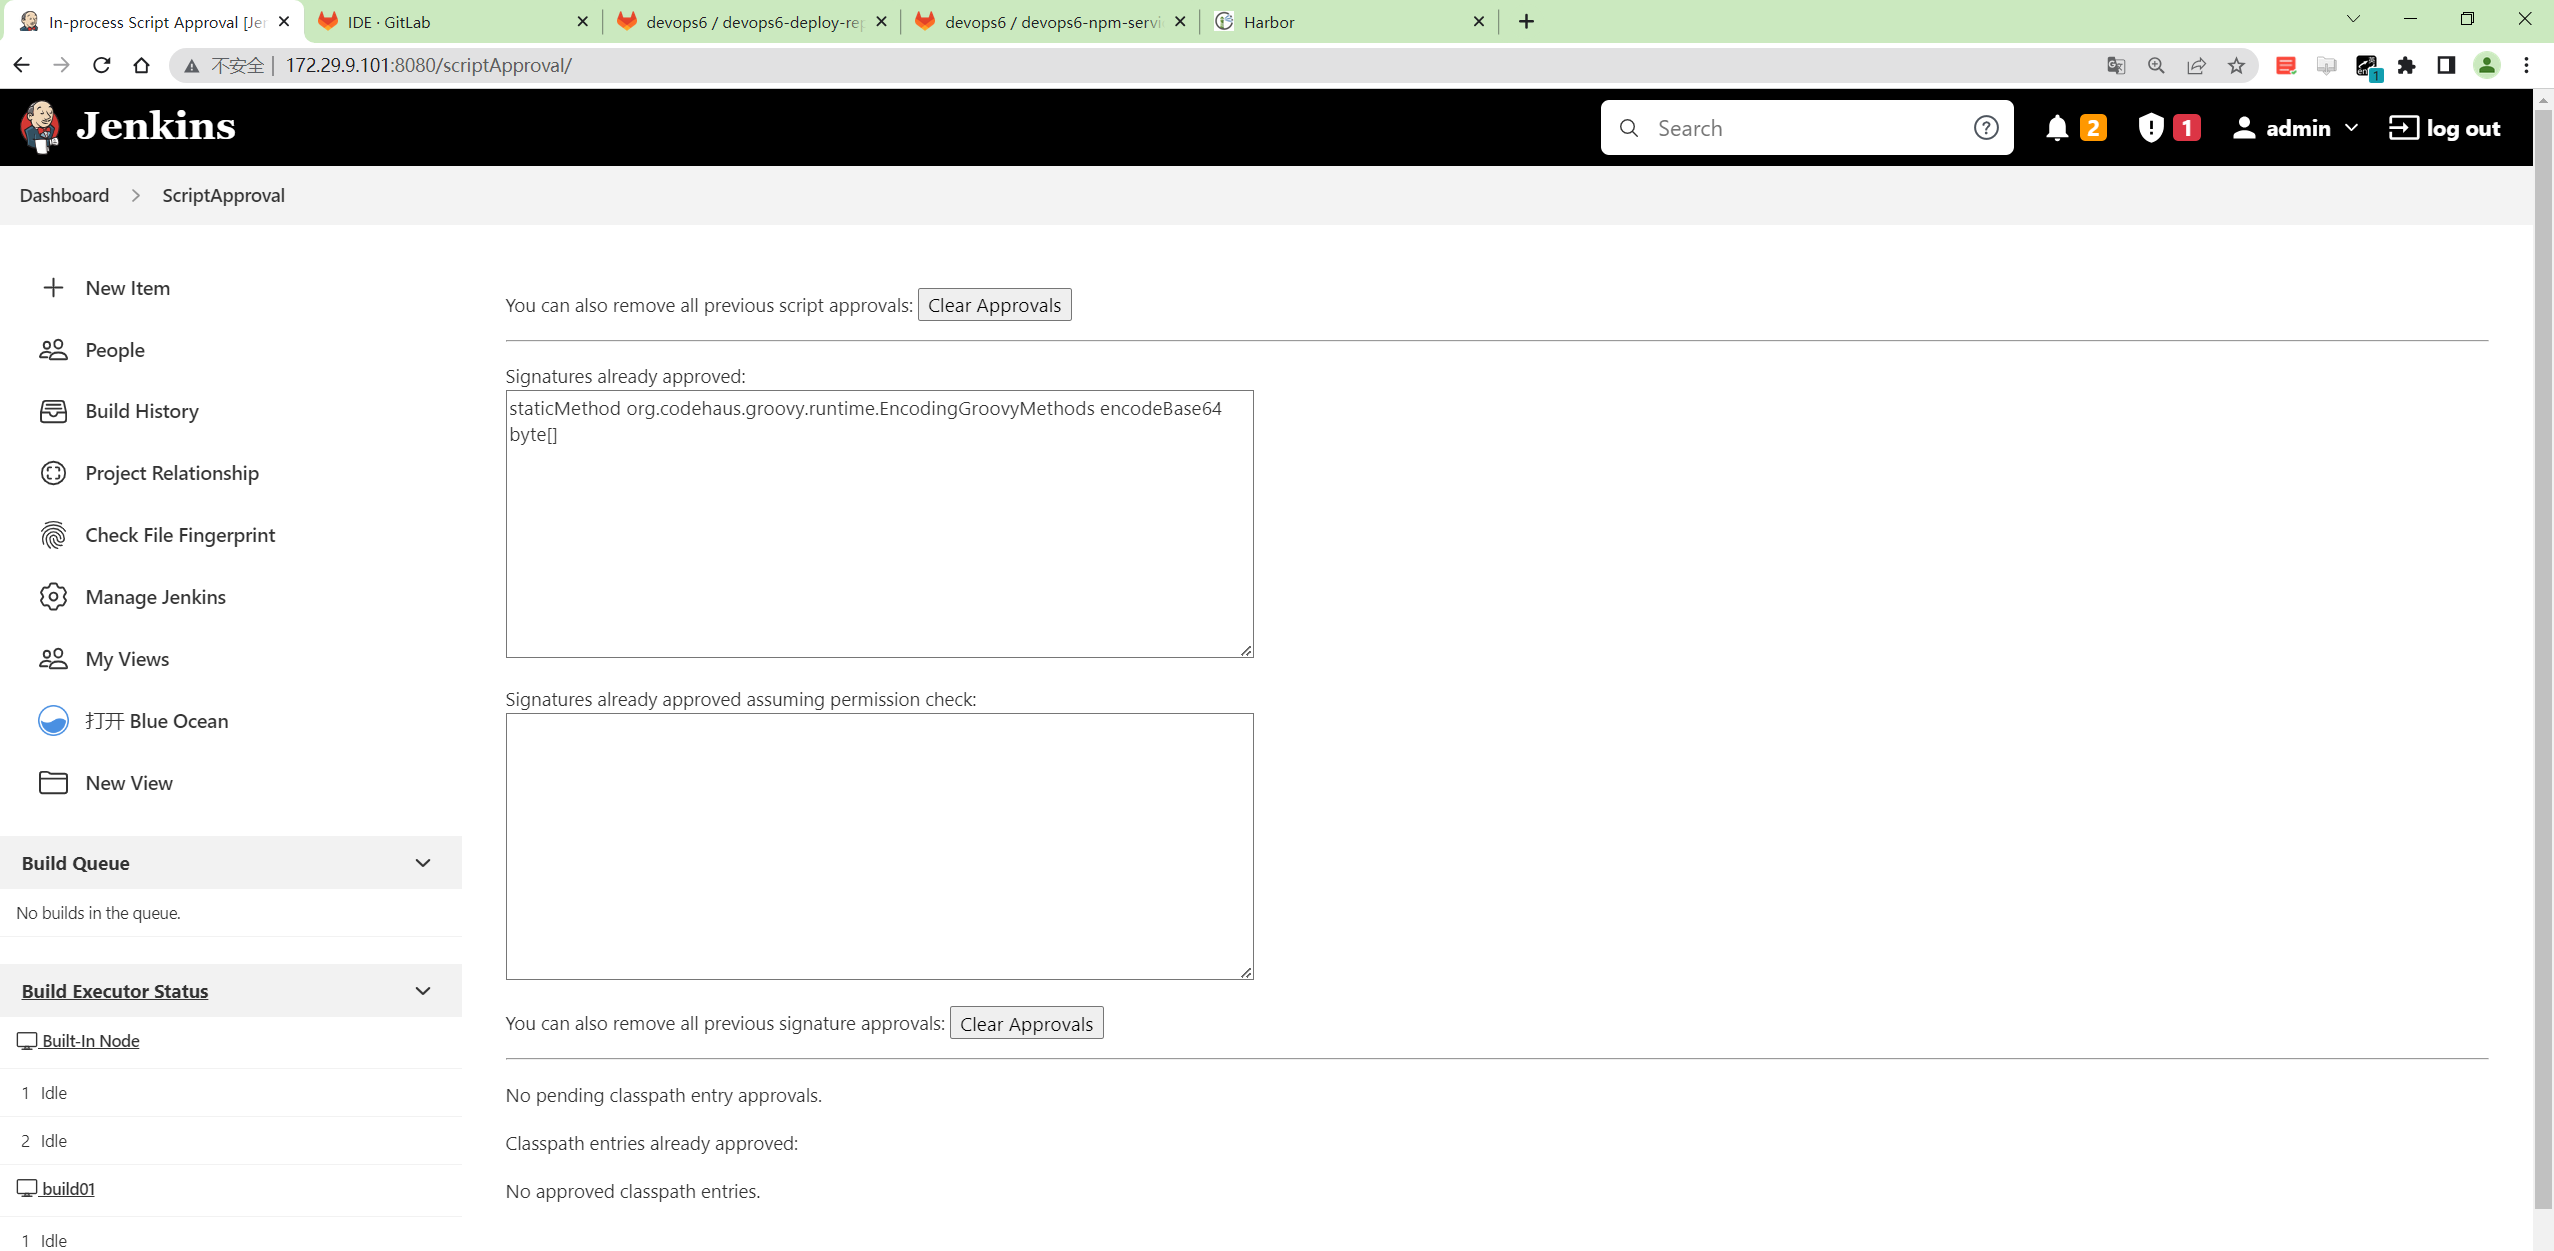
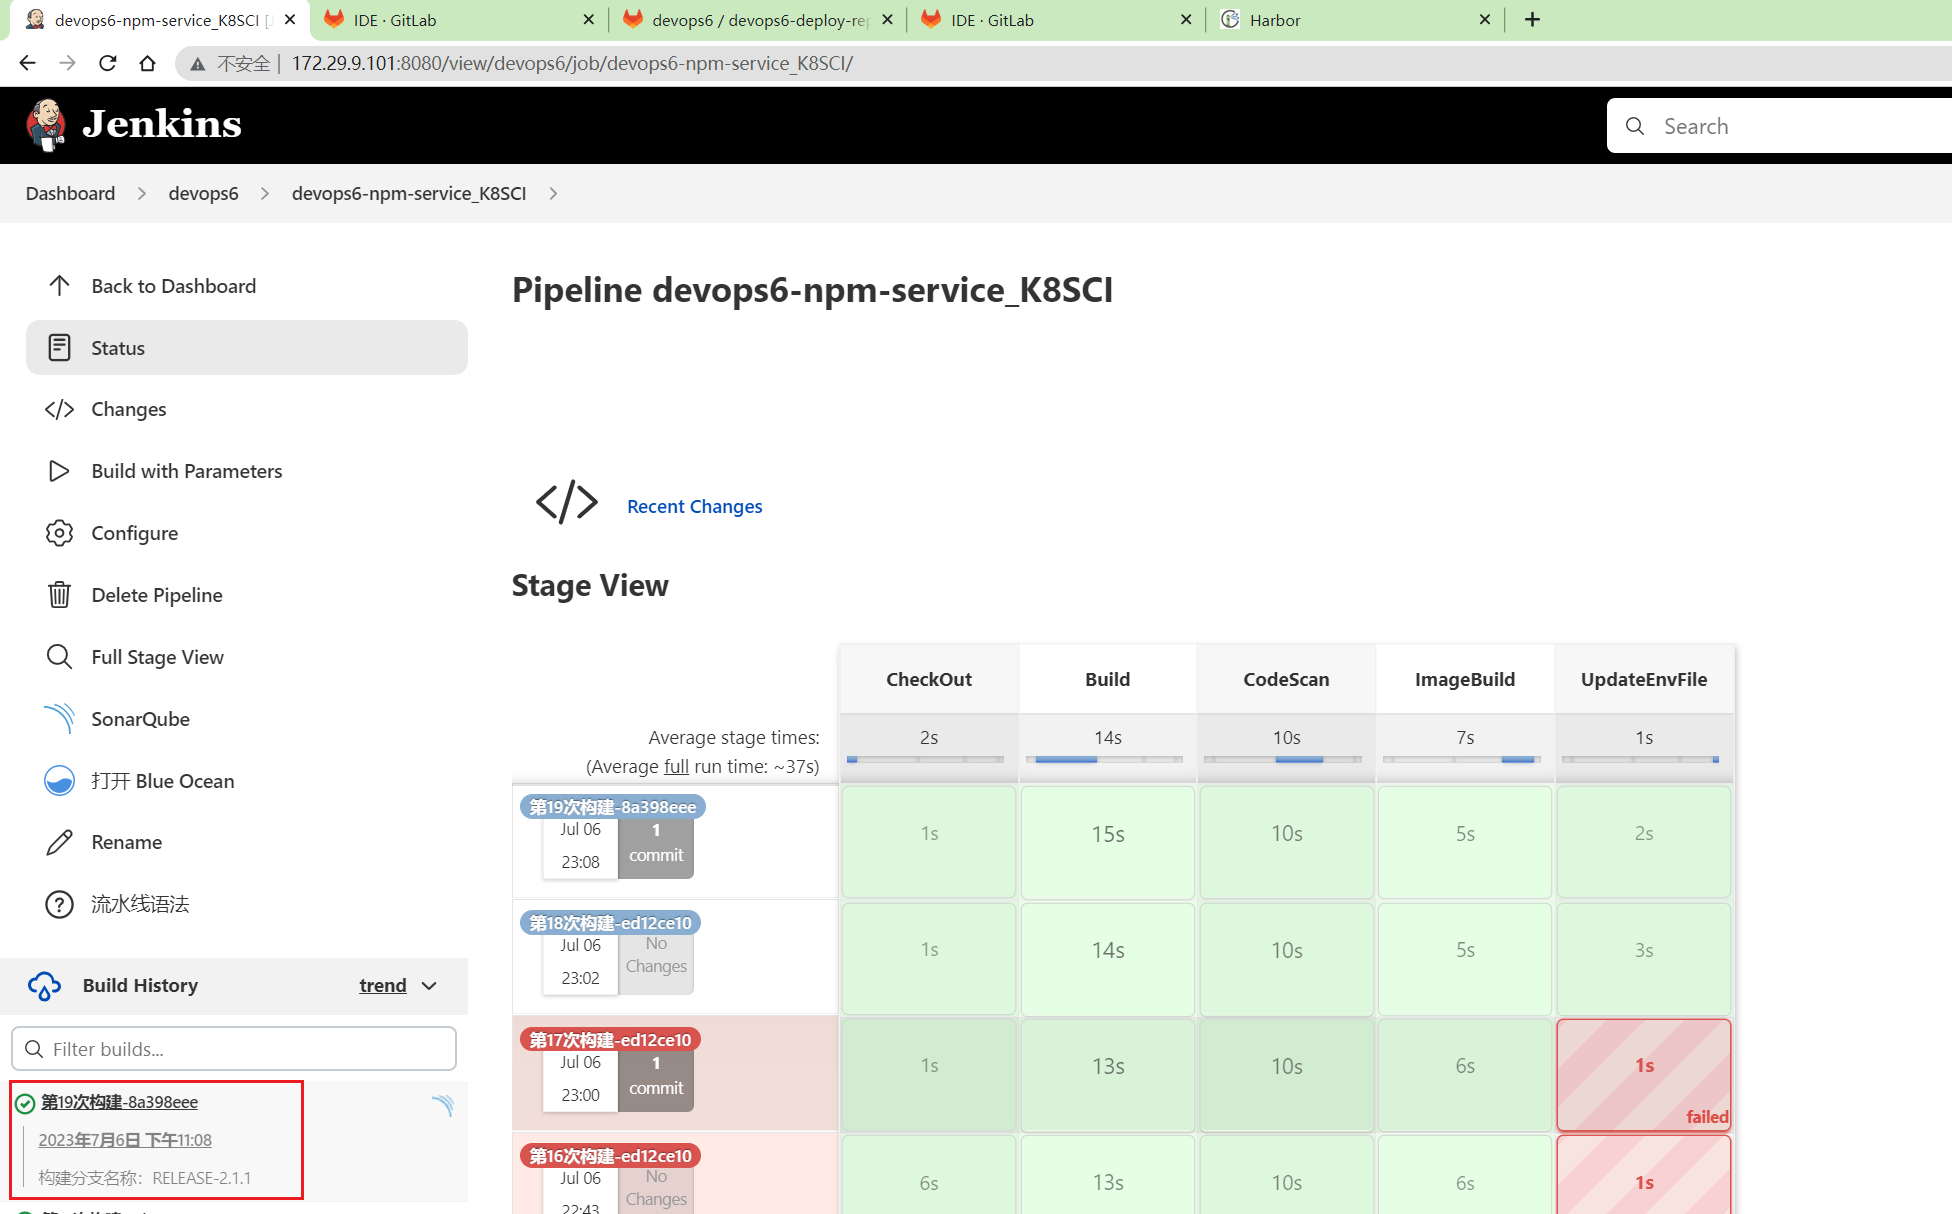
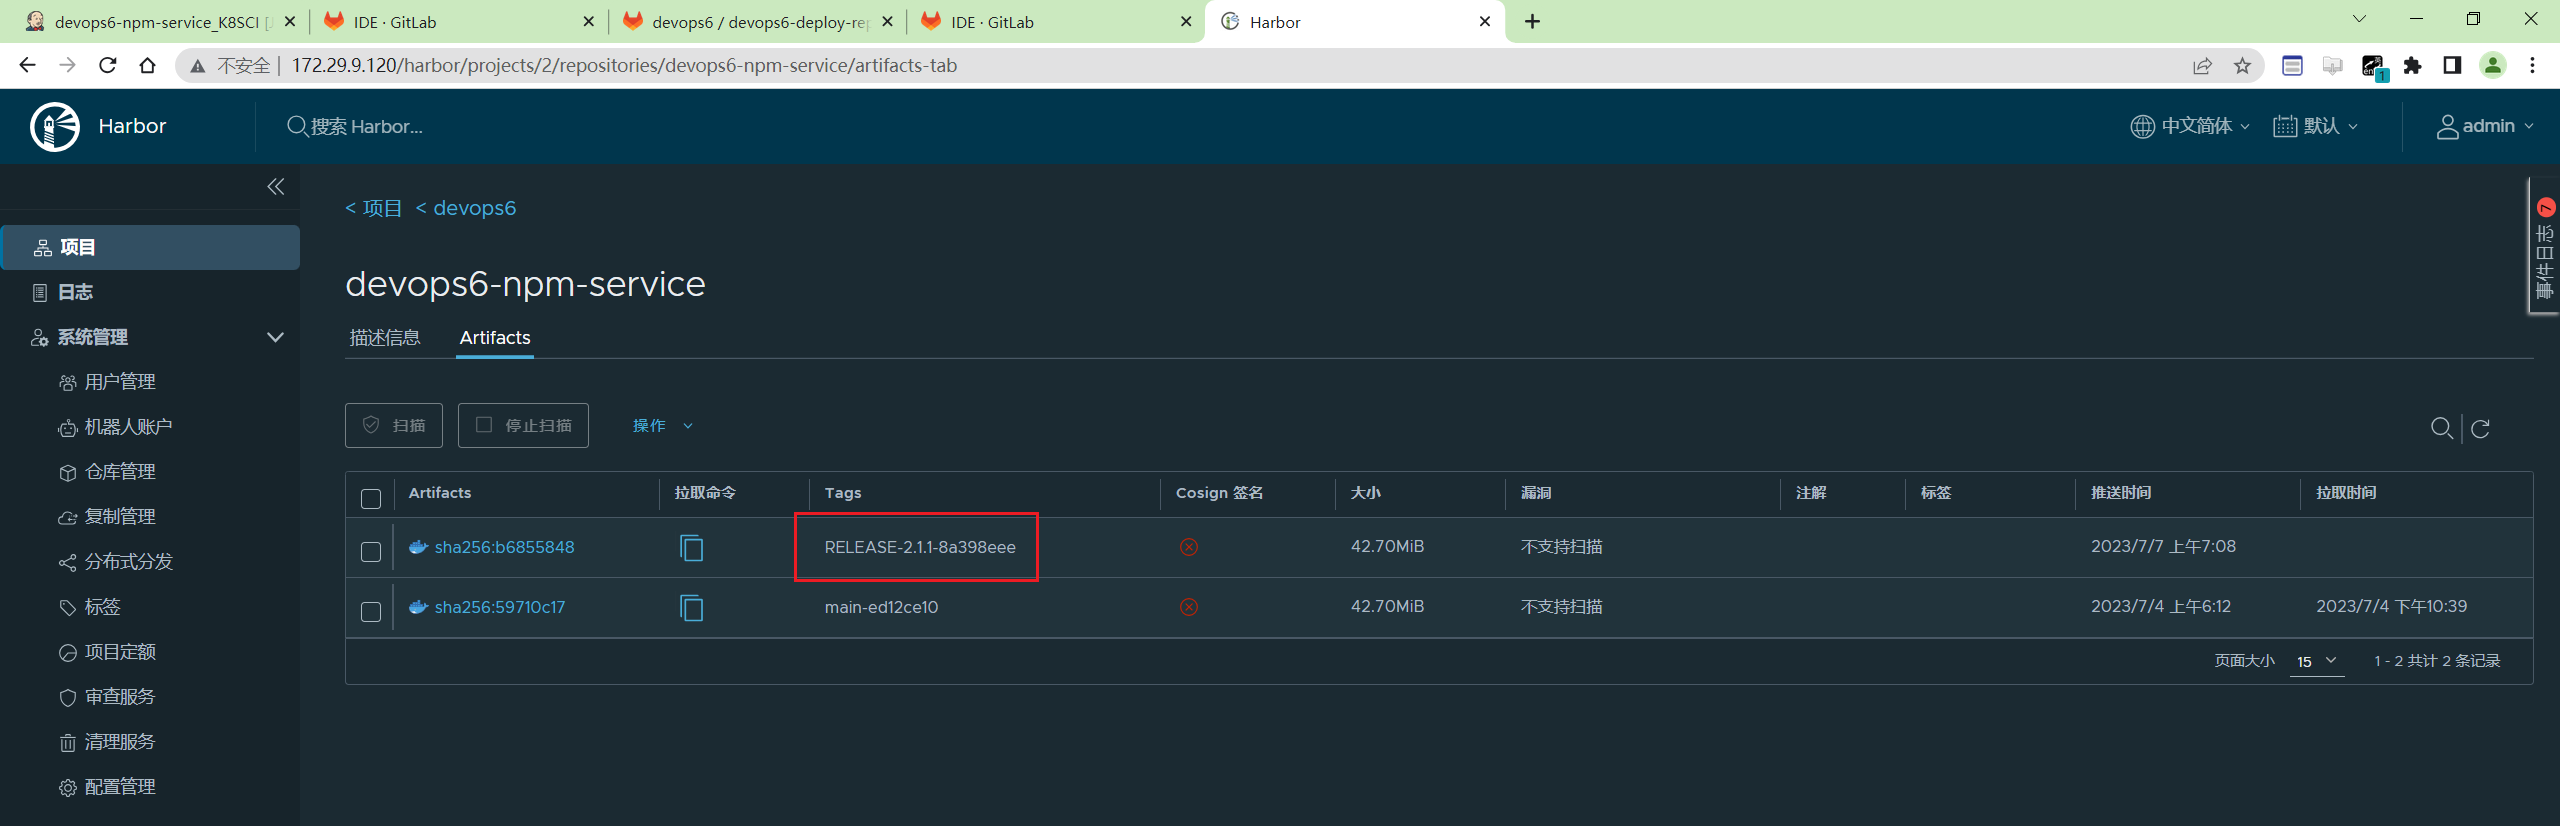
符合预期。
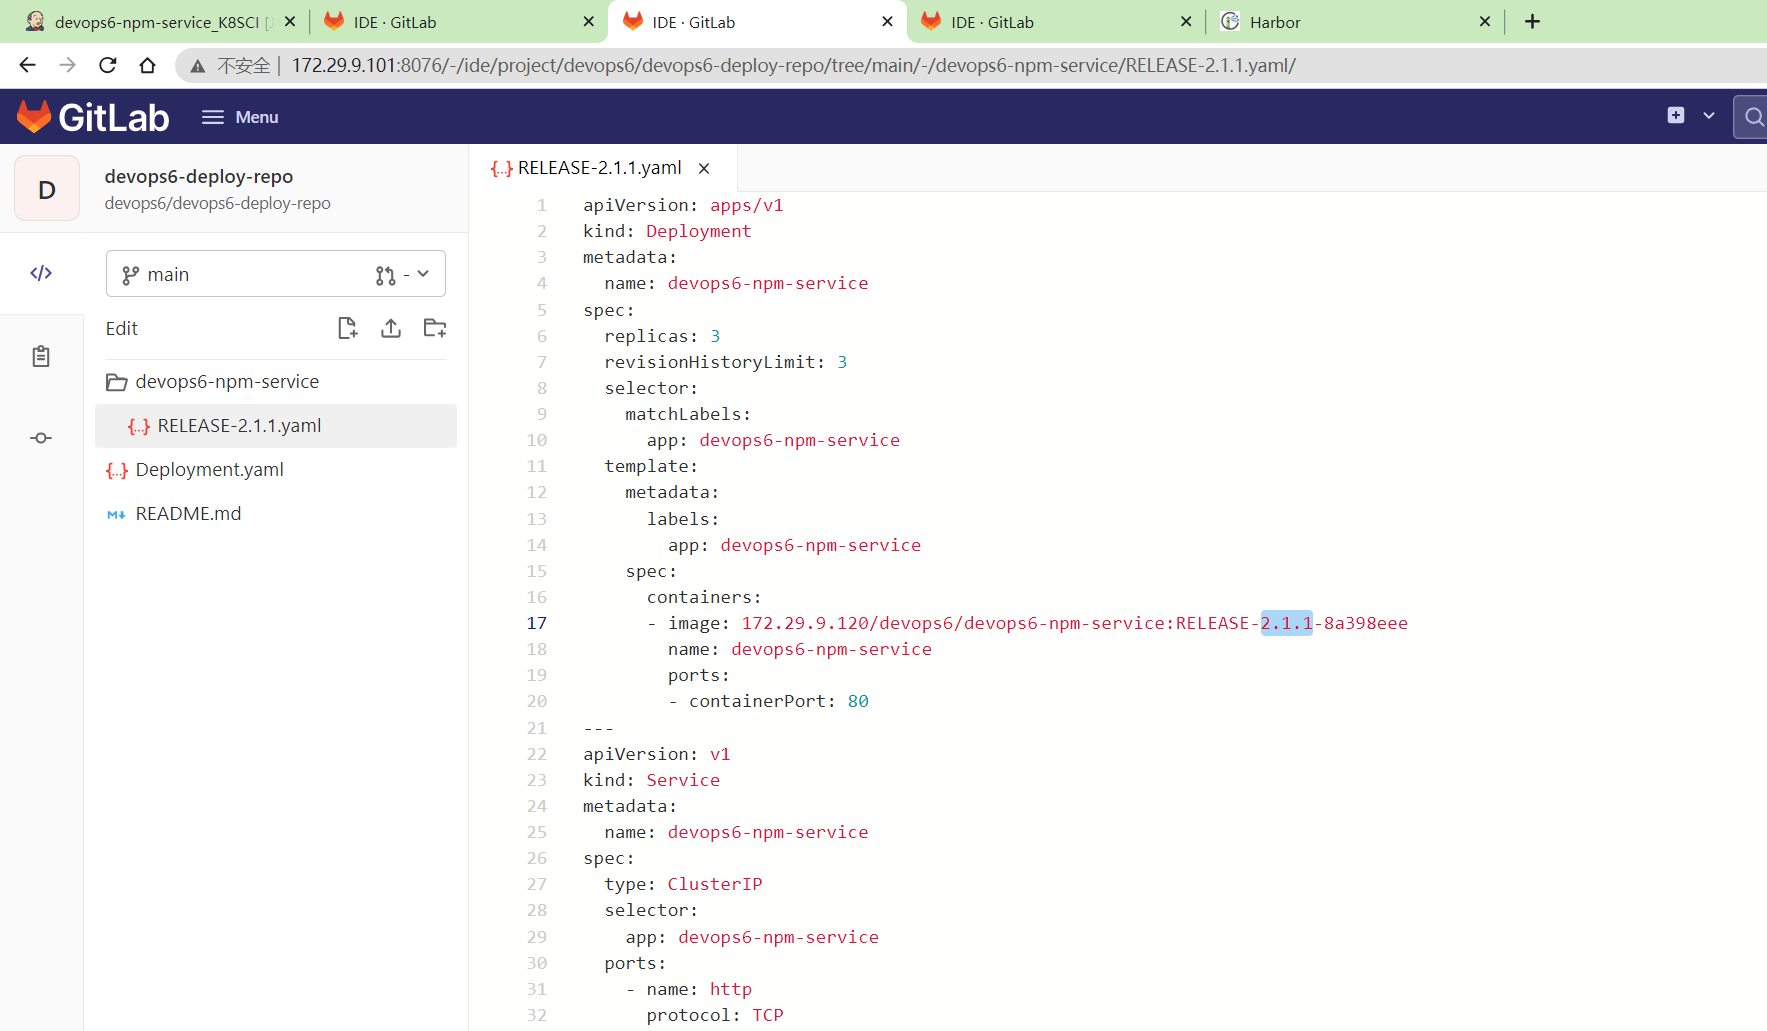
【GitOps最重要的一个特性: ==自动更新部署文件==】
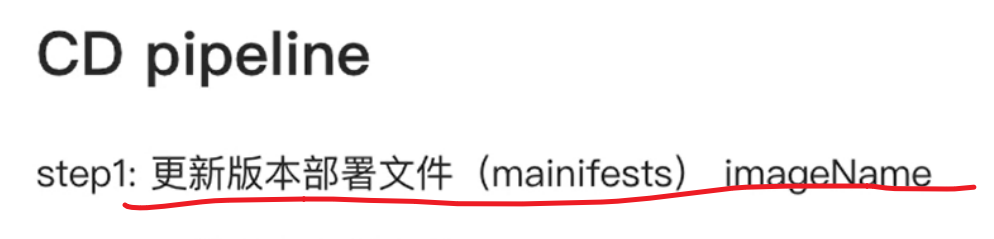
更新生成版本文件
- 步骤: 拿到 env仓库中的deployments.yaml模板文件, 然后替换内容,更新到版本库。
更新对象:
- RELEASE_VERSION(镜像TAG)
 1       stage("UpdateEnvFile"){
 2            steps{
 3                script {
 4                    // 更新部署文件
 5
 6                    projectId = 11
 7                    fileName = "Deployment.yaml"  //模板文件
 8                    branchName = "main"
 9
10                    //下载模板文件
11                    fileData = mygit.GetRepoFile(projectId,fileName,branchName)
12                    sh "rm -fr ${fileName}"
13
14                    //模板文件内容保存到本地
15                    writeFile file: fileName , text: fileData
16                    env.deployFile = fileName
17                    //替换镜像
18                    sh "sed -i 's#__IMAGE_NAME__#${env.fullImageName}#g' ${env.deployFile} "
19                    sh "ls -l ; cat ${fileName}"
20
21                    //创建/更新发布文件
22                    newYaml = sh returnStdout: true, script: "cat ${env.deployFile}"
23                    println(newYaml)
24
25                    //更新gitlab文件内容
26                    base64Content = newYaml.bytes.encodeBase64().toString()
27
28                    appName = "${JOB_NAME}".split('_')[0] //devops6-npm-service
29                    env.groupName = appName.split('-')[0]   //devops6
30                    env.projectName = appName
31
32                    // 会有并行问题,同时更新报错
33                    try {
34                        mygit.UpdateRepoFile(projectId,"${env.projectName}%2f${env.branchName}.yaml",base64Content, "main")
35                    } catch(e){
36                        mygit.CreateRepoFile(projectId,"${env.projectName}%2f${env.branchName}.yaml",base64Content, "main")
37                    }
38                }
39            }
40        }
更新后的版本文件
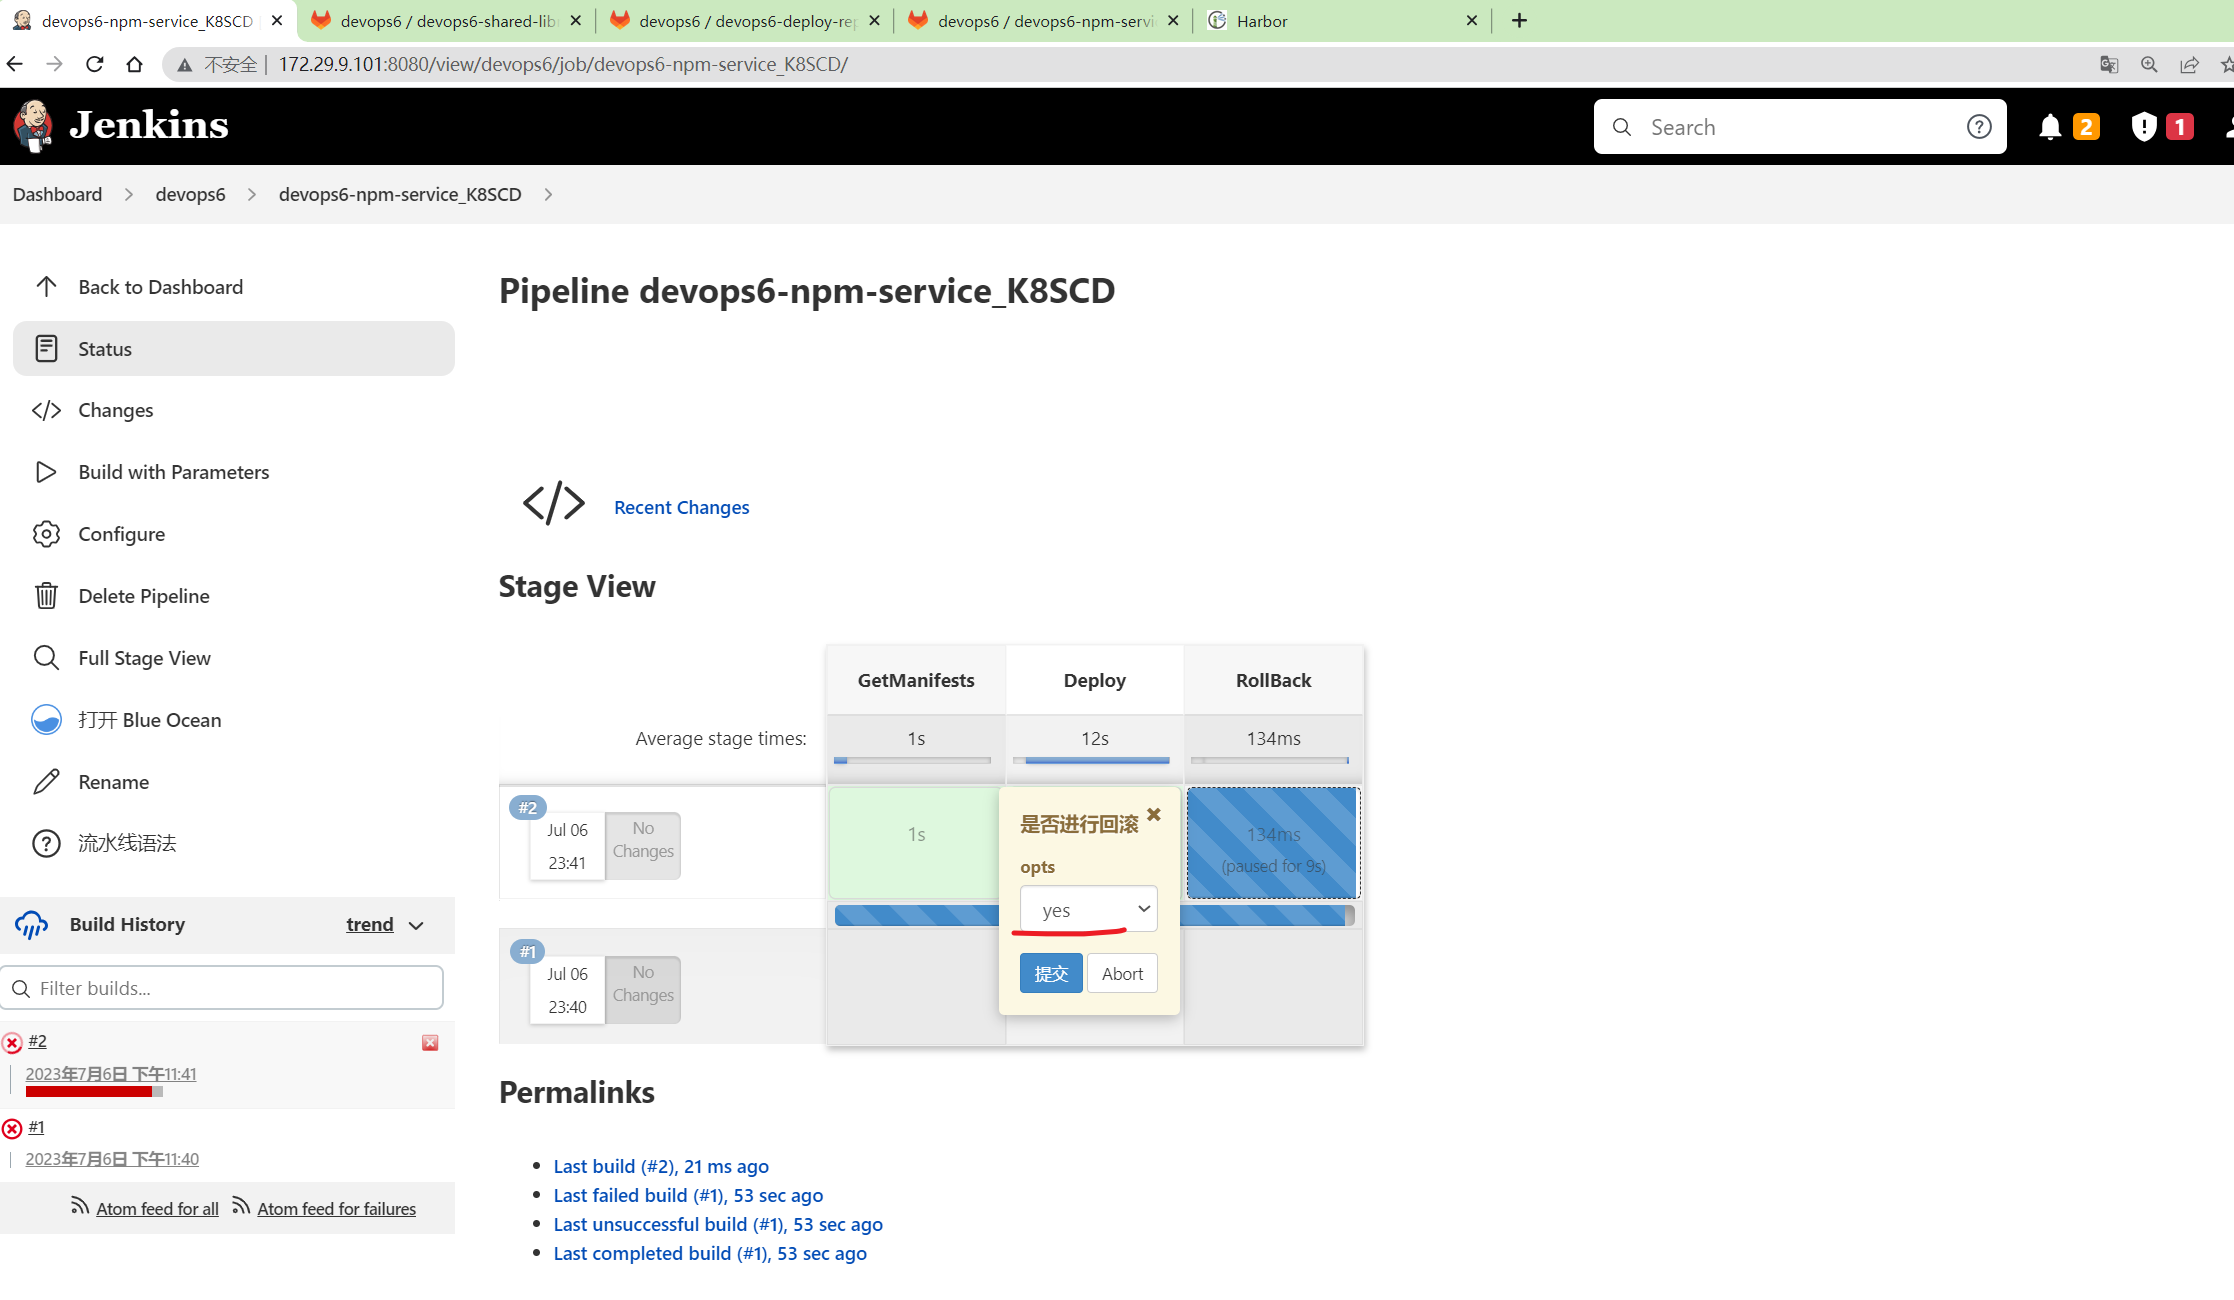
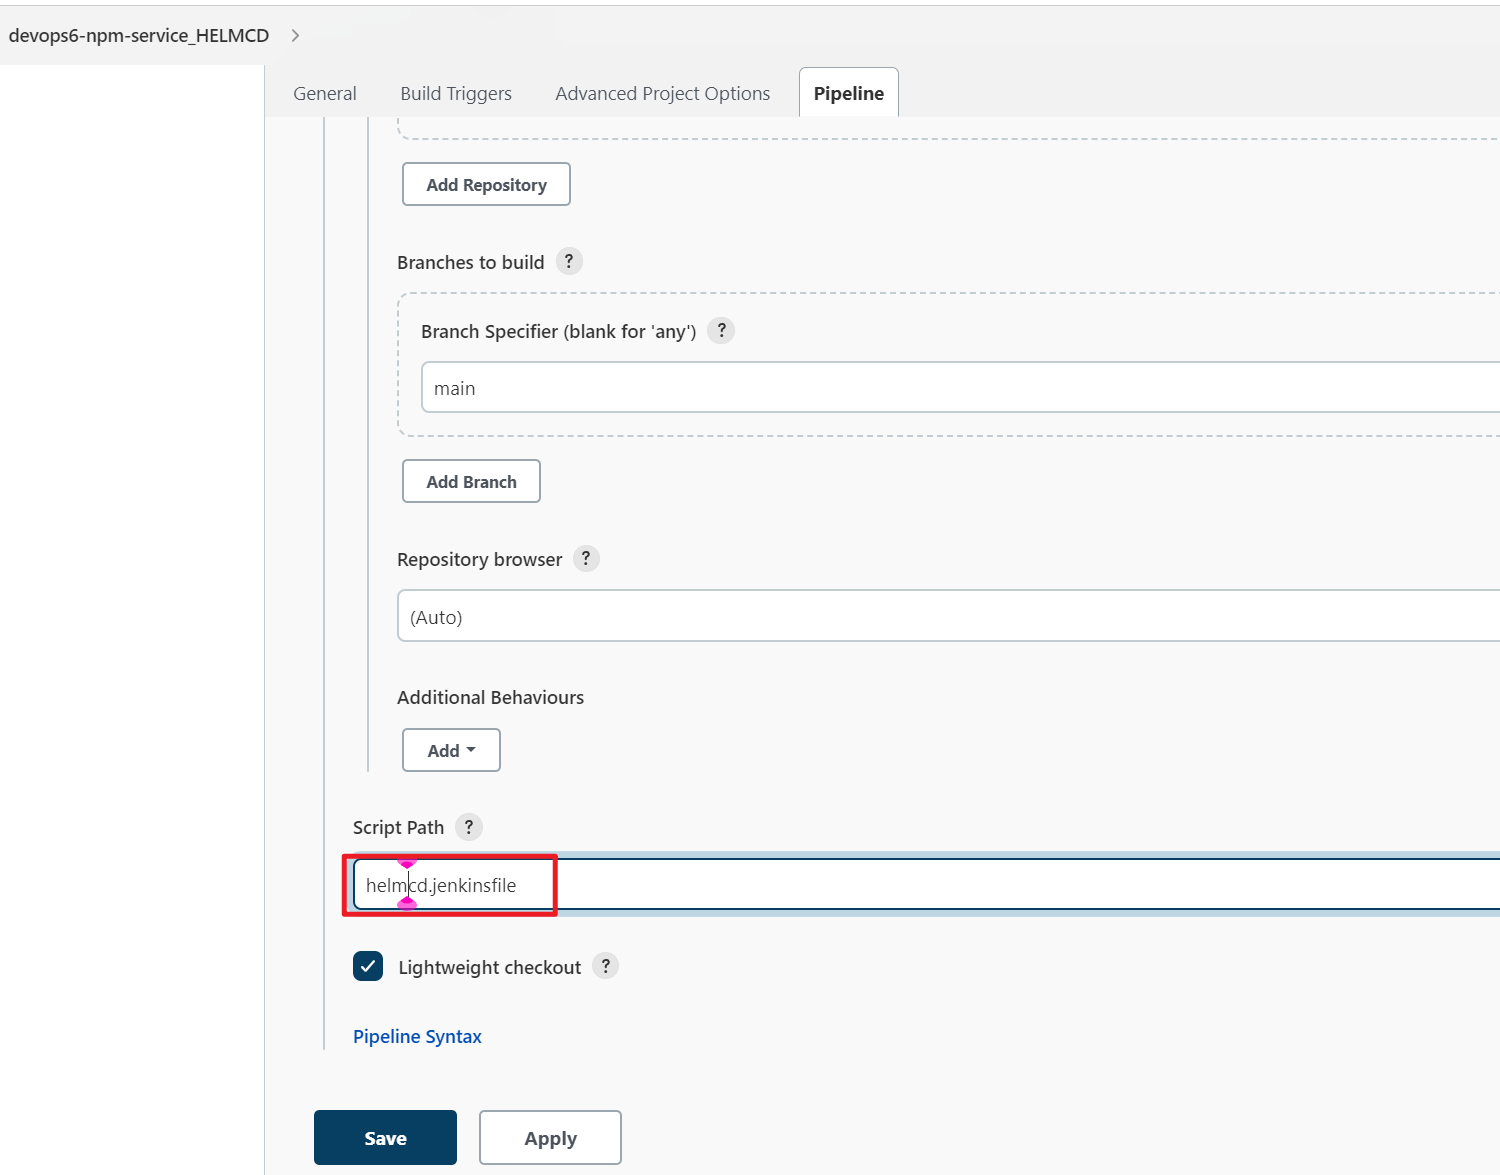
编写CD pipeline
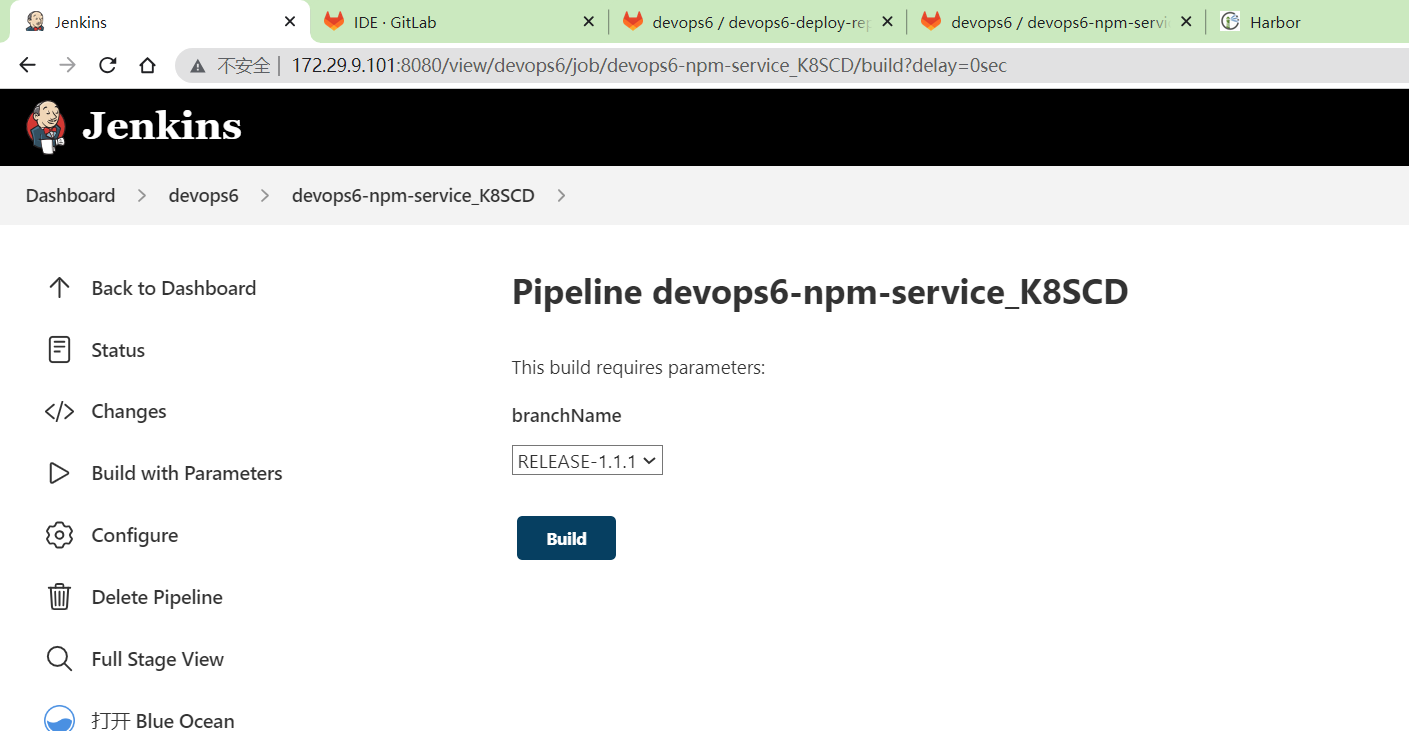
- 创建一个CD的job
devops6-npm-service_K8SCD
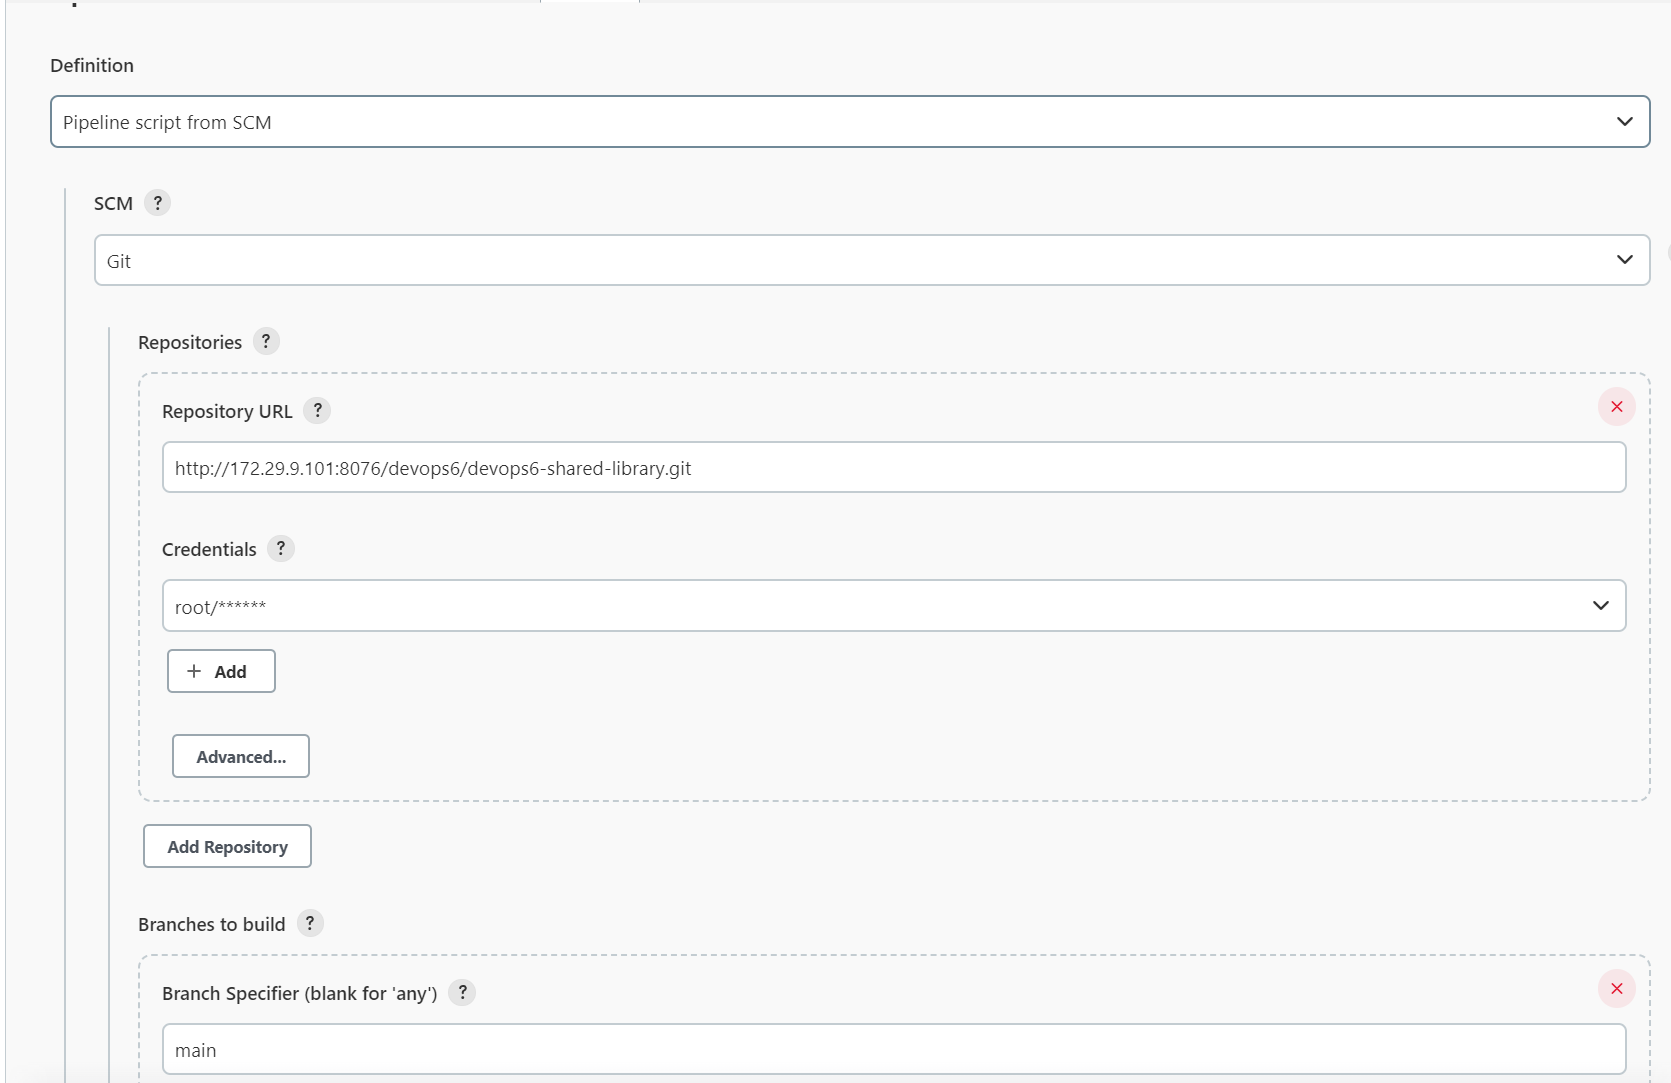
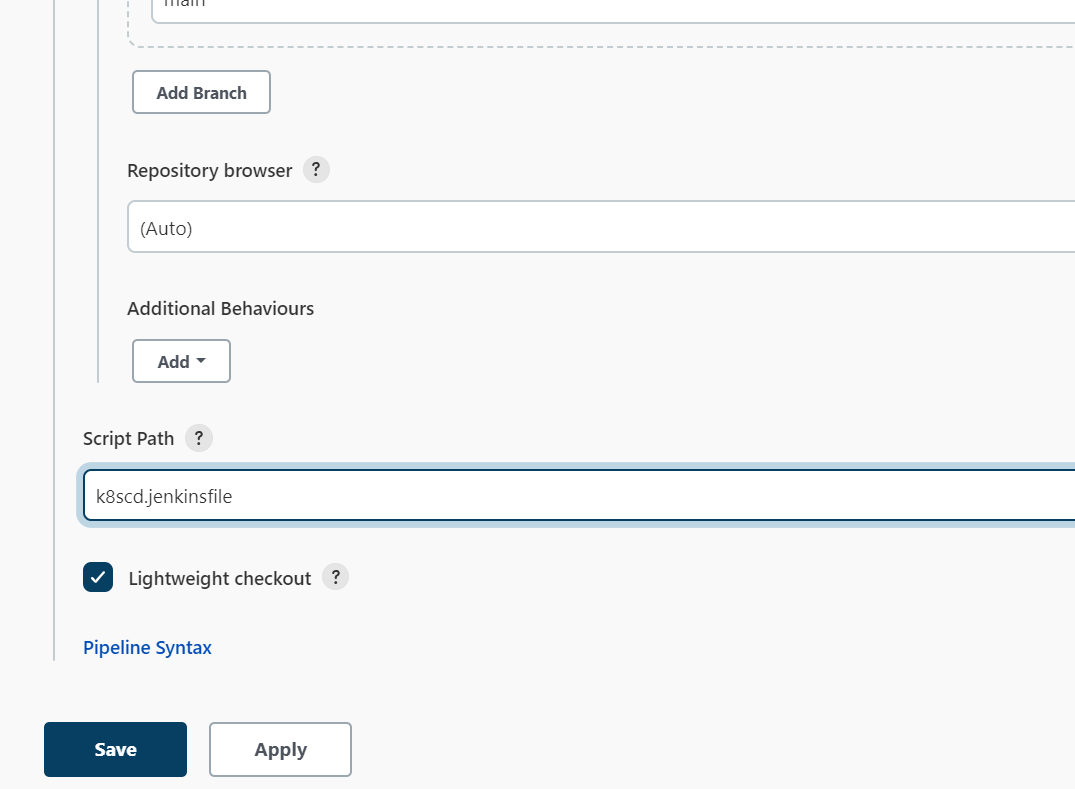
配置git仓库:
- 编写pipeline
k8scd.jenkinsfile文件
 1@Library("devops06@main") _
 2
 3def mygit = new org.devops.Gitlab()
 4
 5//使用git 参数需要格式化
 6env.branchName = "${env.branchName}" - "origin/"
 7println(env.branchName)
 8
 9pipeline {
10    agent { label "build"}
11    options {
12        skipDefaultCheckout true
13    }
14    stages{
15        stage("GetManifests"){
16            steps{
17                script{
18
19                   //下载发布文件
20                    projectId = 11
21                    env.deployFile = "${env.branchName}.yaml"  //版本分支RELEASE-2.1.1.yaml
22                    env.appName = "${JOB_NAME}".split('_')[0] //devops6-maven-service
23                    filePath = "${env.appName}%2f${env.deployFile}" //devops6-npm-service/RELEASE-2.1.1.yaml
24                    branchName = "main"
25                    fileData = mygit.GetRepoFile(projectId,filePath,branchName)
26                    sh "rm -fr ${env.deployFile}"
27                    writeFile file: env.deployFile , text: fileData
28                    sh "ls -l ; cat ${env.deployFile}"
29                }
30            }
31        }
32
33        stage("Deploy"){
34            steps{
35                script{
36                    env.namespace = "${env.appName}".split('-')[0]   //devops6
37
38                    sh """
39                        ## 发布应用
40                        kubectl apply -f ${env.deployFile} -n ${env.namespace}
41
42                    """
43
44                    // 获取应用状态
45                    5.times{
46                        sh "sleep 2; kubectl -n ${env.namespace} get pod | grep ${env.appName}"
47                    }
48                }
49            }
50        }
51
52        stage("RollBack"){
53            input {
54                message "是否进行回滚"
55                ok "提交"
56                submitter ""
57                parameters {
58                    choice(choices: ['yes', 'no'], name: 'opts')
59                }
60            }
61            steps{
62                script{
63                    switch("${opts}") {
64                        case "yes":
65                            sh "kubectl rollout undo deployment/${env.appName} -n ${env.namespace} "
66                            break
67                        case "no":
68                            break
69                    }
70                }
71            }
72        }
73    }
74}
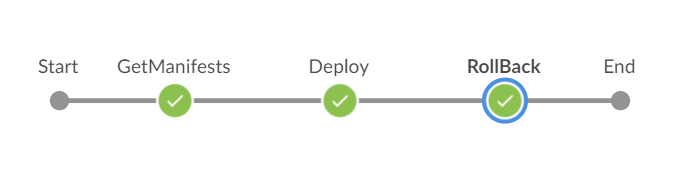
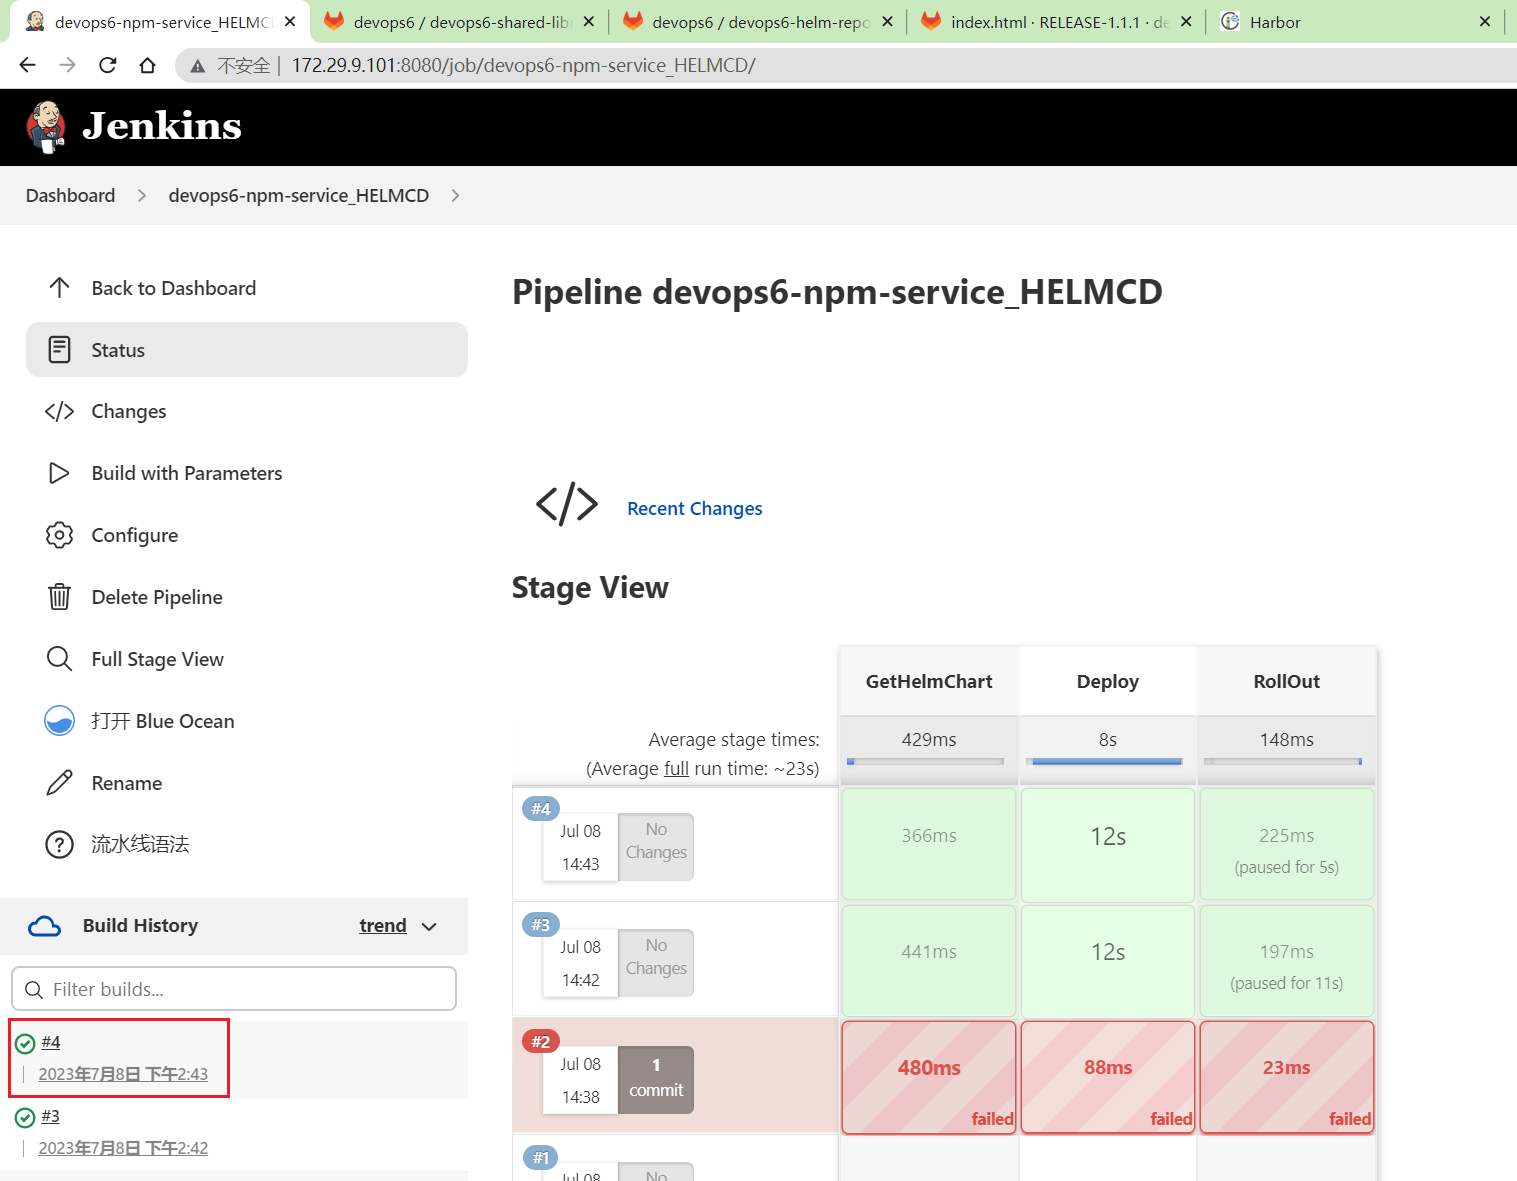
- 运行流水线
我们来提前观察下此时版本:
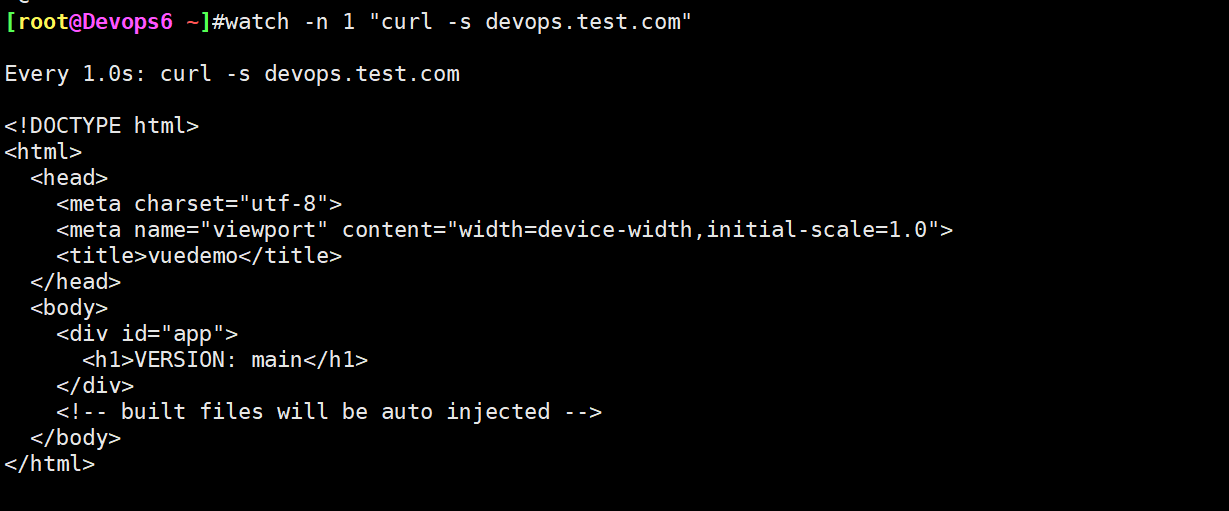
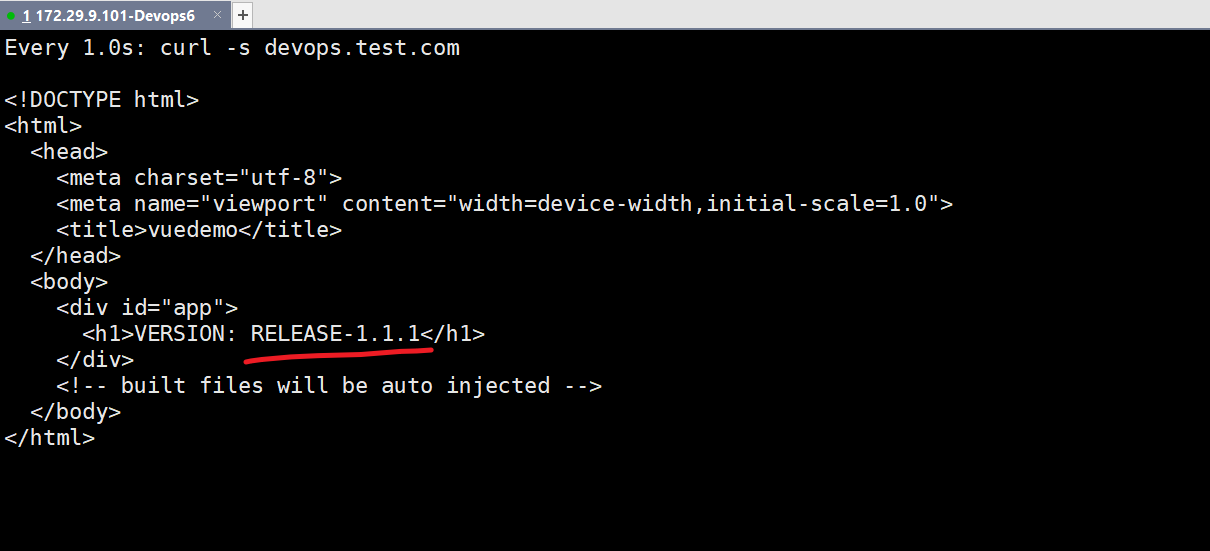
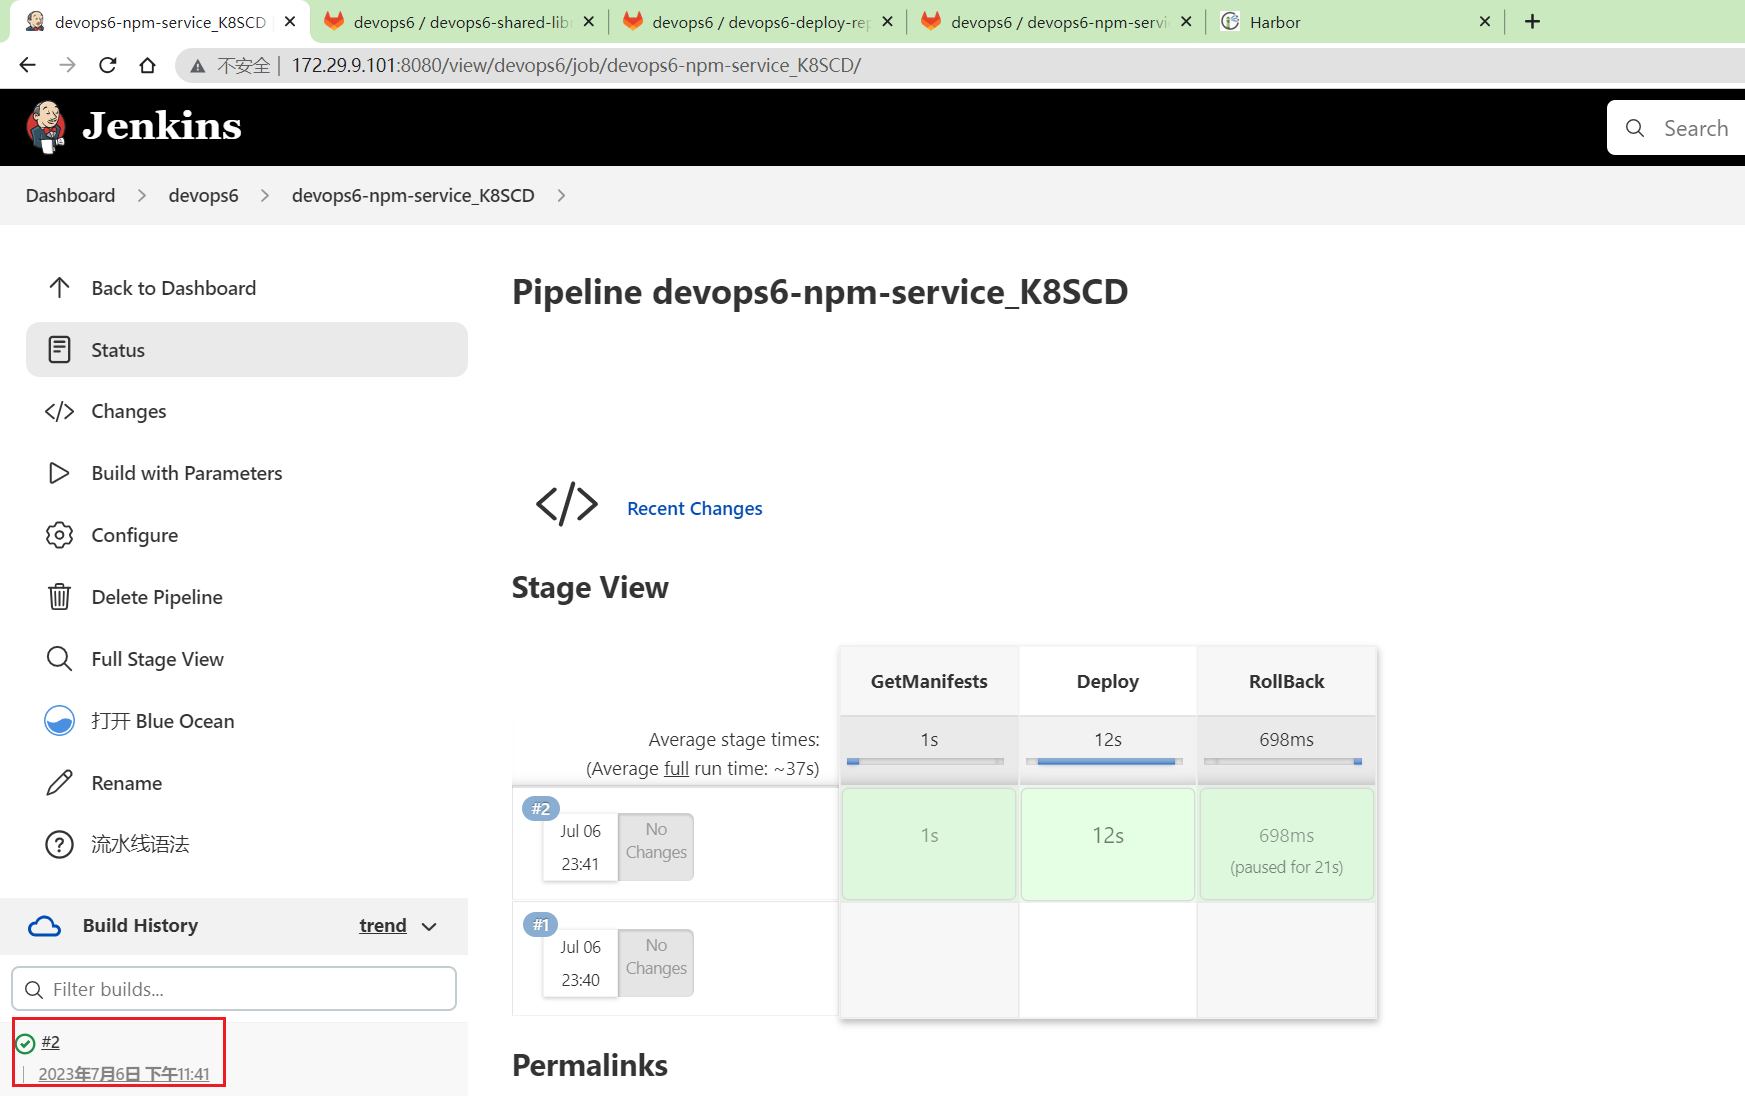
符合预期。
完整代码
完整代码如下:
链接:https://pan.baidu.com/s/1XFtZ0epIwgVwu0jzQHyJkA?pwd=0820 提取码:0820
2023.7.9-day9-k8s-ci-cd (kubectl和helm ci-cd)
CI/CD共享库源码 前端项目 (Dockerfile) K8s清单文件代码仓库 helm chart仓库
环境:
1gitlab-ce:15.0.3-ce.0
2jenkins:2.346.3-2-lts-jdk11
3sonarqube:9.9.0-community
4harbor v2.6.2

k8sci.jenkinsfile文件
  1@Library("devops06@main") _
  2
  3//import src/org/devops/xxx.groovy
  4def checkout = new org.devops.CheckOut()
  5def build = new org.devops.Build()
  6def sonar = new org.devops.Sonar()
  7def mygit = new org.devops.Gitlab()
  8
  9
 10//使用git 参数需要格式化
 11env.branchName = "${env.branchName}" - "origin/"
 12println(env.branchName)
 13
 14pipeline {
 15    agent {label "build"}
 16
 17    //跳过默认的代码检出功能
 18    options {
 19        skipDefaultCheckout true
 20    }
 21
 22
 23    stages{
 24        stage("CheckOut"){
 25            steps{
 26                script{
 27                    checkout.CheckOut()
 28
 29                    //获取commitID
 30                    env.commitID = checkout.GetCommitID()
 31                    println("commitID: ${env.commitID}")
 32
 33                    // Jenkins构建显示信息
 34                    currentBuild.displayName = "第${BUILD_NUMBER}次构建-${env.commitID}"
 35                    currentBuild.description = "构建分支名称:${env.branchName}"
 36                    //currentBuild.description = "Trigger by user jenkins \n branch: ${env.branchName}"
 37                }
 38            }
 39        }
 40
 41        stage("Build"){
 42            steps{
 43                script{
 44                    build.Build()
 45                }
 46            }
 47
 48        }
 49
 50        stage("CodeScan"){
 51            // 是否跳过代码扫描?
 52            when {
 53                environment name: 'skipSonar', value: 'false'
 54            }
 55
 56            steps{
 57                script{
 58                    sonar.SonarScannerByPlugin()
 59
 60                }
 61            }
 62        }
 63
 64        stage("ImageBuild"){
 65            steps{
 66                script{
 67                    //PushArtifactByPlugin()
 68                    //PushArtifactByPluginPOM()
 69
 70                    // init package info
 71                    appName = "${JOB_NAME}".split('_')[0] //devops6-maven-service_CI
 72                    repoName = appName.split('-')[0]   //devops6
 73
 74                    imageName = "${repoName}/${appName}"
 75                    imageTag = "${env.branchName}-${env.commitID}"
 76                    env.fullImageName = "172.29.9.120/${imageName}:${imageTag}"
 77                    sh """
 78                        #登录镜像仓库
 79                        docker login -u admin -p Harbor12345 172.29.9.120
 80
 81                        # 构建镜像
 82                        docker build -t ${env.fullImageName} .
 83
 84                        # 上传镜像
 85                        docker push ${env.fullImageName}
 86
 87                        # 删除镜像
 88                        sleep 2
 89                        docker rmi ${env.fullImageName}
 90                    """
 91                }
 92            }
 93
 94        }
 95
 96        stage("UpdateEnvFile"){
 97            steps{
 98                script {
 99                    // 更新部署文件
100
101                    projectId = 11
102                    fileName = "Deployment.yaml"  //模板文件
103                    branchName = "main"
104
105                    //下载模板文件
106                    fileData = mygit.GetRepoFile(projectId,fileName,branchName)
107                    sh "rm -fr ${fileName}"
108
109                    //模板文件内容保存到本地
110                    writeFile file: fileName , text: fileData
111                    env.deployFile = fileName
112                    //替换镜像
113                    sh "sed -i 's#__IMAGE_NAME__#${env.fullImageName}#g' ${env.deployFile} "
114                    sh "ls -l ; cat ${fileName}"
115
116                    //创建/更新发布文件
117                    newYaml = sh returnStdout: true, script: "cat ${env.deployFile}"
118                    println(newYaml)
119
120                    //更新gitlab文件内容
121                    base64Content = newYaml.bytes.encodeBase64().toString()
122
123                    appName = "${JOB_NAME}".split('_')[0] //devops6-npm-service
124                    env.groupName = appName.split('-')[0]   //devops6
125                    env.projectName = appName
126
127                    // 会有并行问题,同时更新报错
128                    try {
129                        mygit.UpdateRepoFile(projectId,"${env.projectName}%2f${env.branchName}.yaml",base64Content, "main")
130                    } catch(e){
131                        mygit.CreateRepoFile(projectId,"${env.projectName}%2f${env.branchName}.yaml",base64Content, "main")
132                    }
133                }
134            }
135        }
136
137    }
138}
k8scd.jenkinsfile文件:
 1@Library("devops06@main") _
 2
 3def mygit = new org.devops.Gitlab()
 4
 5//使用git 参数需要格式化
 6env.branchName = "${env.branchName}" - "origin/"
 7println(env.branchName)
 8
 9pipeline {
10    agent { label "build"}
11    options {
12        skipDefaultCheckout true
13    }
14    stages{
15        stage("GetManifests"){
16            steps{
17                script{
18
19                   //下载发布文件
20                    projectId = 11
21                    env.deployFile = "${env.branchName}.yaml"  //版本分支RELEASE-2.1.1.yaml
22                    env.appName = "${JOB_NAME}".split('_')[0] //devops6-maven-service
23                    filePath = "${env.appName}%2f${env.deployFile}" //devops6-npm-service/RELEASE-2.1.1.yaml
24                    branchName = "main"
25                    fileData = mygit.GetRepoFile(projectId,filePath,branchName)
26                    sh "rm -fr ${env.deployFile}"
27                    writeFile file: env.deployFile , text: fileData
28                    sh "ls -l ; cat ${env.deployFile}"
29                }
30            }
31        }
32
33        stage("Deploy"){
34            steps{
35                script{
36                    env.namespace = "${env.appName}".split('-')[0]   //devops6
37
38                    sh """
39                        ## 发布应用
40                        kubectl apply -f ${env.deployFile} -n ${env.namespace}
41
42                    """
43
44                    // 获取应用状态
45                    5.times{
46                        sh "sleep 2; kubectl -n ${env.namespace} get pod | grep ${env.appName}"
47                    }
48                }
49            }
50        }
51
52        stage("RollBack"){
53            input {
54                message "是否进行回滚"
55                ok "提交"
56                submitter ""
57                parameters {
58                    choice(choices: ['yes', 'no'], name: 'opts')
59                }
60            }
61            steps{
62                script{
63                    switch("${opts}") {
64                        case "yes":
65                            sh "kubectl rollout undo deployment/${env.appName} -n ${env.namespace} "
66                            break
67                        case "no":
68                            break
69                    }
70                }
71            }
72        }
73    }
74}
2、Helm CI/CD流水线

环境准备
删除devops6命名空间
1[root@Devops6 ~]#kubectl delete ns devops6
集群安装helm
 1[root@Devops6 ~]#tar xf helm-v3.7.2-linux-amd64.tar.gz
 2[root@Devops6 ~]#cd linux-amd64/
 3[root@Devops6 linux-amd64]#cp helm /usr/bin/
 4[root@Devops6 linux-amd64]#chmod +x  /usr/bin/helm
 5[root@Devops6 linux-amd64]#helm version
 6WARNING: Kubernetes configuration file is group-readable. This is insecure. Location: /root/.kube/config
 7WARNING: Kubernetes configuration file is world-readable. This is insecure. Location: /root/.kube/config
 8version.BuildInfo{Version:"v3.7.2", GitCommit:"663a896f4a815053445eec4153677ddc24a0a361", GitTreeState:"clean", GoVersion:"go1.16.10"}
 9[root@Devops6 linux-amd64]#helm repo add stable http://mirror.azure.cn/kubernetes/charts/
10WARNING: Kubernetes configuration file is group-readable. This is insecure. Location: /root/.kube/config
11WARNING: Kubernetes configuration file is world-readable. This is insecure. Location: /root/.kube/config
12"stable" has been added to your repositories
13[root@Devops6 linux-amd64]# helm repo list
14WARNING: Kubernetes configuration file is group-readable. This is insecure. Location: /root/.kube/config
15WARNING: Kubernetes configuration file is world-readable. This is insecure. Location: /root/.kube/config
16NAME  	URL
17stable	http://mirror.azure.cn/kubernetes/charts/
18[root@Devops6 linux-amd64]#echo "source <(helm completion bash)" >> ~/.bashrc
19[root@Devops6 linux-amd64]#source ~/.bashrc
20WARNING: Kubernetes configuration file is group-readable. This is insecure. Location: /root/.kube/config
21WARNING: Kubernetes configuration file is world-readable. This is insecure. Location: /root/.kube/config
22[root@Devops6 linux-amd64]#helm list
23WARNING: Kubernetes configuration file is group-readable. This is insecure. Location: /root/.kube/config
24WARNING: Kubernetes configuration file is world-readable. This is insecure. Location: /root/.kube/config
25NAME	NAMESPACE	REVISION	UPDATED	STATUS	CHART	APP VERSION
26[root@Devops6 linux-amd64]#
- 具体安装文档参考链接:

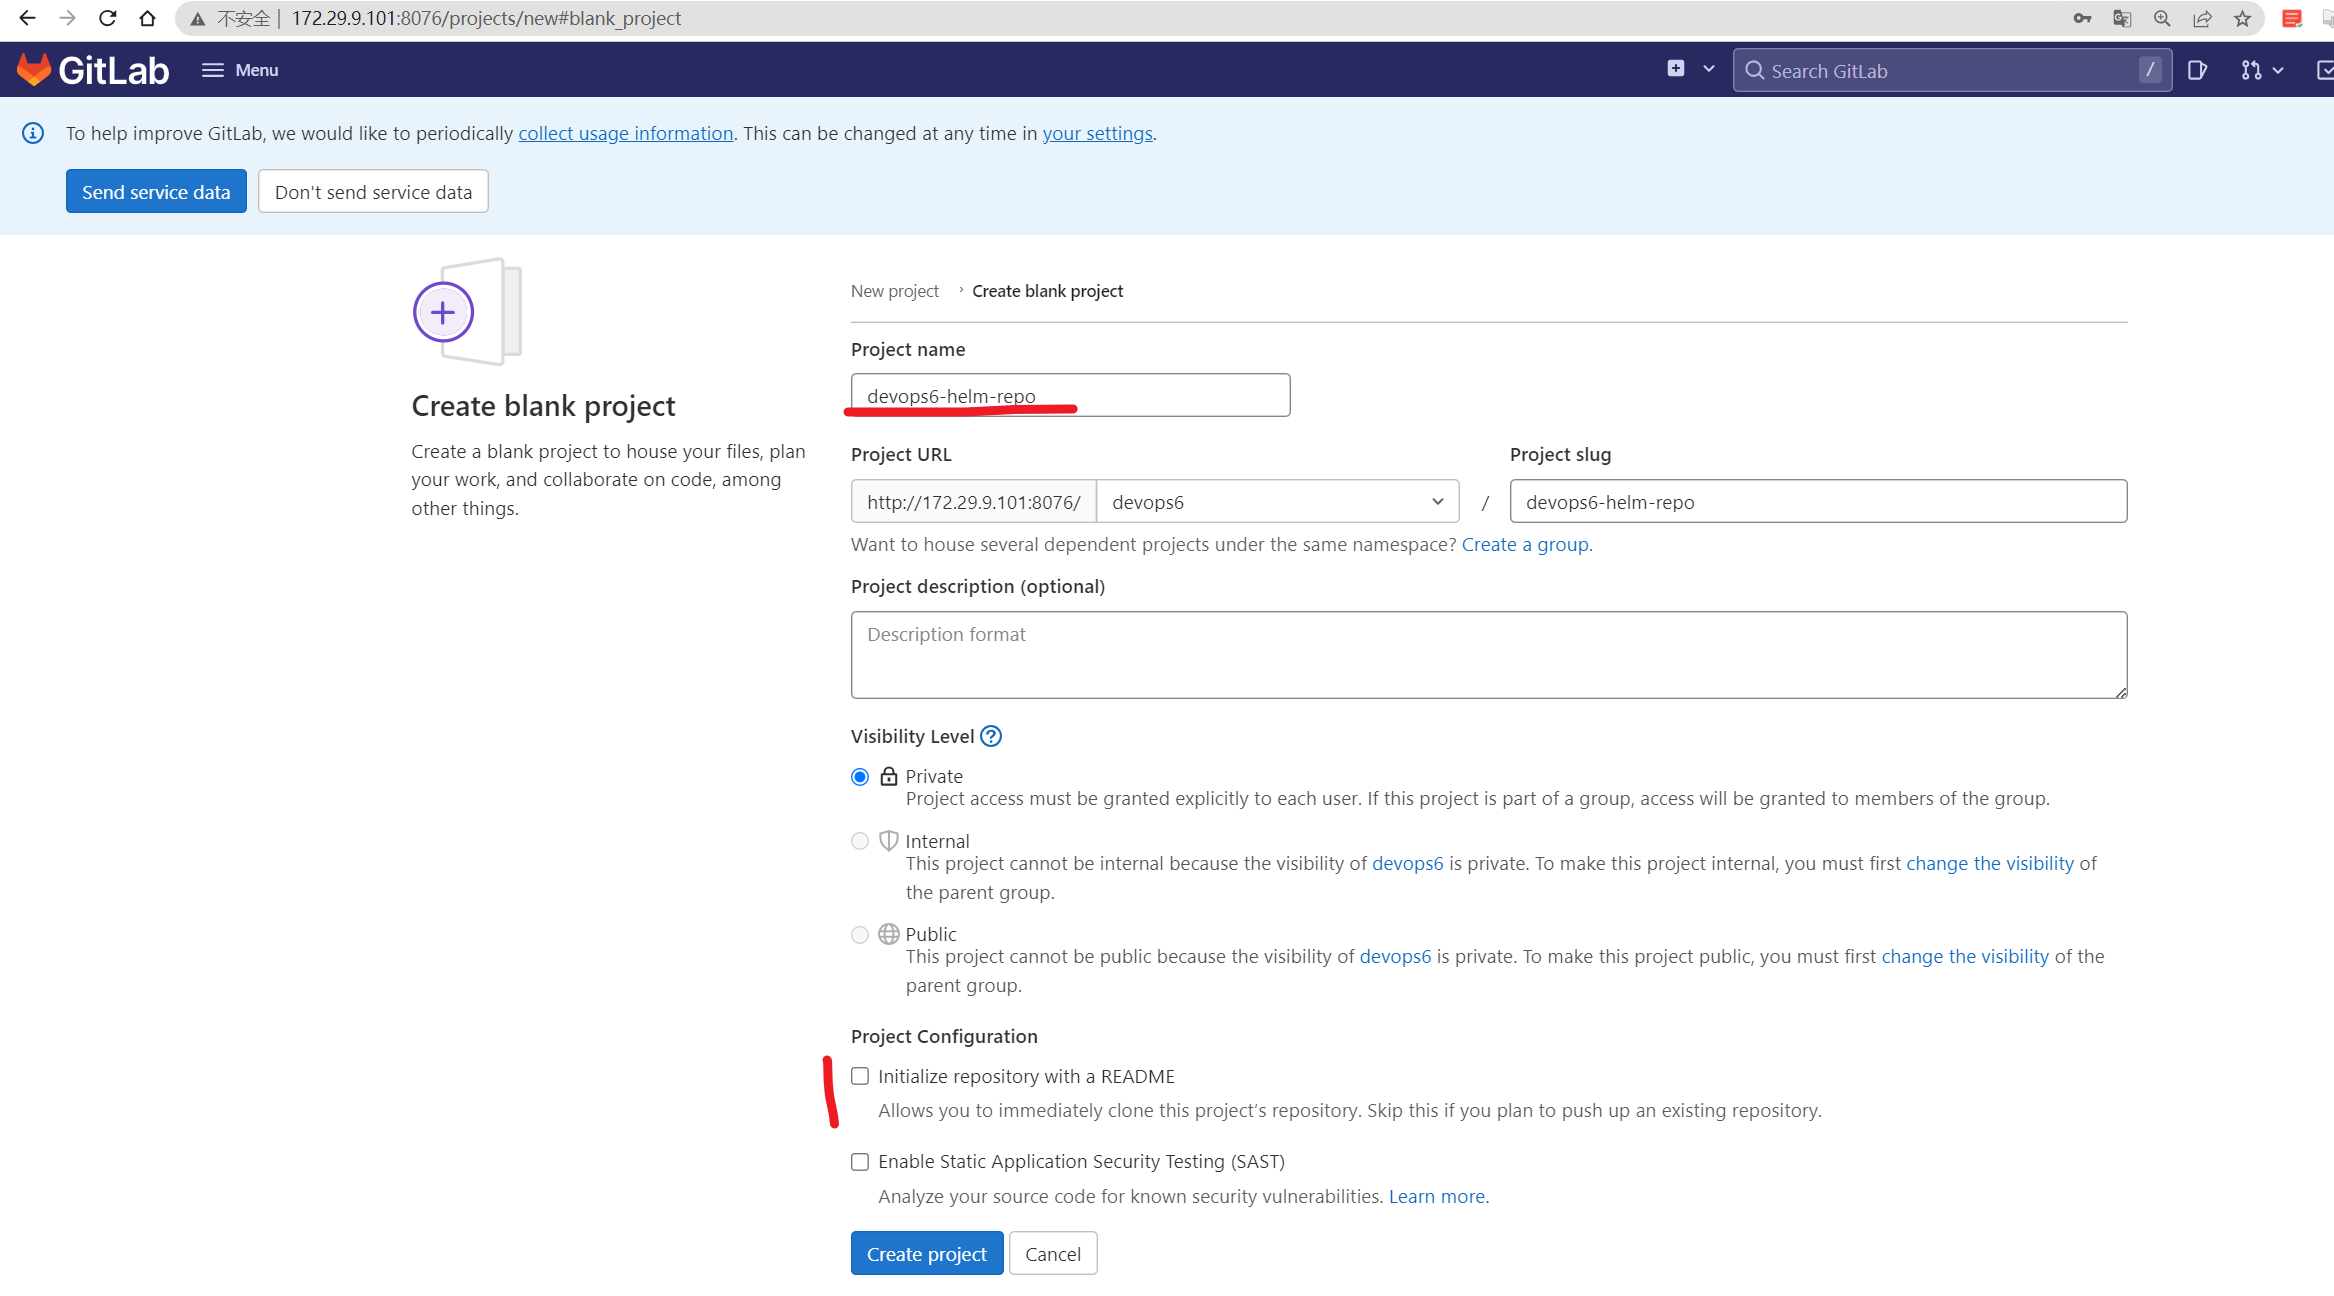
创建helm仓库
devops6-helm-repo
helm手动安装包
- 生成helm chart
1[root@Devops6 ~]#helm create devops6-npm-service
2WARNING: Kubernetes configuration file is group-readable. This is insecure. Location: /root/.kube/config
3WARNING: Kubernetes configuration file is world-readable. This is insecure. Location: /root/.kube/config
4Creating devops6-npm-service
5[root@Devops6 ~]#cd devops6-npm-service/
6[root@Devops6 devops6-npm-service]#ls
7charts  Chart.yaml  templates  values.yaml
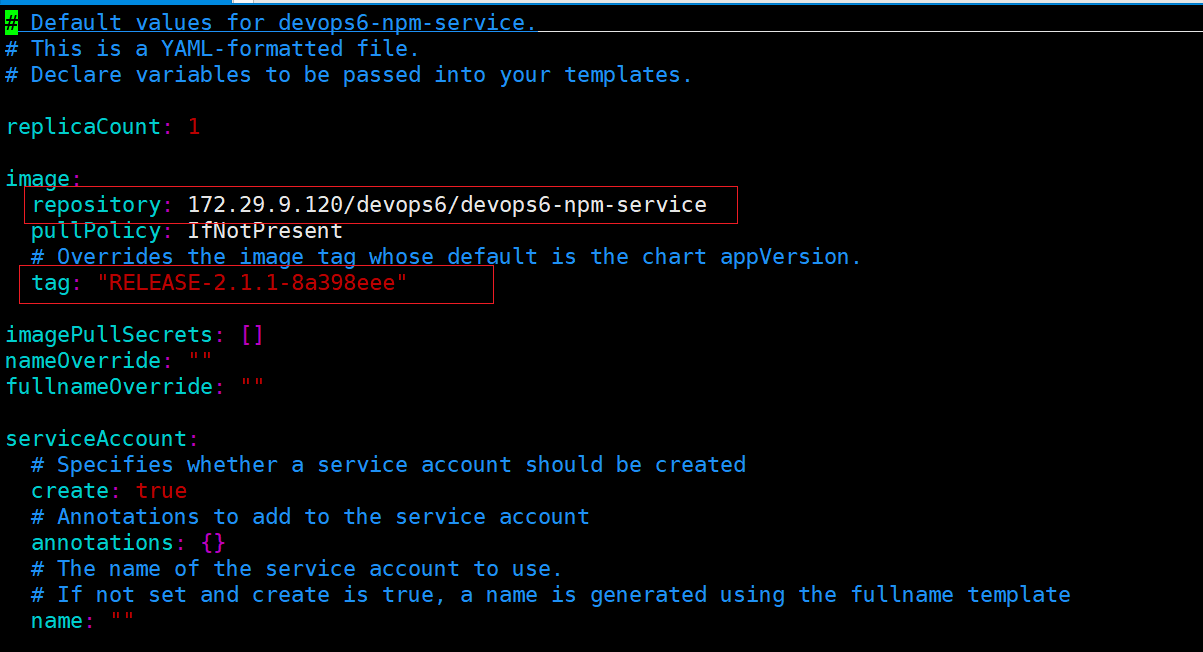
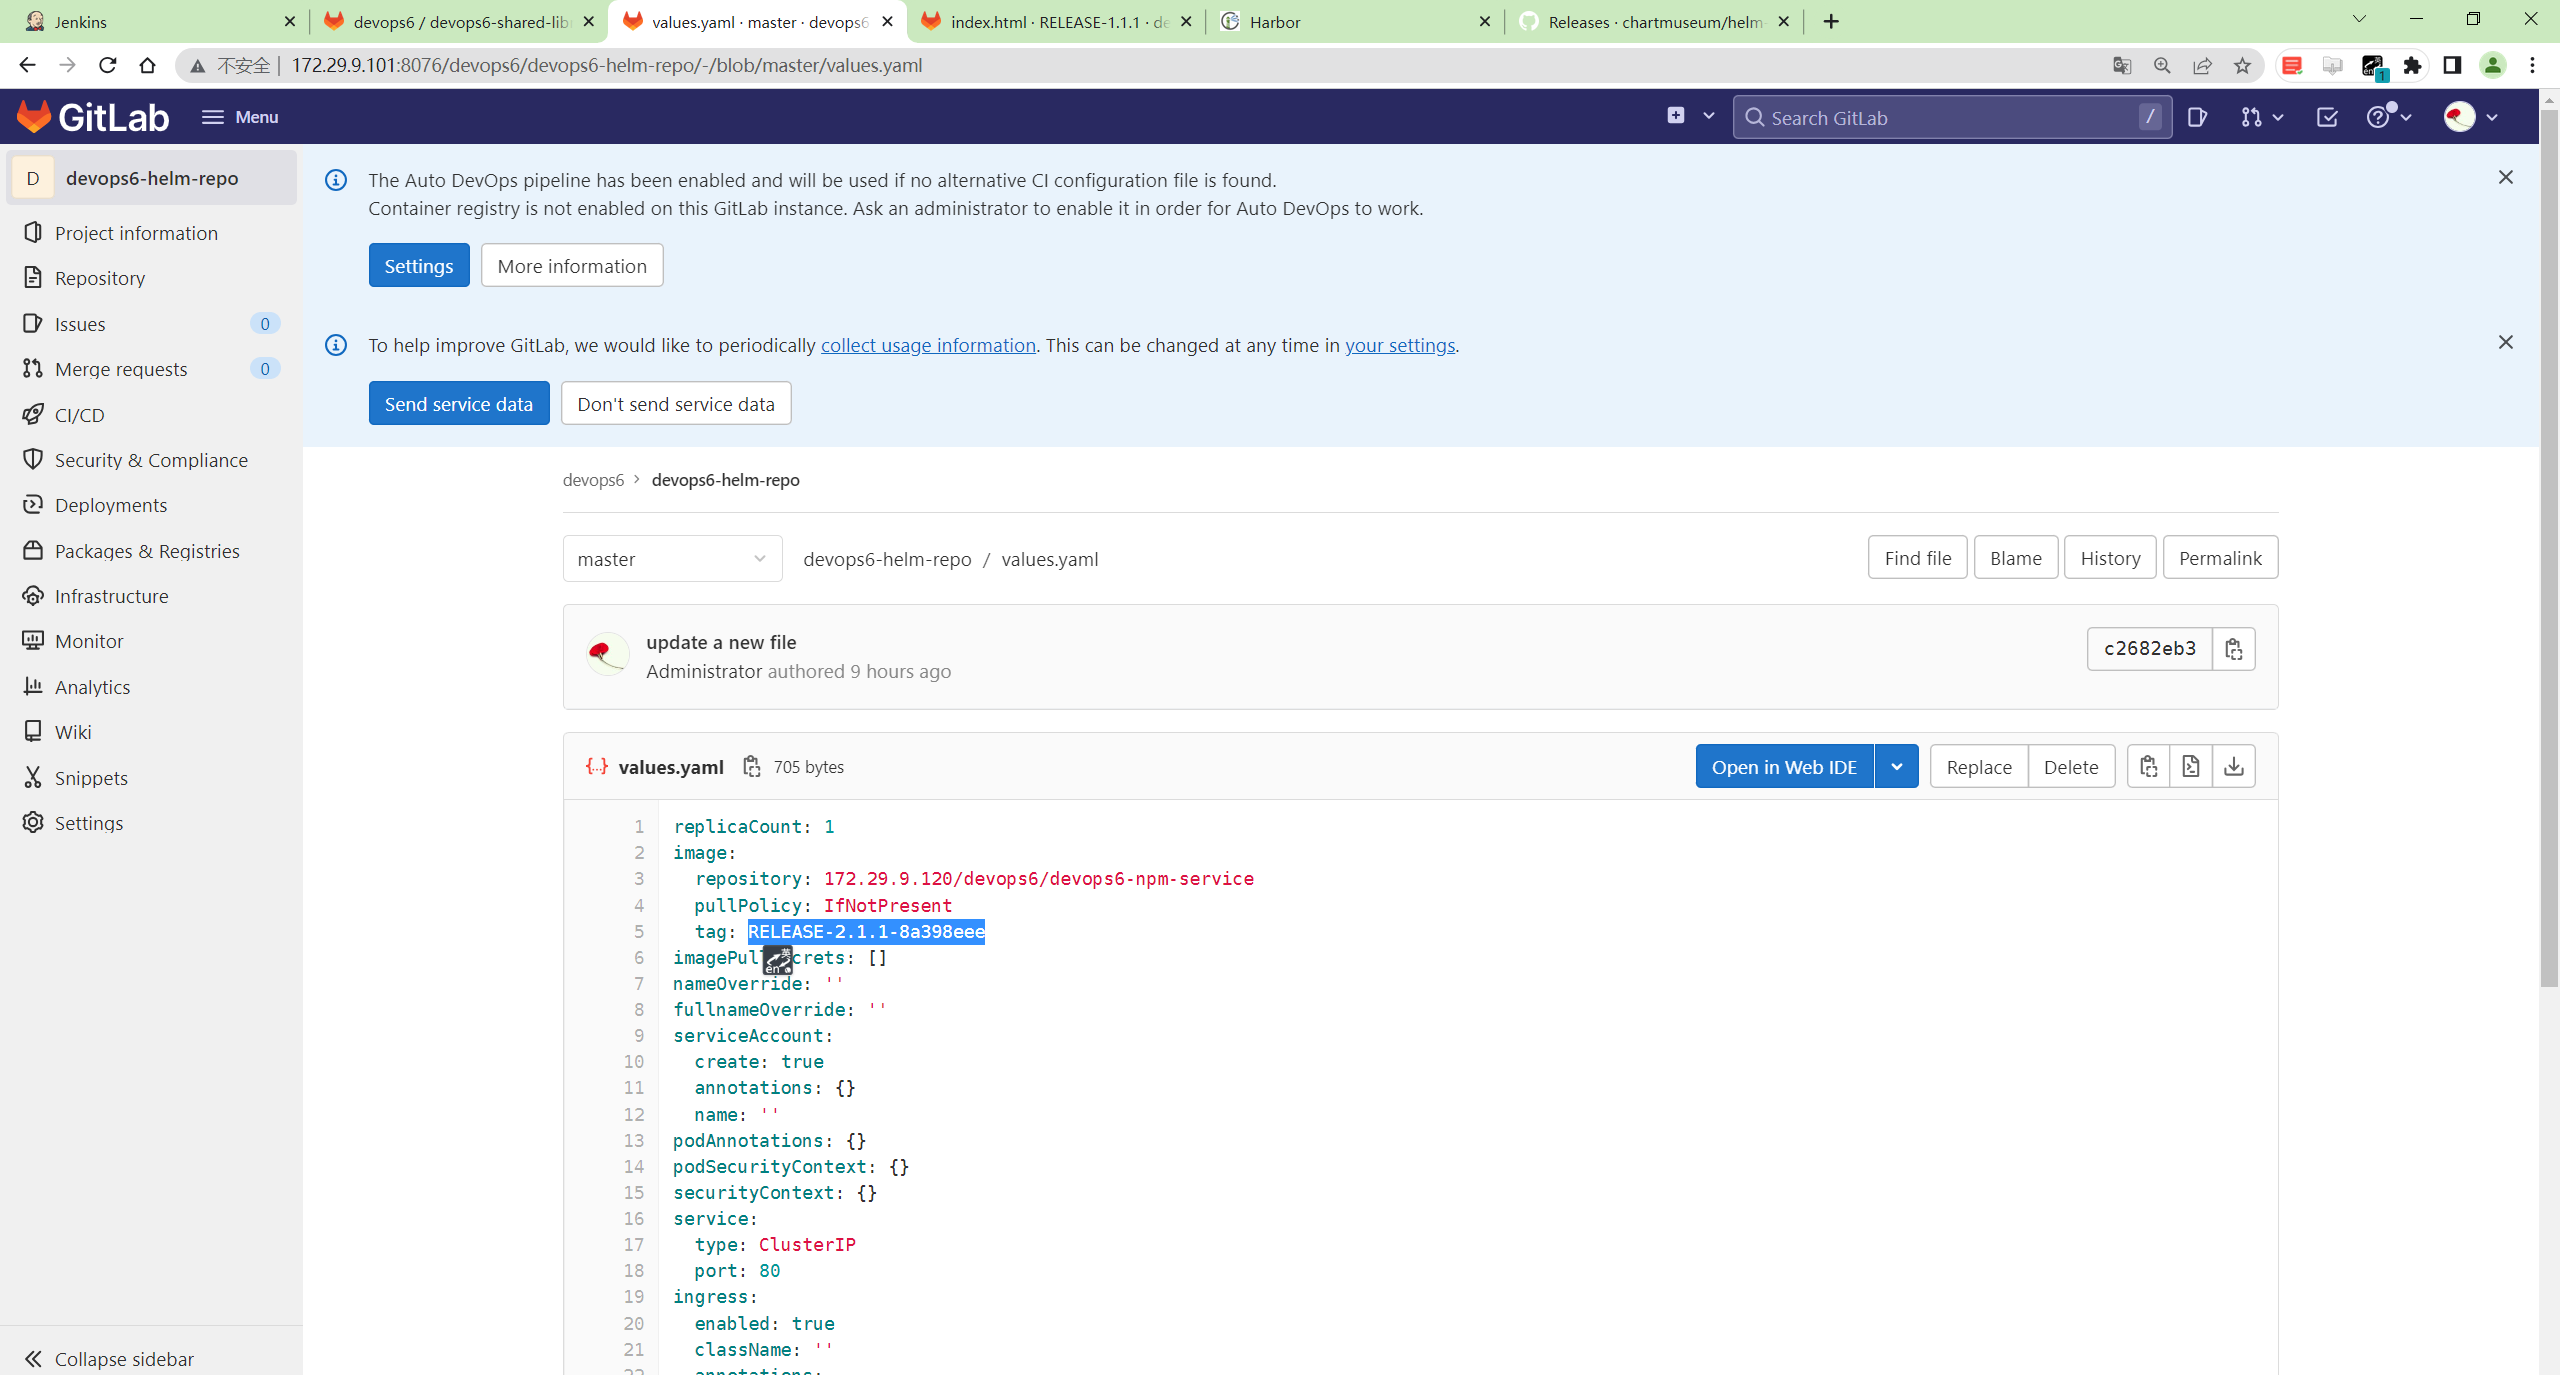
- 编辑
values.yaml
修改如下2处地方:
 1[root@Devops6 devops6-npm-service]#vim values.yaml
 2image:
 3  repository: 172.29.9.120/devops6/devops6-npm-service
 4  pullPolicy: IfNotPresent
 5  # Overrides the image tag whose default is the chart appVersion.
 6  tag: "RELEASE-2.1.1-8a398eee"
 7
 8……
 9ingress:
10  enabled: true
11  className: ""
12  annotations:
13    kubernetes.io/ingress.class: nginx
14    # kubernetes.io/tls-acme: "true"
15  hosts:
16    - host: devops.test.com
17      paths:
18        - path: /
19          pathType: Prefix

- 生成部署文件
1[root@Devops6 devops6-npm-service]#helm template --output-dir manifests .
2WARNING: Kubernetes configuration file is group-readable. This is insecure. Location: /root/.kube/config
3WARNING: Kubernetes configuration file is world-readable. This is insecure. Location: /root/.kube/config
4wrote manifests/devops6-npm-service/templates/serviceaccount.yaml
5wrote manifests/devops6-npm-service/templates/service.yaml
6wrote manifests/devops6-npm-service/templates/deployment.yaml
7wrote manifests/devops6-npm-service/templates/ingress.yaml
8wrote manifests/devops6-npm-service/templates/tests/test-connection.yaml
- 部署
 1[root@Devops6 devops6-npm-service]#helm install devops6-npm-service . -ndevops6 --create-namespace
 2WARNING: Kubernetes configuration file is group-readable. This is insecure. Location: /root/.kube/config
 3WARNING: Kubernetes configuration file is world-readable. This is insecure. Location: /root/.kube/config
 4NAME: devops6-npm-service
 5LAST DEPLOYED: Sat Jul  8 10:57:40 2023
 6NAMESPACE: devops6
 7STATUS: deployed
 8REVISION: 1
 9NOTES:
101. Get the application URL by running these commands:
11  http://devops.test.com/
- 验证
 1[root@Devops6 devops6-npm-service]#kubectl get po -ndevops6
 2NAME                                   READY   STATUS    RESTARTS   AGE
 3devops6-npm-service-7bcb6c49b5-rls6f   1/1     Running   0          28s
 4
 5[root@Devops6 devops6-npm-service]#watch -n 1 "curl -s devops.test.com"
 6Every 1.0s: curl -s devops.test.com             Sat Jul  8 10:58:46 2023
 7<!DOCTYPE html>
 8<html>
 9  <head>
10    <meta charset="utf-8">
11    <meta name="viewport" content="width=device-width,initial-scale=1.0">
12    <title>vuedemo</title>
13  </head>
14  <body>
15    <div id="app">
16      <h1>VERSION: RELEASE-2.1.1</h1>
17    </div>
18    <!-- built files will be auto injected -->
19  </body>
20</html>
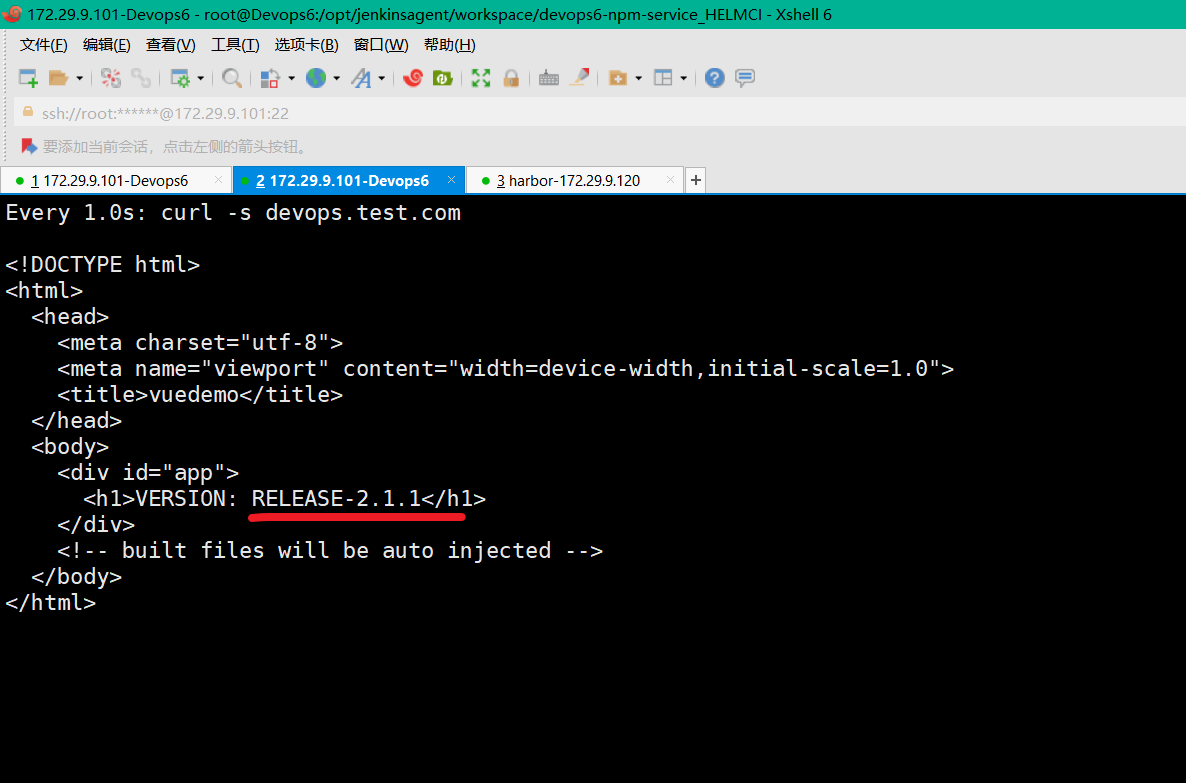
部署成功。
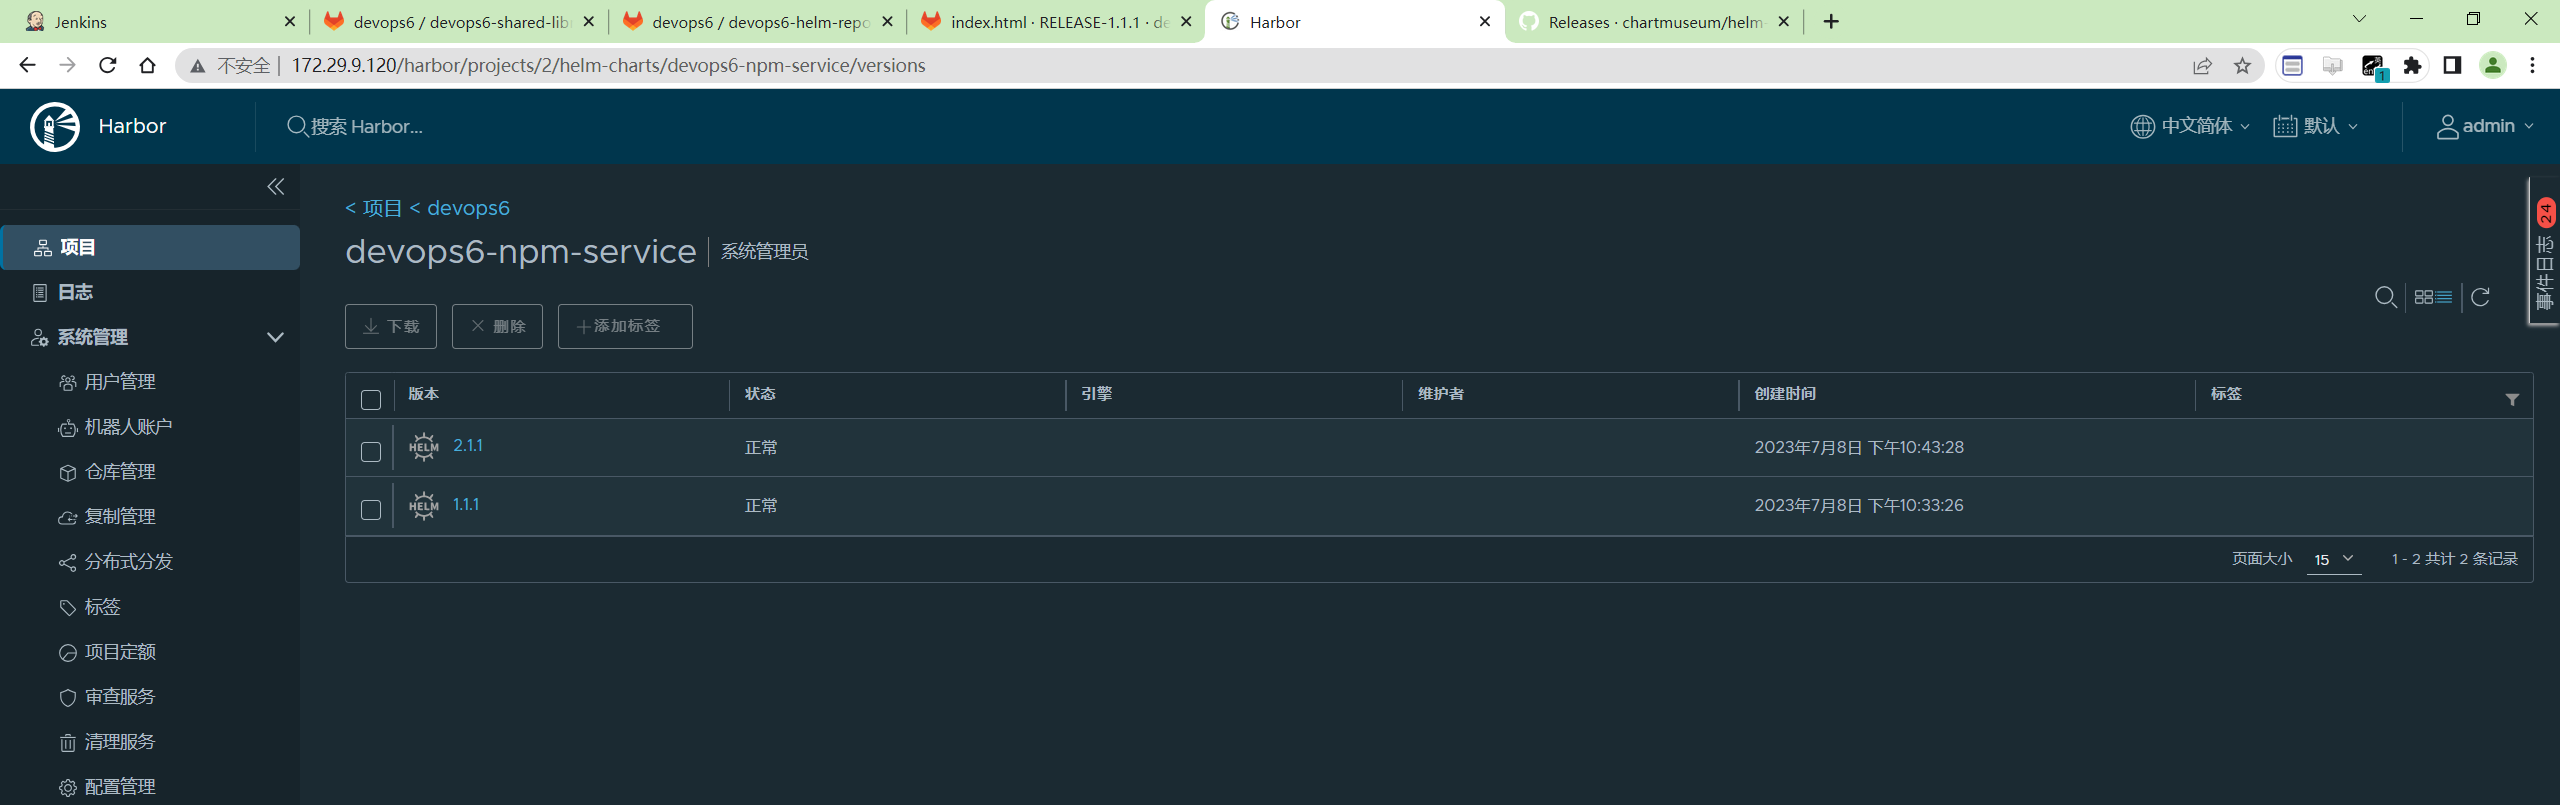
- 将次helm chart推送到刚才创建的helm仓库
 1#先删除manifests目录
 2[root@Devops6 devops6-npm-service]#pwd
 3/root/devops6-npm-service
 4[root@Devops6 devops6-npm-service]#ls
 5charts  Chart.yaml  manifests  templates  values.yaml
 6[root@Devops6 devops6-npm-service]#rm -rf manifests/
 7
 8#推送 (注意:这次试验这里是master分支)
 9cd existing_folder
10git init
11git remote add origin http://172.29.9.101:8076/devops6/devops6-helm-repo.git
12git add .
13git commit -m "Initial commit"
14git push -u origin master
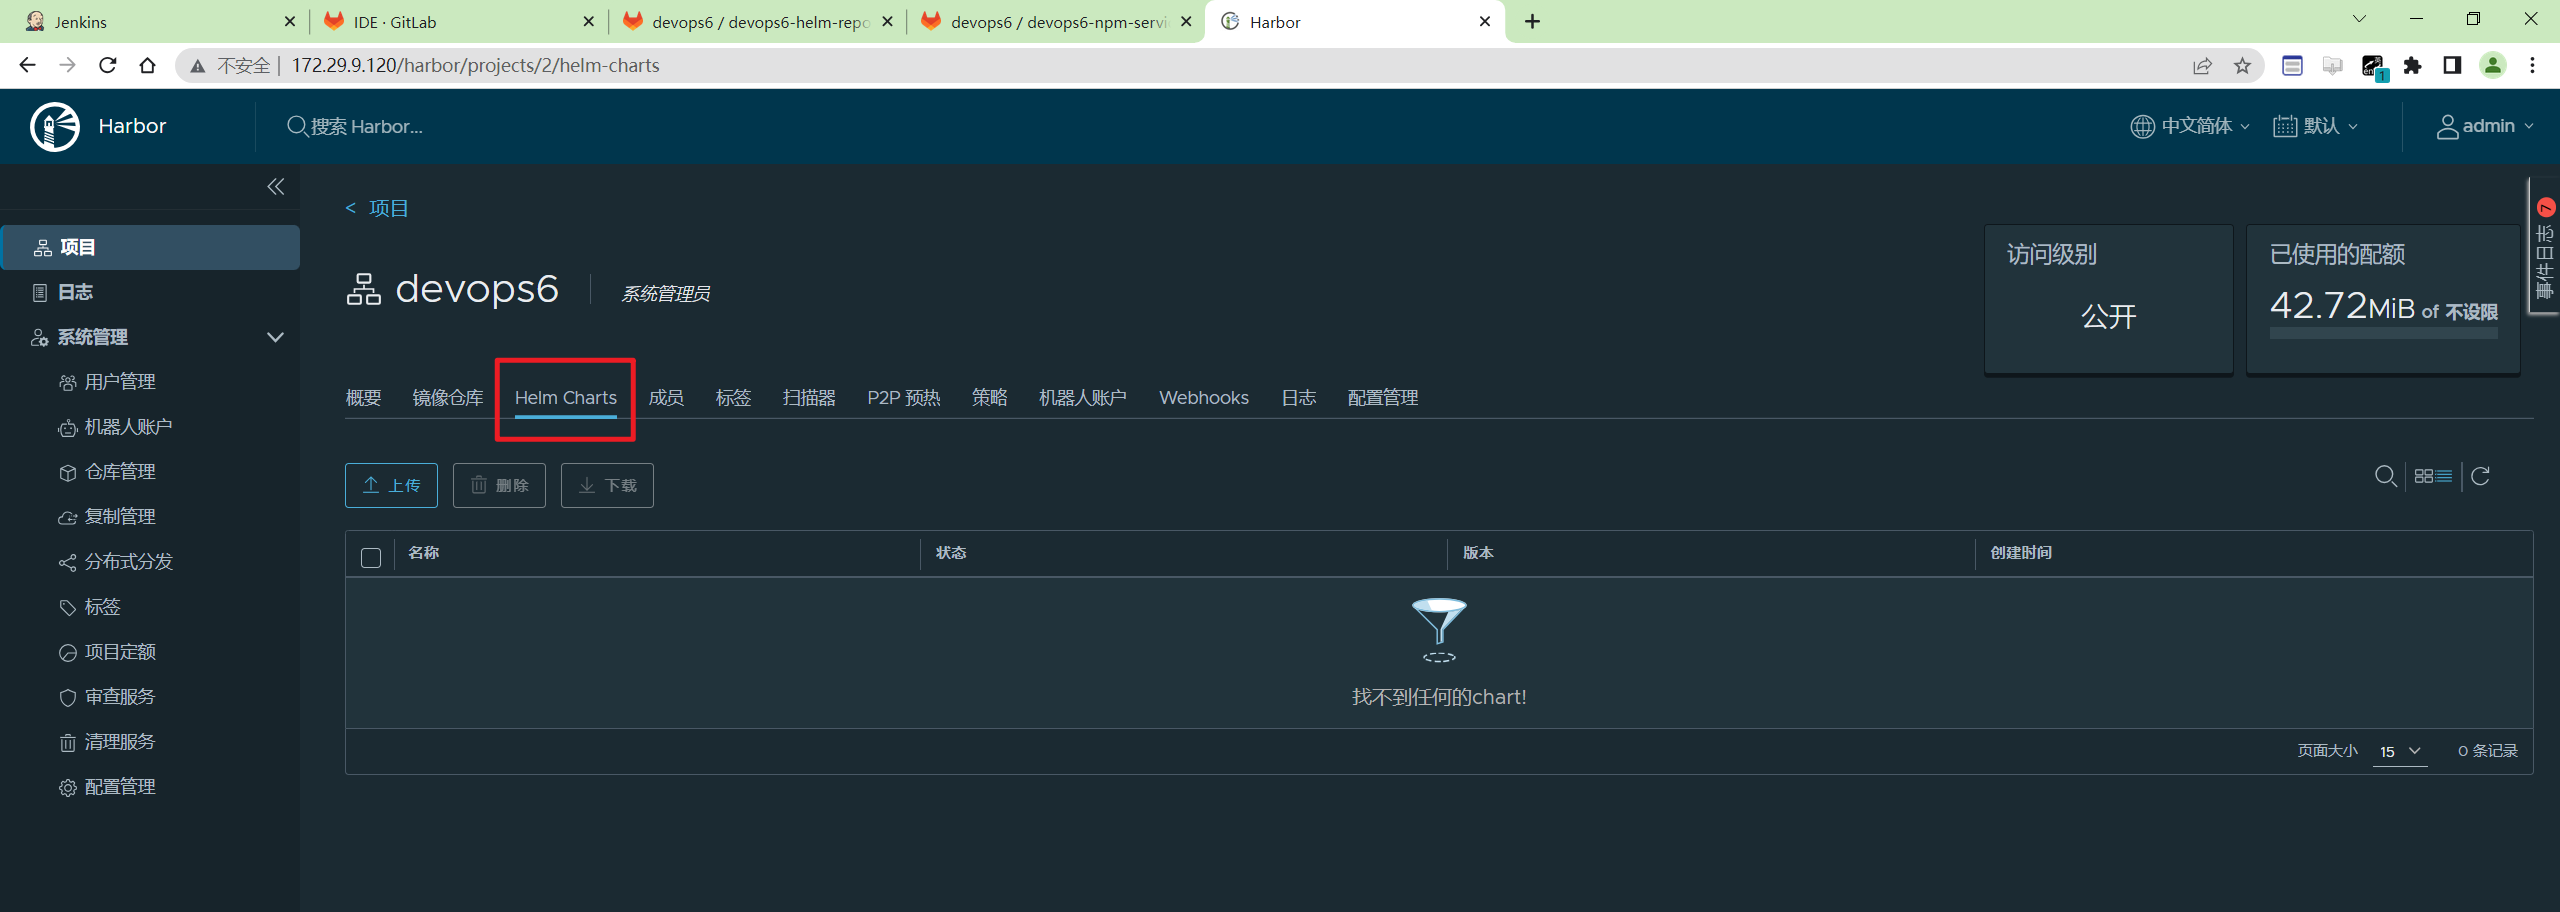
harbor上开启helm chart
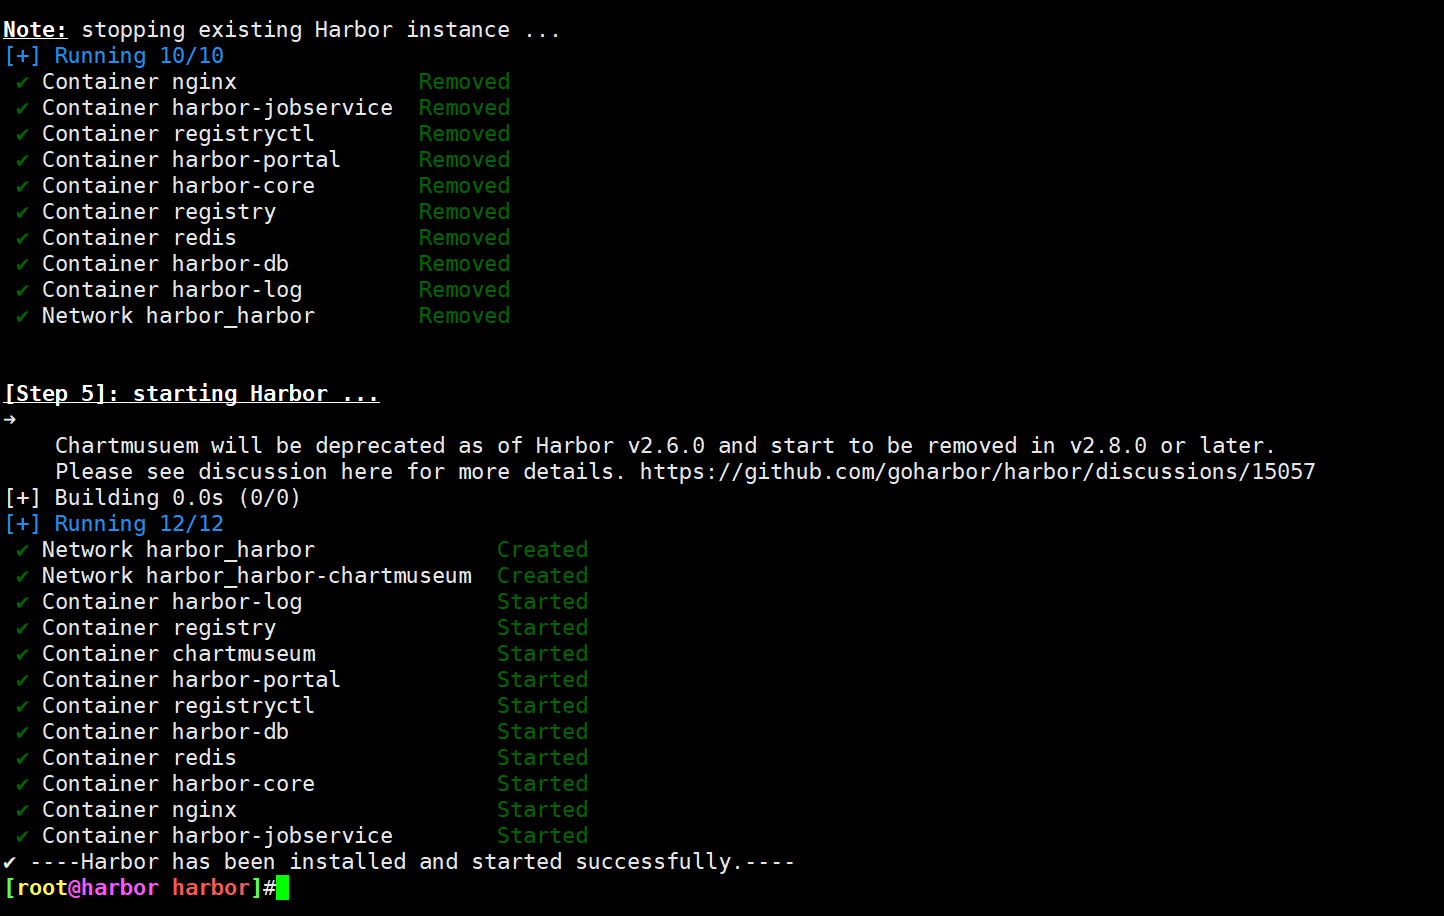
- 默认harbor没有helm chart功能,需要另外配置下才行
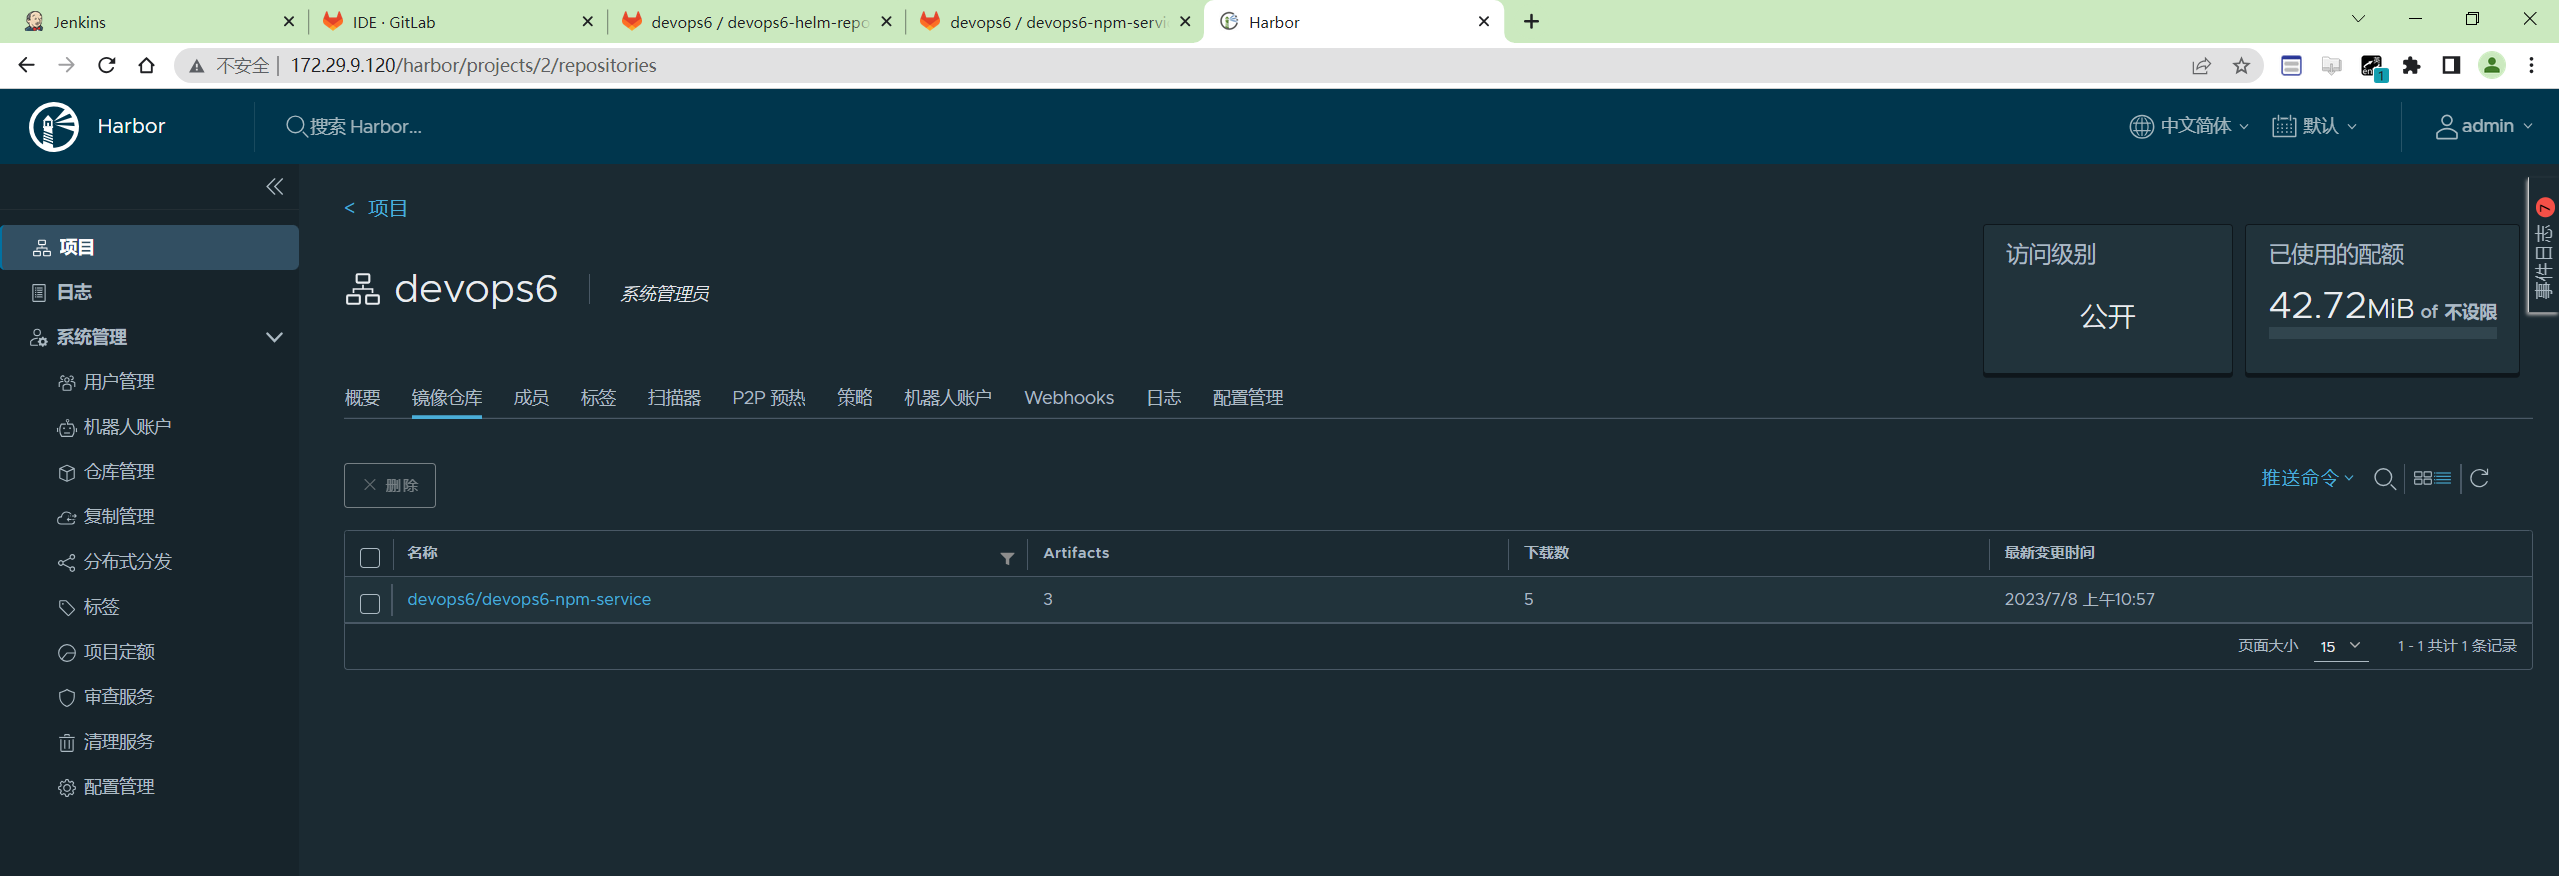
- 配置
1开启helm charts
2./install.sh  --with-chartmuseum
3helm repo add devops6repo http://172.29.9.120/chartrepo/devops6/  --username=admin --password=Harbor12345

配置完后,harbor界面就出现了helm chart选项了:
添加过程:
 1[root@Devops6 devops6-npm-service]#helm repo list
 2WARNING: Kubernetes configuration file is group-readable. This is insecure. Location: /root/.kube/config
 3WARNING: Kubernetes configuration file is world-readable. This is insecure. Location: /root/.kube/config
 4NAME  	URL
 5stable	http://mirror.azure.cn/kubernetes/charts/
 6[root@Devops6 devops6-npm-service]#helm repo add devops6repo http://172.29.9.120/chartrepo/devops6/  --username=admin --password=Harbor12345
 7WARNING: Kubernetes configuration file is group-readable. This is insecure. Location: /root/.kube/config
 8WARNING: Kubernetes configuration file is world-readable. This is insecure. Location: /root/.kube/config
 9"devops6repo" has been added to your repositories
10[root@Devops6 devops6-npm-service]#helm repo list
11WARNING: Kubernetes configuration file is group-readable. This is insecure. Location: /root/.kube/config
12WARNING: Kubernetes configuration file is world-readable. This is insecure. Location: /root/.kube/config
13NAME       	URL
14stable     	http://mirror.azure.cn/kubernetes/charts/
15devops6repo	http://172.29.9.120/chartrepo/devops6/
helm安装cm-push软件
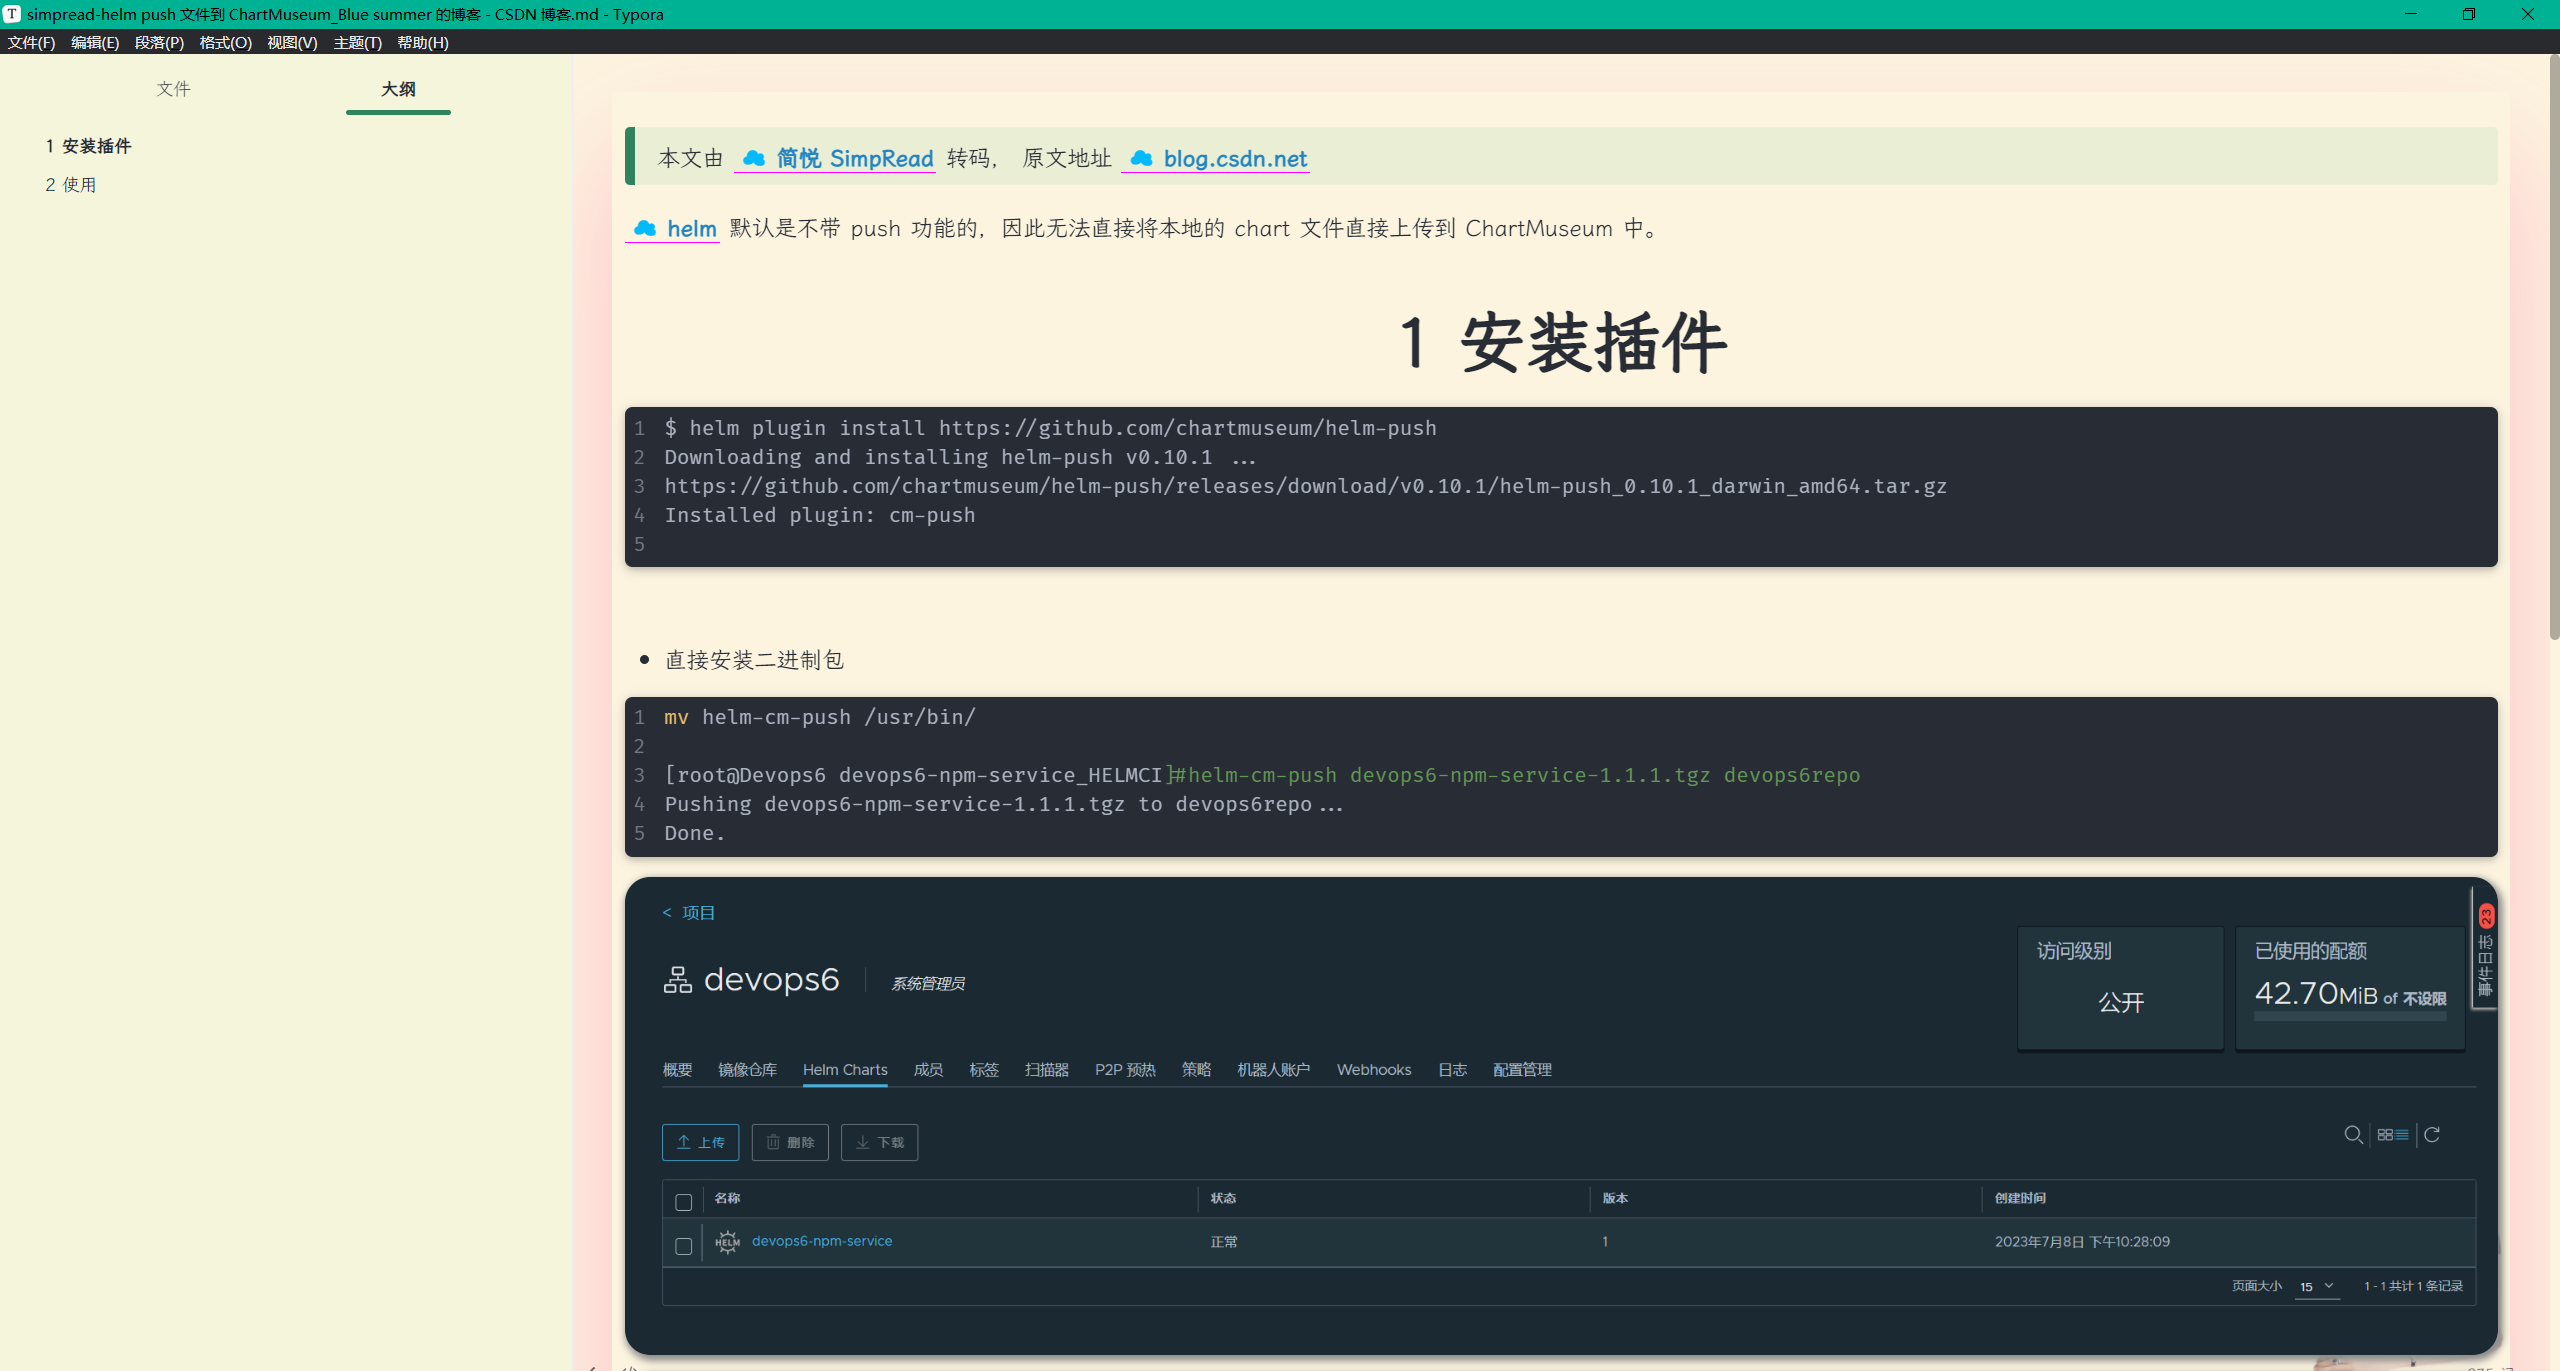
CI pipeline
pipeline代码
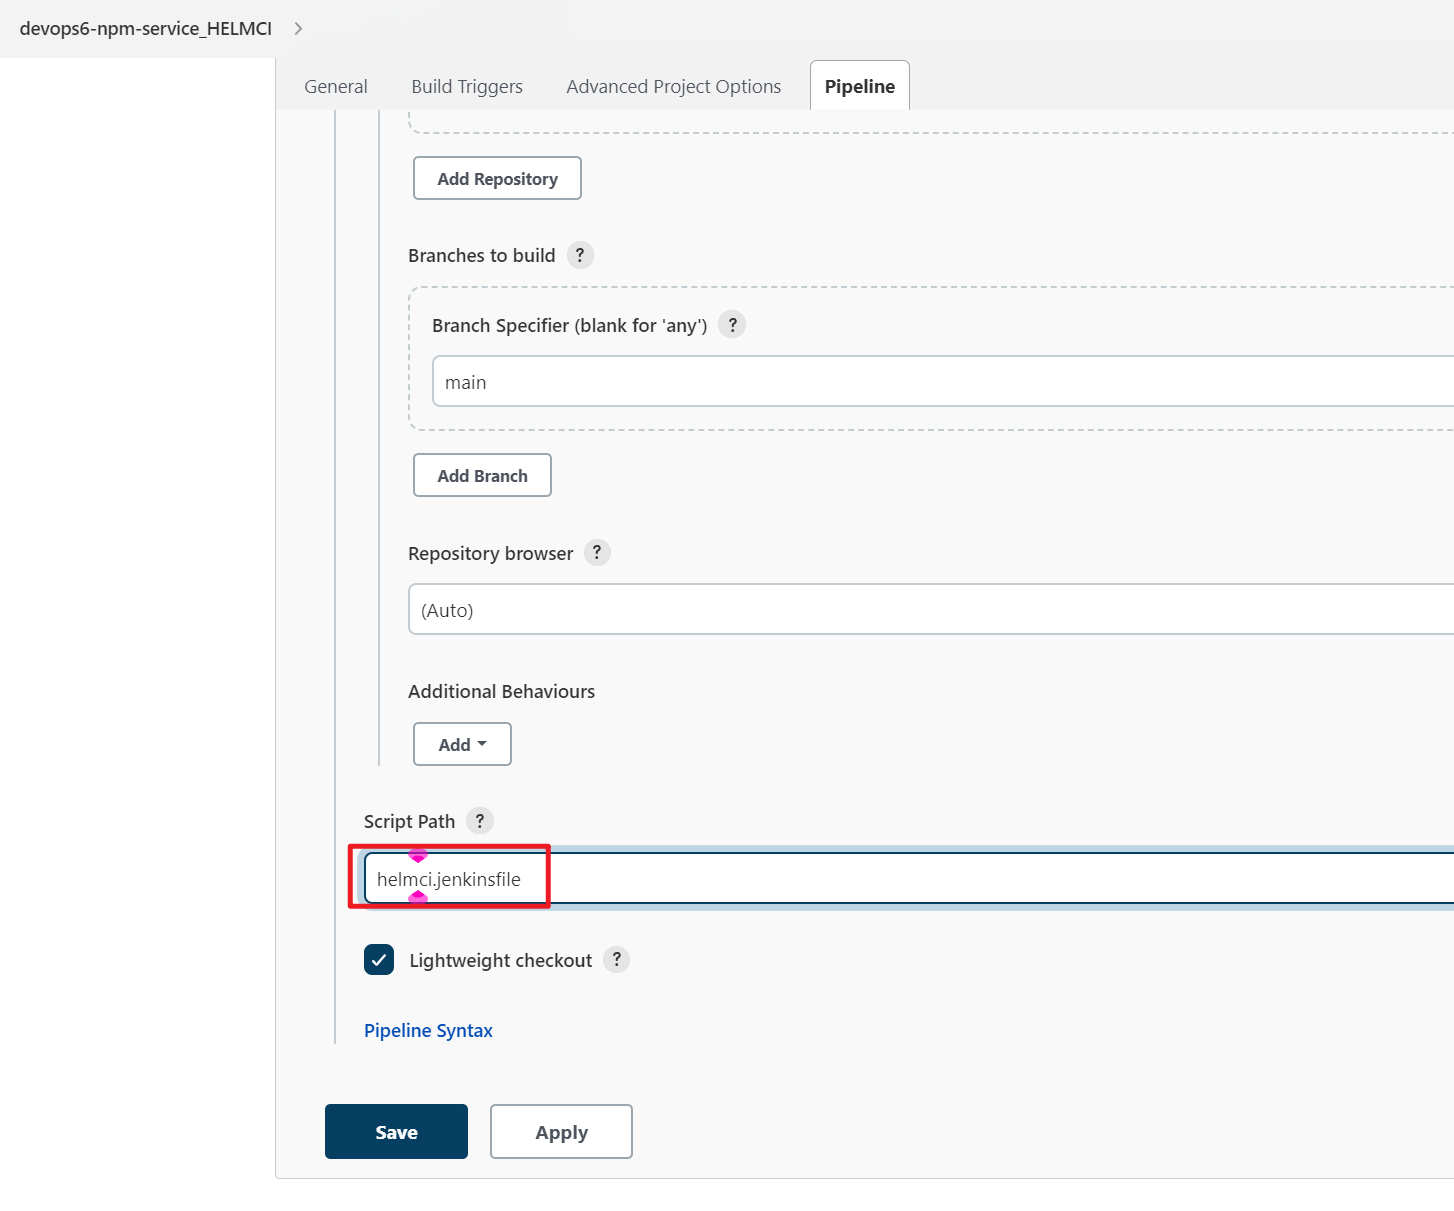
创建CI 流水线
- 以
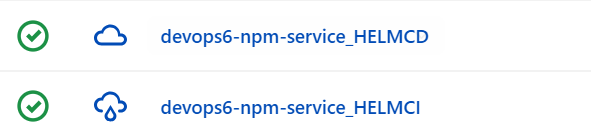
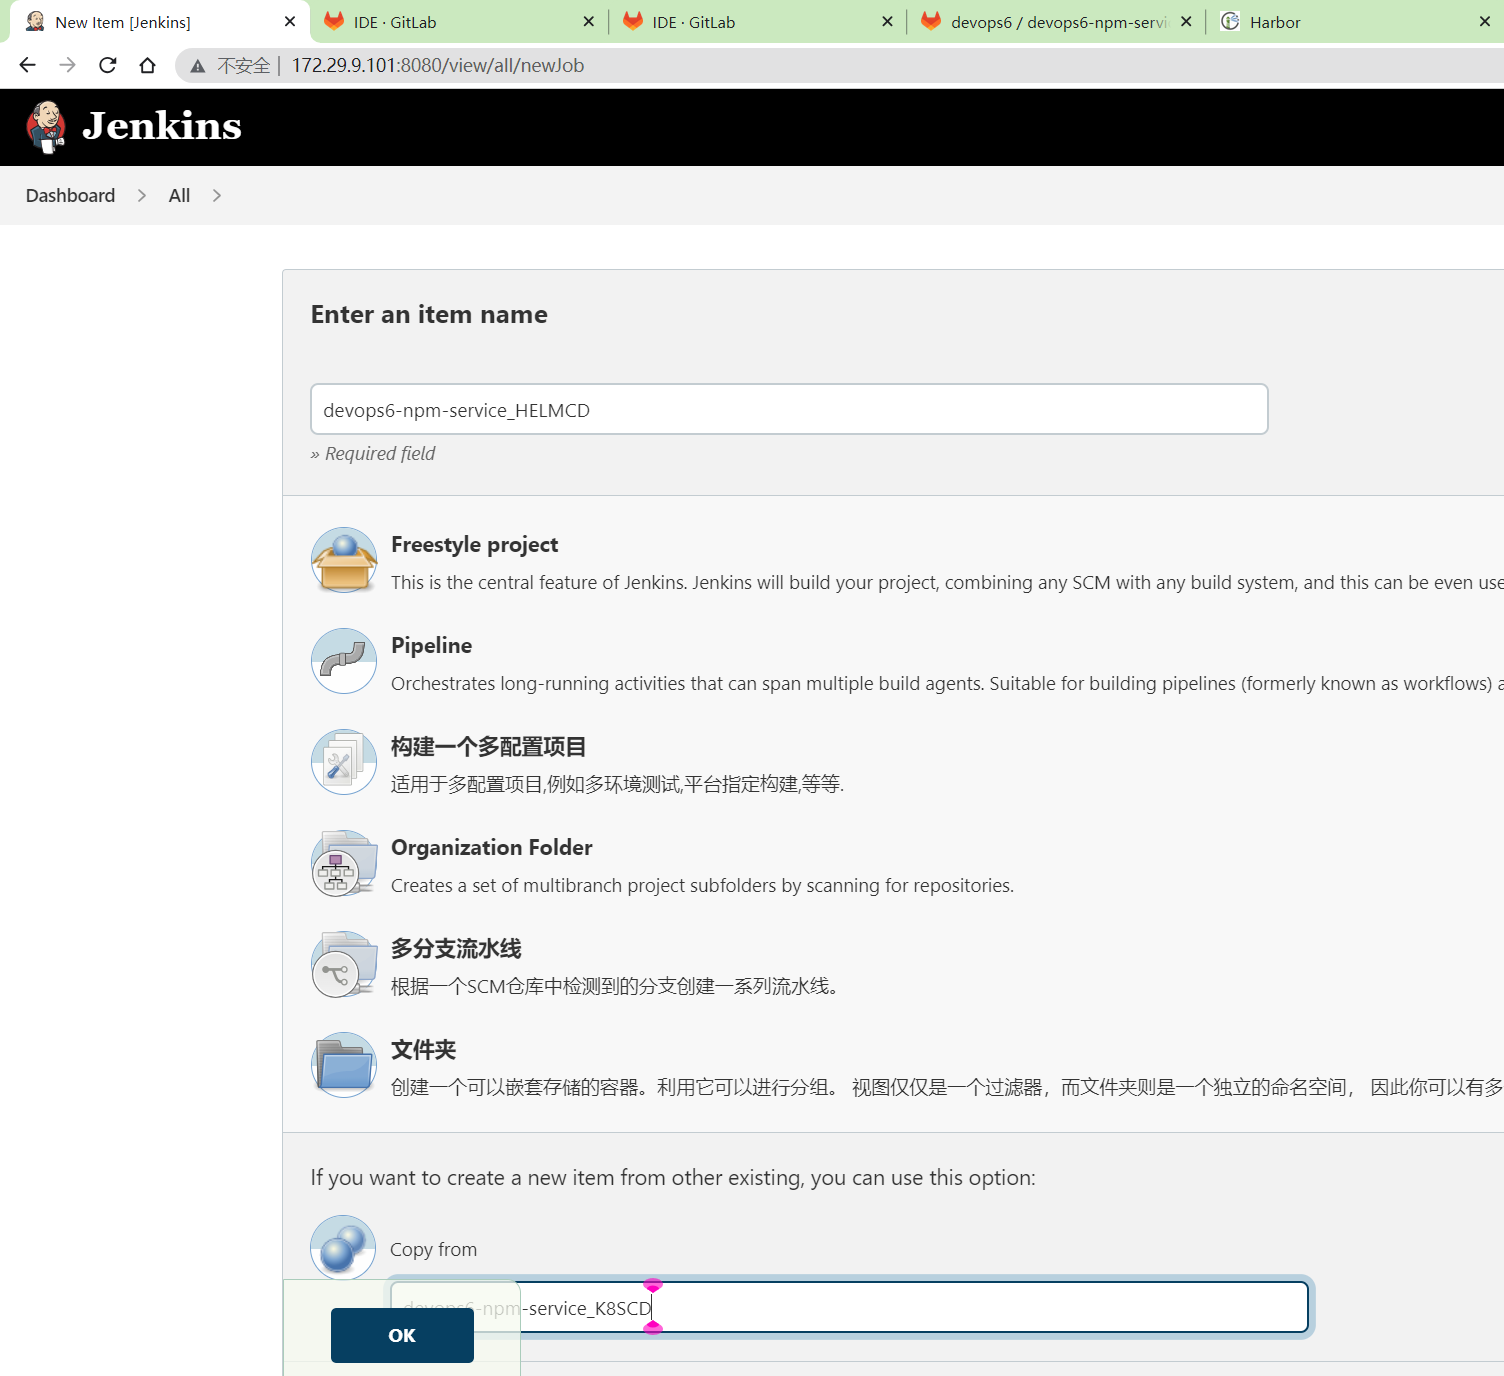
devops6-npm-service_K8SCI为基础新创建devops6-npm-service_HELMCI项目

修改为helmci.jenkinsfile。
- 最终

CI 测试

CD pipeline
pipeline代码
创建CD流水线
- 以
devops6-npm-service_K8SCD为基础新创建devops6-npm-service_HELMCD项目
修改为helmcd.jenkinsfile
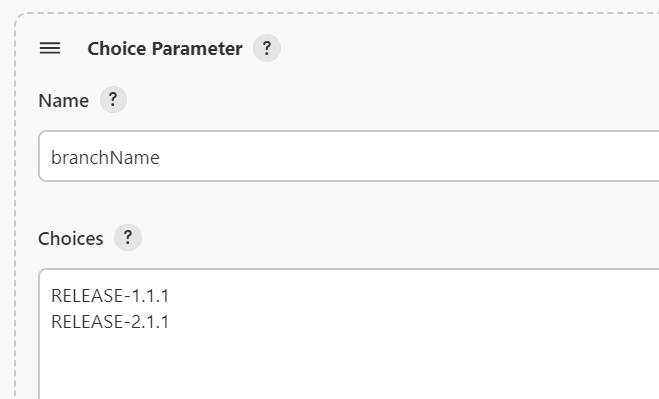
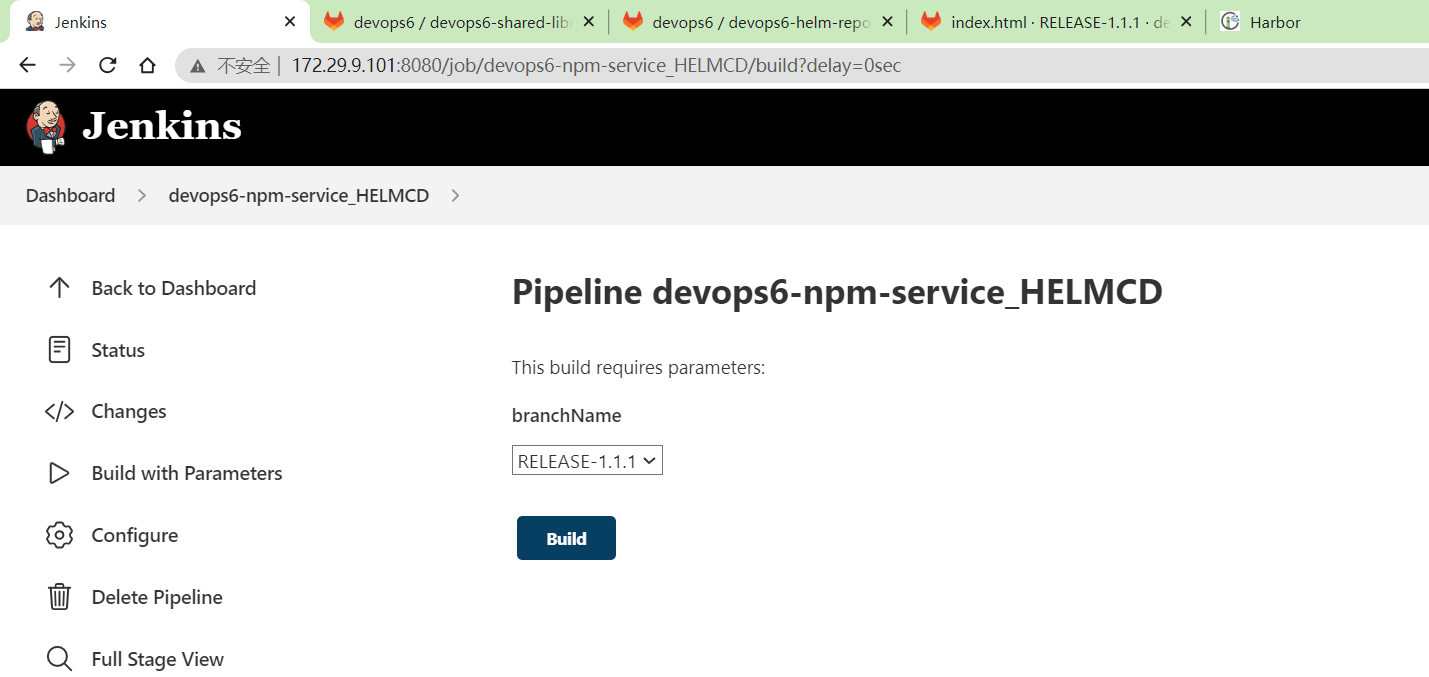
修改选线参数:
最终:
CD测试
完整代码
完整代码如下:
链接:https://pan.baidu.com/s/1XFtZ0epIwgVwu0jzQHyJkA?pwd=0820 提取码:0820
2023.7.9-day9-k8s-ci-cd (kubectl和helm ci-cd)
CI/CD共享库源码 前端项目 (Dockerfile) K8s清单文件代码仓库 helm chart仓库
环境:
1gitlab-ce:15.0.3-ce.0
2jenkins:2.346.3-2-lts-jdk11
3sonarqube:9.9.0-community
4harbor v2.6.2
helmci.jenkinsfile文件
  1@Library("devops06@main") _
  2
  3//import  src/org/devops/Build.groovy
  4def build = new org.devops.Build()
  5def sonar = new org.devops.Sonar()
  6def checkouts = new org.devops.CheckOut()
  7def mygit = new org.devops.Gitlab()
  8
  9//使用git 参数需要格式化
 10env.branchName = "${env.branchName}" - "origin/"
 11println(env.branchName)
 12
 13pipeline {
 14    agent { label "build"}
 15    options {
 16        skipDefaultCheckout true
 17    }
 18    stages{
 19        stage("CheckOut"){
 20            steps{
 21                script{
 22                   checkouts.CheckOut()
 23                }
 24            }
 25        }
 26        stage("Build"){
 27            steps{
 28                script{
 29                    build.Build()
 30                }
 31            }
 32        }
 33
 34        stage("CodeScan"){
 35            steps{
 36                script{
 37                    sonar.SonarScannerByPlugin()
 38                }
 39            }
 40        }
 41        stage("ImageBuild"){
 42            steps{
 43                script{
 44                    //PushArtifactByPlugin()
 45                    //PushArtifactByPluginPOM()
 46                    // init package info
 47                    appName = "${JOB_NAME}".split('_')[0] //devops6-maven-service
 48                    repoName = appName.split('-')[0]   //devops6
 49
 50                    //commitID
 51                    commitID = checkouts.GetCommitID()
 52                    println(commitID)
 53
 54                    // Jenkins构建显示信息
 55                    currentBuild.displayName = "第${BUILD_NUMBER}次构建-${commitID}"
 56                    currentBuild.description = "构建分支名称:${env.branchName}"
 57
 58                    imageName = "${repoName}/${appName}"
 59                    env.imageTag = "${env.branchName}-${commitID}"
 60                    env.fullImageName = "172.29.9.120/${imageName}:${env.imageTag}"
 61                    sh """
 62                        #登录镜像仓库
 63                        docker login -u admin -p Harbor12345 172.29.9.120
 64
 65                        # 构建镜像
 66                        docker build -t ${env.fullImageName} .
 67
 68                        # 上传镜像
 69                        docker push ${env.fullImageName}
 70
 71                        # 删除镜像
 72                        sleep 2
 73                        docker rmi ${env.fullImageName}
 74                    """
 75                }
 76            }
 77        }
 78        stage("UpdateEnvFile"){
 79            steps{
 80                script {
 81                    // 更新部署文件
 82
 83                    projectId = 12 //helm repo id
 84                    fileName = "values.yaml"  //模板文件
 85                    branchName = "master"
 86                    //下载模板文件
 87                    fileData = mygit.GetRepoFile(projectId,fileName,branchName)
 88                    sh "rm -fr ${fileName}"
 89
 90                    //修改镜像tag
 91                    yamlData = readYaml text: fileData
 92                    yamlData.image.tag = "${env.imageTag}"
 93
 94                    //模板文件内容保存到本地
 95                    writeYaml file: "${fileName}" , data: yamlData
 96
 97
 98                    //创建/更新发布文件
 99                    newYaml = sh returnStdout: true, script: "cat ${fileName}"
100                    println(newYaml)
101                    //更新gitlab文件内容
102                    base64Content = newYaml.bytes.encodeBase64().toString()
103
104
105                    // 会有并行问题,同时更新报错
106                    try {
107                        mygit.UpdateRepoFile(projectId,"${fileName}",base64Content, "master")
108                    } catch(e){
109                        mygit.CreateRepoFile(projectId,"${fileName}",base64Content, "master")
110                    }
111                }
112            }
113        }
114        stage("HelmPackage"){
115            steps{
116                script{
117                    // helm pakcage & push harbor
118                    appName = "${JOB_NAME}".split('_')[0]
119                    sh "pwd && ls -l"
120                    sh "mkdir -p ${appName} && cd ${appName}"
121                    ws("${workspace}/${appName}"){
122                        checkout([$class: 'GitSCM', branches: [[name: '*/master']],
123                            extensions: [],
124                            userRemoteConfigs: [[credentialsId: 'gitlab-root',
125                            url: 'http://172.29.9.101:8076/devops6/devops6-helm-repo.git']]])
126
127                        sh "ls -l"
128                    }
129                    //helm package
130                    chartVersion = "${env.branchName}".split("-")[-1]  //1.1.1
131                    sh """
132                        helm package ${appName} --version ${chartVersion}
133                        helm-cm-push ${appName}-${chartVersion}.tgz devops6repo
134                    """
135
136                }
137            }
138        }
139    }
140}
helmcd.jenkinsfile文件
1@Library("devops06@main") _
2
3def checkout = new org.devops.CheckOut()
4def build = new org.devops.Build()
5
6//使用git 参数需要格式化
7env.branchName = "${env.branchName}" - "origin/"
8println(env.branchName)
9
10//commitID
11env.commitID = checkouts.GetCommitID()
12println(commitID)
13
14// Jenkins构建显示信息
15currentBuild.displayName = "第${BUILD_NUMBER}次构建-${env.commitID}"
16currentBuild.description = "构建分支名称:${env.branchName}"
17
18pipeline {
19 agent { label "build"}
20 options {
21 skipDefaultCheckout true
22 }
23 stages{
24 stage("GetHelmChart"){
25 steps{
26 script{
27 //下载helm chart
28 env.chartVersion = "${env.branchName}".split("-")[-1]
29 env.appName = "${JOB_NAME}".split('_')[0]
30 sh """
31 helm repo update devops6repo
32 helm pull devops6repo/${env.appName} --version ${env.chartVersion}
33 """
34 }
35 }
36 }
37
38 stage("Deploy"){
39 steps{
40 script{
41 env.namespace = "${env.appName}".split('-')[0] //devops6
42
43 sh """
44 ## 发布应用
45 helm upgrade --install --create-namespace "${env.appName}" ./"${env.appName}"-${env.chartVersion}.tgz -n ${env.namespace}
46 helm history "${env.appName}" -n ${env.namespace}
47 """
48
49 // 获取应用状态
50 5.times{
51 sh "sleep 2; kubectl -n ${env.namespace} get pod | grep ${env.appName}"
52 }
53
54 //收集history
55 env.revision = sh returnStdout: true,
56 script: """helm history ${env.appName} -n ${env.namespace} | grep -v 'REVISION' | awk '{print \$1}' """
57 println("${env.revision}")
58 println("${env.revision.split('\n').toString()}")
59 env.REVISION = "${env.revision.split('\n').toString()}"
60 println("${env.REVISION}")
61 }
62 }
63 }
64
65
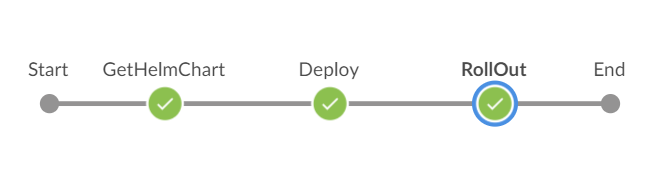
66 stage("RollOut"){
67 input {
68 message "是否进行回滚"
69 ok "提交"
70 submitter ""
71 parameters {
72 choice(choices: ['yes', 'no'], name: 'opts')
73 }
74 }
75
76 steps{
77 script{
78
79 switch("${opts}") {
80 case "yes":
81 def result = input message: "选择回滚版本?",
82 parameters: [choice(choices: env.REVISION, name: 'rversion')]
83
84 println("${result}")
85 sh "helm rollback ${env.appName} ${result} -n ${env.namespace} "
86 break
87
88 case "no":
89 break
90 }
91 }
92 }
93 }
94 }
95}
关于我
我的博客主旨:
- 排版美观,语言精炼;
- 文档即手册,步骤明细,拒绝埋坑,提供源码;
- 本人实战文档都是亲测成功的,各位小伙伴在实际操作过程中如有什么疑问,可随时联系本人帮您解决问题,让我们一起进步!
🍀 微信二维码 x2675263825 (舍得), qq:2675263825。

🍀 微信公众号 《云原生架构师实战》

🍀 语雀
https://www.yuque.com/xyy-onlyone
🍀 csdn https://blog.csdn.net/weixin_39246554?spm=1010.2135.3001.5421

🍀 知乎 https://www.zhihu.com/people/foryouone
最后
好了,关于本次就到这里了,感谢大家阅读,最后祝大家生活快乐,每天都过的有意义哦,我们下期见!
📡
推荐使用微信支付
推荐使用支付宝