--
:
--
:
--
kind使用
最后更新于:
Kind
目录
[toc]
前言
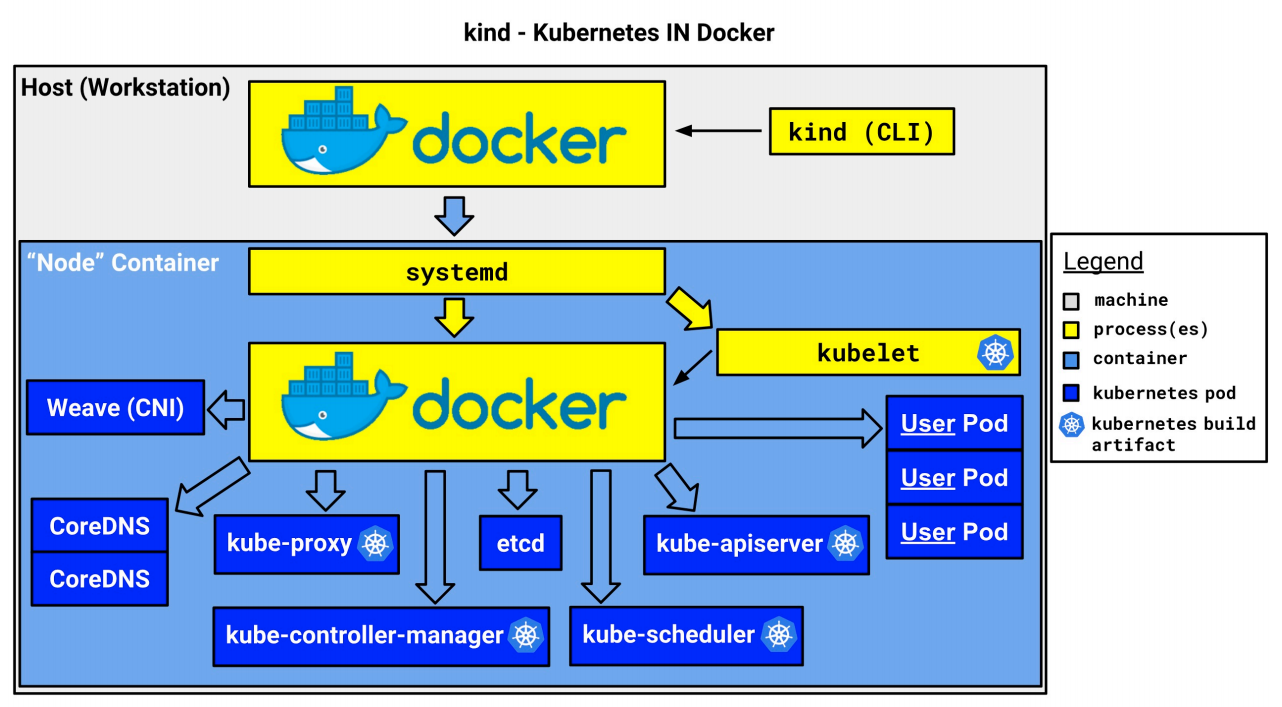
Kind 是 Kubernetes in Docker 的简写,是一个使用 Docker 容器作为 Node 节点,在本地创建和运行Kubernetes 集群的工具。适用于在本机创建 Kubernetes 集群环境进行开发和测试。使用 Kind 搭建的集群无法在生产中使用,但是如果你只是想在本地简单的玩玩 K8s,不想占用太多的资源,那么使用 Kind 是你不错的选择。
Kind 内部也是使用 Kubeadm 创建和启动集群节点,并使用 Containerd 作为容器运行时,所以弃用 dockershim对 Kind 没有什么影响。
Kind 的架构图如下所示,它将 Docker 容器作为 Kubernetes 的 Node 节点,并在该 Node 中安装 Kubernetes组件,包括一个或者多个 Control Plane 和一个或者多个 Work Nodes。这就解决了在本机运行多个 Node 的问题,而不需要虚拟化。
官方网站
1、安装
见单独md。
2、操作
要了解 Kind 的操作,最简单的方式就是直接执行一条 kind 命令,或者 kind -h,这也是我们了解任何 CLI 工具最基础的方法:
 1[root@docker ~]#kind -h
 2kind creates and manages local Kubernetes clusters using Docker container 'nodes'
 3
 4Usage:
 5  kind [command]
 6
 7Available Commands:
 8  build       Build one of [node-image]
 9  completion  Output shell completion code for the specified shell (bash, zsh or fish)
10  create      Creates one of [cluster]
11  delete      Deletes one of [cluster]
12  export      Exports one of [kubeconfig, logs]
13  get         Gets one of [clusters, nodes, kubeconfig]
14  help        Help about any command
15  load        Loads images into nodes
16  version     Prints the kind CLI version
17
18Flags:
19  -h, --help              help for kind
20      --loglevel string   DEPRECATED: see -v instead
21  -q, --quiet             silence all stderr output
22  -v, --verbosity int32   info log verbosity, higher value produces more output
23      --version           version for kind
24
25Use "kind [command] --help" for more information about a command.
从上面的命令可以看出 kind 工具包含很多可用的命令,比如 build 、create、 delete、load 等等。
其中最重要的应该属于 create 命令了,该命令可以用来创建一个集群,用同样的方式我们可以继续查看 kind create 命令的使用方法:
 1[root@docker ~]#kind create -h
 2Creates one of local Kubernetes cluster (cluster)
 3
 4Usage:
 5  kind create [flags]
 6  kind create [command]
 7
 8Available Commands:
 9  cluster     Creates a local Kubernetes cluster
10
11Flags:
12  -h, --help   help for create
13
14Global Flags:
15      --loglevel string   DEPRECATED: see -v instead
16  -q, --quiet             silence all stderr output
17  -v, --verbosity int32   info log verbosity, higher value produces more output
18
19Use "kind create [command] --help" for more information about a command.
可以看出只有一个 cluster 子命令可用,但是该子命令后面如何操作呢?
 1[root@docker ~]#kind create cluster -h
 2Creates a local Kubernetes cluster using Docker container 'nodes'
 3
 4Usage:
 5  kind create cluster [flags]
 6
 7Flags:
 8      --config string       path to a kind config file
 9  -h, --help                help for cluster
10      --image string        node docker image to use for booting the cluster
11      --kubeconfig string   sets kubeconfig path instead of $KUBECONFIG or $HOME/.kube/config
12  -n, --name string         cluster name, overrides KIND_CLUSTER_NAME, config (default kind)
13      --retain              retain nodes for debugging when cluster creation fails
14      --wait duration       wait for control plane node to be ready (default 0s)
15
16Global Flags:
17      --loglevel string   DEPRECATED: see -v instead
18  -q, --quiet             silence all stderr output
19  -v, --verbosity int32   info log verbosity, higher value produces more output
创建集群
可以看到 create cluster 后面没有可用的子命令了,但是有一些 Flags 标志可以传递,但其实不传递任何的参数也可以创建一个 K8s 集群,这属于最简单创建 K8s 的方式,只需要执行如下所示的命令即可创建一个默认的集群(目前最新版本只支持到 K8s v1.25.3 版本):
 1[root@docker ~]#kind create cluster
 2Creating cluster "kind" ...
 3 ✓ Ensuring node image (kindest/node:v1.25.3) 🖼
 4 ✓ Preparing nodes 📦
 5 ✓ Writing configuration 📜
 6 ✓ Starting control-plane 🕹️
 7 ✓ Installing CNI 🔌
 8 ✓ Installing StorageClass 💾
 9Set kubectl context to "kind-kind"
10You can now use your cluster with:
11
12kubectl cluster-info --context kind-kind
13
14Not sure what to do next? 😅  Check out https://kind.sigs.k8s.io/docs/user/quick-start/
查看集群版本
创建完成后就可以直接使用 kubectl 命令管理该 K8s 集群了:
 1[root@docker ~]#kubectl get node
 2NAME                 STATUS   ROLES           AGE   VERSION
 3kind-control-plane   Ready    control-plane   56s   v1.25.3
 4[root@docker ~]#kubectl get po -A
 5NAMESPACE            NAME                                         READY   STATUS    RESTARTS   AGE
 6kube-system          coredns-565d847f94-k2db5                     1/1     Running   0          42s
 7kube-system          coredns-565d847f94-v4vhc                     1/1     Running   0          42s
 8kube-system          etcd-kind-control-plane                      1/1     Running   0          56s
 9kube-system          kindnet-6599x                                1/1     Running   0          42s
10kube-system          kube-apiserver-kind-control-plane            1/1     Running   0          56s
11kube-system          kube-controller-manager-kind-control-plane   1/1     Running   0          56s
12kube-system          kube-proxy-gpf4b                             1/1     Running   0          42s
13kube-system          kube-scheduler-kind-control-plane            1/1     Running   0          56s
14local-path-storage   local-path-provisioner-684f458cdd-wjlwr      1/1     Running   0          42s
15
16#kind create cluster,kind创建集群的时候从,他会自动去配置kubeconfig文件,所以可直接使用kubectl管理kind创建的集群。
17#kindnet是kind安装k8s集群是已经默认配置好的cni插件;
创建集群并指定集群名称
默认的集群名称为 kind,在创建的时候我们可以使用参数 –name 指定创建的集群名称,可以创建多个群集:
 1[root@docker ~]#kind create cluster --name kind-2
 2Creating cluster "kind-2" ...
 3 ✓ Ensuring node image (kindest/node:v1.25.3) 🖼
 4 ✓ Preparing nodes 📦
 5 ✓ Writing configuration 📜
 6 ✓ Starting control-plane 🕹️
 7 ✓ Installing CNI 🔌
 8 ✓ Installing StorageClass 💾
 9Set kubectl context to "kind-kind-2"
10You can now use your cluster with:
11
12kubectl cluster-info --context kind-kind-2
13
14Not sure what to do next? 😅  Check out https://kind.sigs.k8s.io/docs/user/quick-start/
创建集群并指定启动集群的 Node 镜像
此外还可以指定启动集群的 Node 镜像:
 1[root@docker ~]#kind create cluster --name kind-3 --image kindest/node:v1.23.4
 2Creating cluster "kind-3" ...
 3 ✓ Ensuring node image (kindest/node:v1.23.4) 🖼
 4 ✓ Preparing nodes 📦
 5 ✓ Writing configuration 📜
 6 ✓ Starting control-plane 🕹️
 7 ✓ Installing CNI 🔌
 8 ✓ Installing StorageClass 💾
 9Set kubectl context to "kind-kind-3"
10You can now use your cluster with:
11
12kubectl cluster-info --context kind-kind-3
13
14Thanks for using kind! 😊
15
16[root@docker ~]#kubectl get node
17NAME                   STATUS   ROLES                  AGE     VERSION
18kind-3-control-plane   Ready    control-plane,master   4m49s   v1.23.4
获取集群列表
然后可以使用 kind get clusters 命令来获取集群列表:
1[root@docker ~]#kind get clusters
2kind
3kind-2
切换集群
当有多个集群的时候,我们可以使用 kubectl 来切换要管理的集群:
1# 切换到集群 `kind`
2[root@docker ~]#kubectl config use-context kind-kind
3Switched to context "kind-kind".
4
5# 切换到集群 `kind-2`
6[root@docker ~]#kubectl config use-context kind-kind-2
7Switched to context "kind-kind-2".
删除集群
要删除集群也非常简单,比如要删除 kind-2 集群:
1[root@docker ~]#kind delete cluster --name kind-2
2Deleting cluster "kind-2" ...
将本机镜像导入到 Kind 集群
Kind 集群中的 Docker 镜像可以从互联网直接拉取,有时候可能比较缓慢,我们可以将本机镜像导入到 Kind 集群中去,比如使用如下命令可以将镜像导入到 kind-control-plane 节点去:
案例:导入本地镜像到kind的k8s集群里的所有节点上(常用)
1#或者导入本地镜像到所有节点上!
2#kind get clusters
3kind load  docker-image k8s.gcr.io/ingress-nginx/controller:v1.2.0 --name devopscluster
4
5#或者导入本地镜像到某个节点上!
6kind load docker-image  nginx:mainline-alpine --nodes kind-control-plane
测试过程:
 1#测试过程:
 21、宿主机拉取测试镜像
 3[root@docker ~]#docker images
 4REPOSITORY     TAG       IMAGE ID       CREATED        SIZE
 5kindest/node   <none>    d8644f660df0   5 weeks ago    898MB
 6kindest/node   v1.23.4   6b76f7b7813a   9 months ago   1.47GB
 7[root@docker ~]#docker pull  nginx:mainline-alpine
 8mainline-alpine: Pulling from library/nginx
 959bf1c3509f3: Pull complete
10f3322597df46: Pull complete
11d09cf91cabdc: Pull complete
123a97535ac2ef: Pull complete
13919ade35f869: Pull complete
1440e5d2fe5bcd: Pull complete
15Digest: sha256:eb05700fe7baa6890b74278e39b66b2ed1326831f9ec3ed4bdc6361a4ac2f333
16Status: Downloaded newer image for nginx:mainline-alpine
17docker.io/library/nginx:mainline-alpine
18[root@docker ~]#docker images
19REPOSITORY     TAG               IMAGE ID       CREATED         SIZE
20kindest/node   <none>            d8644f660df0   5 weeks ago     898MB
21kindest/node   v1.23.4           6b76f7b7813a   9 months ago    1.47GB
22nginx          mainline-alpine   cc44224bfe20   11 months ago   23.5MB
23
242、进入到kind节点(容器)
25[root@docker ~]#kubectl get node
26NAME                 STATUS   ROLES           AGE   VERSION
27kind-control-plane   Ready    control-plane   26m   v1.25.3
28[root@docker ~]#docker ps
29CONTAINER ID   IMAGE                  COMMAND                  CREATED          STATUS          PORTS                       NAMES
3024c2e3b39d3b   kindest/node:v1.25.3   "/usr/local/bin/entr…"   27 minutes ago   Up 26 minutes   127.0.0.1:46202->6443/tcp   kind-control-plane
31[root@docker ~]#docker exec -it kind-control-plane /bin/sh
32# ctr -n k8s.io i ls -q
33docker.io/kindest/kindnetd:v20221004-44d545d1
34docker.io/kindest/local-path-helper:v20220607-9a4d8d2a
35docker.io/kindest/local-path-provisioner:v0.0.22-kind.0
36import-2022-10-25@sha256:0dae4b69c2aa90e6c24691ebbe2e860e2a1ae68463a622c627fb58110153d950
37import-2022-10-25@sha256:1c35781a4b6011d5c27bedbba7ca130db72c4aaf74d108c60bc77ae49130e5e4
38import-2022-10-25@sha256:4002c19dafb94b1995fc598fae590f70cac10135f61ca2551bd97aae37ed9c4a
39import-2022-10-25@sha256:409b0e81d9aecf59df96df445a3171f43e2ae834ef6c9e77b1492c4d19bfd78d
40registry.k8s.io/coredns/coredns:v1.9.3
41registry.k8s.io/etcd:3.5.4-0
42registry.k8s.io/kube-apiserver:v1.25.3
43registry.k8s.io/kube-controller-manager:v1.25.3
44registry.k8s.io/kube-proxy:v1.25.3
45registry.k8s.io/kube-scheduler:v1.25.3
46registry.k8s.io/pause:3.7
47sha256:221177c6082a88ea4f6240ab2450d540955ac6f4d5454f0e15751b653ebda165
48sha256:4bc1b1e750e34e3fbb542febefe990232575c949ccc07836125e23f3b1881a56
49sha256:4c1e997385b8fb4ad4d1d3c7e5af7ff3f882e94d07cf5b78de9e889bc60830e6
50sha256:5185b96f0becf59032b8e3646e99f84d9655dff3ac9e2605e0dc77f9c441ae4a
51sha256:5225724a11400a83db6efe486e37aeaec871f0e15b19e82c9160b7c3de880875
52sha256:580dca99efc3bb79350e610acca6242f13442633087f3187f7264adbddfbda07
53sha256:86063cd68dfc91a931a6e095a0f796643990ce18d7edf0bbc3385c85bc95c1ab
54sha256:a8a176a5d5d698f9409dc246f81fa69d37d4a2f4132ba5e62e72a78476b27f66
55sha256:d2f902e939cc38784e56ec30c102ef01a019e13a3b31d4c23332ffdd0244a632
56sha256:d6e3e26021b60c625f0ef5b2dd3f9e22d2d398e05bccc4fdd7d59fbbb6a04d3f
57# ctr -n k8s.io i ls -q|grep nginx
58#
59
603、导入镜像
61[root@docker ~]# kind load docker-image --nodes kind-control-plane nginx:mainline-alpine
62Image: "" with ID "sha256:cc44224bfe208a46fbc45471e8f9416f66b75d6307573e29634e7f42e27a9268" not yet present on node "kind-control-plane", loading...
63
64
654、验证
66# ctr -n k8s.io i ls -q|grep nginx
67docker.io/library/nginx:mainline-alpine
3、配置集群
配置3节点集群
上面我们介绍的是 kind 命令的一些常用操作,此外我们还可以通过一个文件来配置要创建的 K8s 集群,比如定义一个如下所示的 config.yaml 文件:
[root@docker ~]#vim config.yaml
1# config.yaml
2kind: Cluster
3apiVersion: kind.x-k8s.io/v1alpha4
4name: demo
5nodes:
6 - role: control-plane
7 - role: worker
8 - role: worker
该配置文件表示我们一共要创建 3 个节点,一个控制节点,两个工作节点,在创建集群的时候只需要通过 –config 参数指定该文件即可:
 1[root@docker ~]#kind create cluster --config config.yaml
 2Creating cluster "demo" ...
 3 ✓ Ensuring node image (kindest/node:v1.25.3) 🖼
 4 ✓ Preparing nodes 📦 📦 📦
 5 ✓ Writing configuration 📜
 6 ✓ Starting control-plane 🕹️
 7 ✓ Installing CNI 🔌
 8 ✓ Installing StorageClass 💾
 9 ✓ Joining worker nodes 🚜
10Set kubectl context to "kind-demo"
11You can now use your cluster with:
12
13kubectl cluster-info --context kind-demo
14
15Not sure what to do next? 😅  Check out https://kind.sigs.k8s.io/docs/user/quick-start/
创建后的集群名称为 demo ,一共包括 3 个节点:
 1[root@docker ~]#kubectl get node
 2NAME                 STATUS   ROLES           AGE   VERSION
 3demo-control-plane   Ready    control-plane   74s   v1.25.3
 4demo-worker          Ready    <none>          34s   v1.25.3
 5demo-worker2         Ready    <none>          34s   v1.25.3
 6[root@docker ~]#kubectl get  po -A
 7NAMESPACE            NAME                                         READY   STATUS    RESTARTS   AGE
 8kube-system          coredns-565d847f94-8snf4                     1/1     Running   0          62s
 9kube-system          coredns-565d847f94-dwdn6                     1/1     Running   0          62s
10kube-system          etcd-demo-control-plane                      1/1     Running   0          76s
11kube-system          kindnet-jjj7l                                1/1     Running   0          63s
12kube-system          kindnet-l69rg                                1/1     Running   0          37s
13kube-system          kindnet-sljw7                                1/1     Running   0          34s
14kube-system          kube-apiserver-demo-control-plane            1/1     Running   0          74s
15kube-system          kube-controller-manager-demo-control-plane   1/1     Running   0          77s
16kube-system          kube-proxy-2rlsr                             1/1     Running   0          63s
17kube-system          kube-proxy-s8cmz                             1/1     Running   0          34s
18kube-system          kube-proxy-sdskq                             1/1     Running   0          37s
19kube-system          kube-scheduler-demo-control-plane            1/1     Running   0          74s
20local-path-storage   local-path-provisioner-684f458cdd-x97z8      1/1     Running   0          62s
创建一个 HA 模式的控制平面的k8s集群
如果想创建一个 HA 模式的控制平面,那么我们可以定义如下所示的配置文件,只需要指定 3 个(奇数个) control-plane 角色的节点即可:
 1kind: Cluster
 2apiVersion: kind.x-k8s.io/v1alpha4
 3nodes:
 4 - role: control-plane
 5 - role: control-plane
 6 - role: control-plane
 7 - role: worker
 8 - role: worker
 9 - role: worker
10
11# 注意:这里是的HA是用ha-proxy来实现的。
还可以将 Node 的端口映射到宿主机
此外我们还可以将 Node 的端口映射到宿主机,通过配置文件中的 extraPortMappings 属性可以实现该功能,如下所示配置可以将 control-plane 节点 80 端口映射到宿主机的 80 端口上:
1kind: Cluster
2apiVersion: kind.x-k8s.io/v1alpha4
3nodes:
4 - role: control-plane
5   extraPortMappings:
6     - containerPort: 80
7       hostPort: 80
8       listenAddress: "0.0.0.0" # Optional, defaults to "0.0.0.0"
9       protocol: udp # Optional, defaults to tcp

如果要将端口映射与 NodePort 一起使用,kind 节点的 containerPort 和 Service 的 nodePort 需要相等。
1kind: Cluster
2apiVersion: kind.x-k8s.io/v1alpha4
3nodes:
4 - role: control-plane
5 extraPortMappings:
6 - containerPort: 30950
7 hostPort: 80
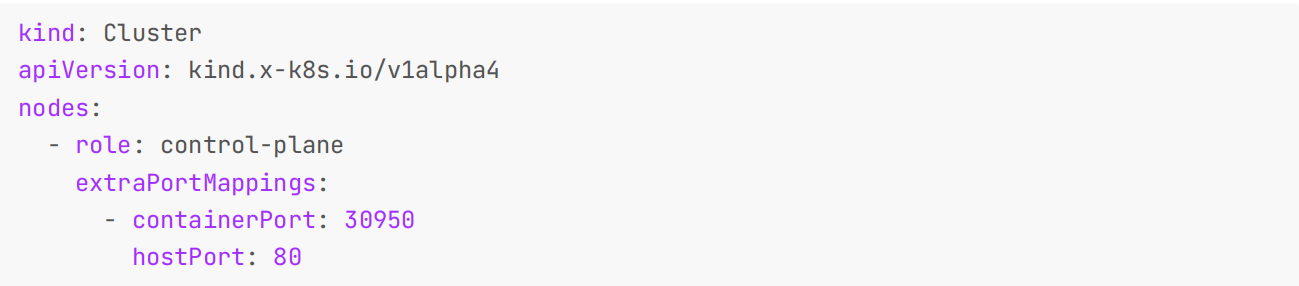
然后将 nodePort 设置为 30950。
 1kind: Pod
 2apiVersion: v1
 3metadata:
 4 name: foo
 5 labels:
 6 app: foo
 7
 8 spec:
 9 containers:
10 - name: foo
11 image: hashicorp/http-echo:0.2.3
12 args:
13 - "-text=foo"
14 ports:
15 - containerPort: 5678
16""+
17apiVersion: v1
18kind: Service
19metadata:
20 name: foo
21spec:
22 type: NodePort
23 ports:
24 - name: http
25 nodePort: 30950
26 port: 5678
27 selector:
28 app: foo


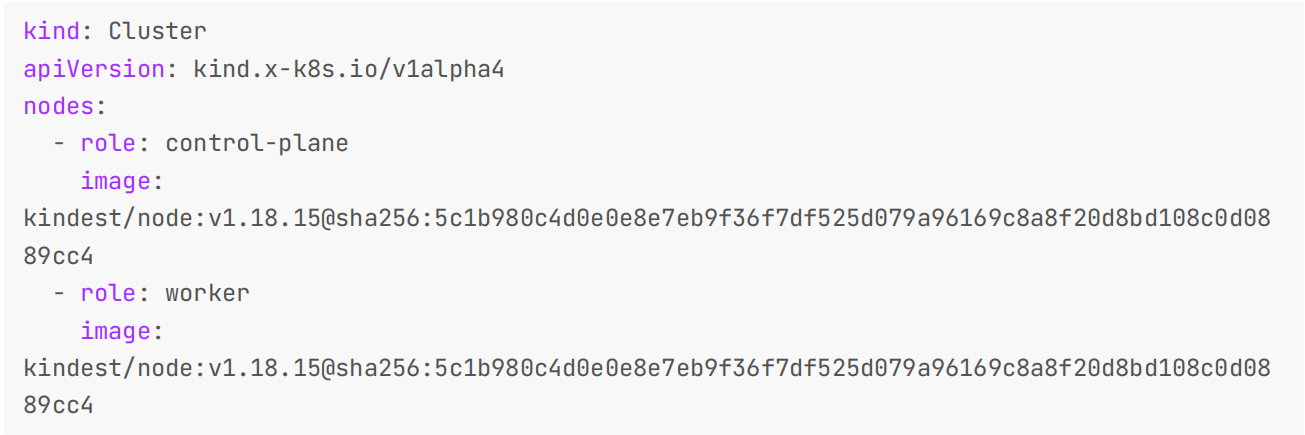
指定k8s镜像
同样我们也可以在配置文件中指定 Node 的容器镜像版本运行指定版本的 Kubernetes 群集。可以在官方 release 页面中中查找需要镜像 tag,带上 sha256 shasum(非必须),例如:
 1kind: Cluster
 2apiVersion: kind.x-k8s.io/v1alpha4
 3nodes:
 4 - role: control-plane
 5 image:
 6kindest/node:v1.18.15@sha256:5c1b980c4d0e0e8e7eb9f36f7df525d079a96169c8a8f20d8bd108c0d08
 789cc4
 8 - role: worker
 9 image:
10kindest/node:v1.18.15@sha256:5c1b980c4d0e0e8e7eb9f36f7df525d079a96169c8a8f20d8bd108c0d08
1189cc4
此外还有一些其他定制操作,比如 Kind 创建的集群默认自带一个轻量级的 CNI 插件 kindnetd ,我们也可以禁用默认设置来安装其他 CNI,比如 Calico。
1kind: Cluster
2apiVersion: kind.x-k8s.io/v1alpha4
3networking:
4# the default CNI will not be installed
5 disableDefaultCNI: true

还可以在 iptables 和 ipvs 之间配置将要使用的 kube-proxy 模式,默认情况下使用 iptables :
1kind: Cluster
2apiVersion: kind.x-k8s.io/v1alpha4
3networking:
4 kubeProxyMode: "ipvs"

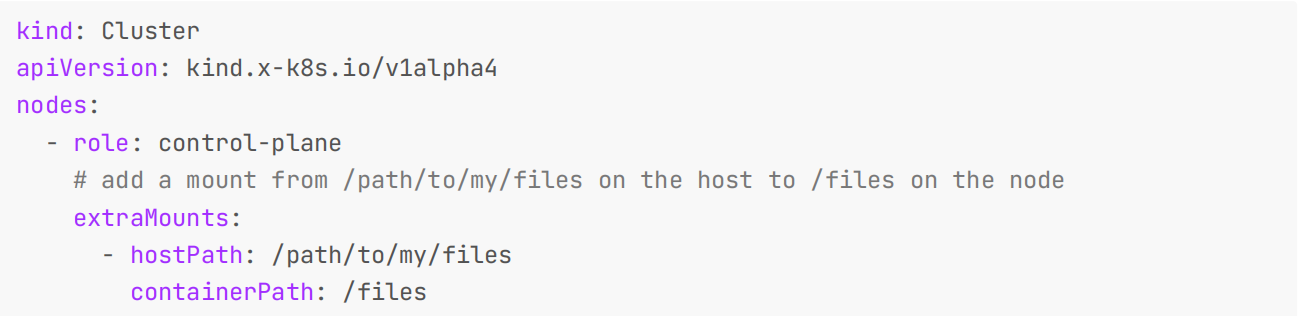
另外我们可以讲宿主机的路径挂载到某个节点上用于数据持久化等。
1kind: Cluster
2apiVersion: kind.x-k8s.io/v1alpha4
3nodes:
4 - role: control-plane
5# add a mount from /path/to/my/files on the host to /files on the node
6 extraMounts:
7 - hostPath: /path/to/my/files
8 containerPath: /files
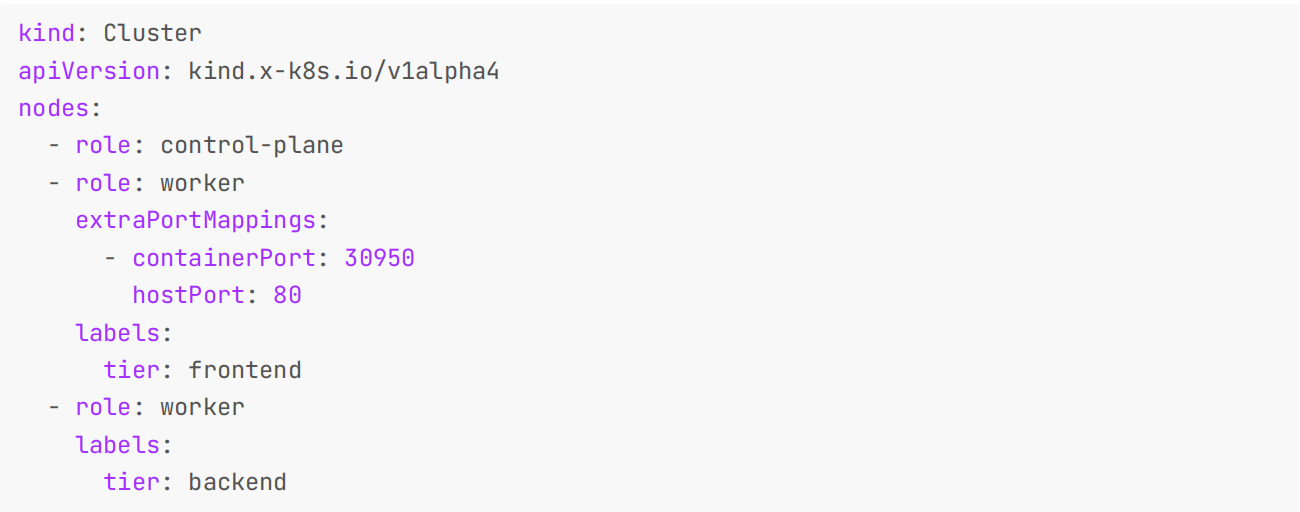
我们还可以给节点定制不同的标签,这对于节点筛选非常有用,只需要在节点中添加 labels 配置即可。
 1kind: Cluster
 2apiVersion: kind.x-k8s.io/v1alpha4
 3nodes:
 4 - role: control-plane
 5 - role: worker
 6 extraPortMappings:
 7 - containerPort: 30950
 8 hostPort: 80
 9 labels:
10 tier: frontend
11 - role: worker
12 labels:
13 tier: backend
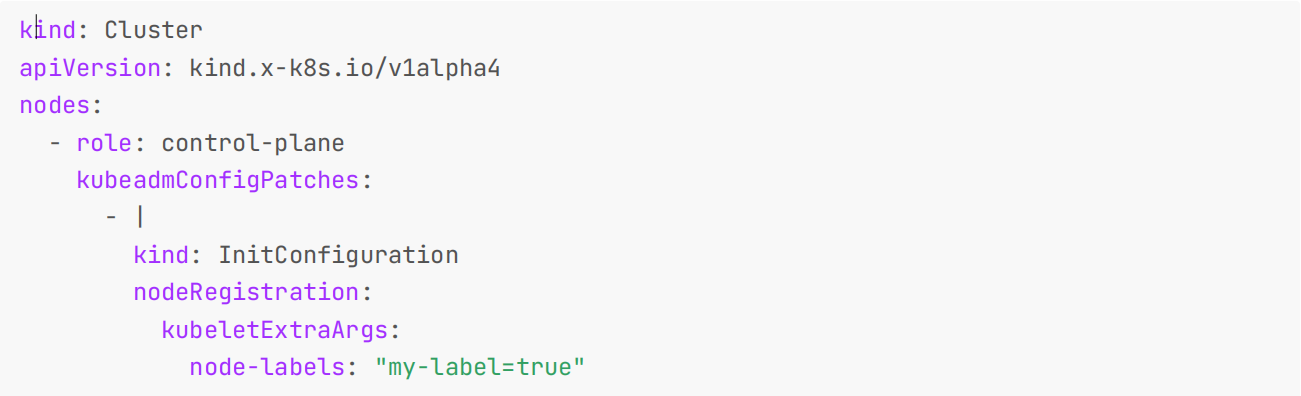
Kind 使用 Kubeadm 来配置的集群节点,他会在第一个控制平面节点上运行 kubeadm init 命令,我们可以使用kubeadm InitConfiguration 来进行一些定制。
 1kind: Cluster
 2apiVersion: kind.x-k8s.io/v1alpha4
 3nodes:
 4 - role: control-plane
 5 kubeadmConfigPatches:
 6 - |
 7 kind: InitConfiguration
 8 nodeRegistration:
 9 kubeletExtraArgs:
10 node-labels: "my-label=true"
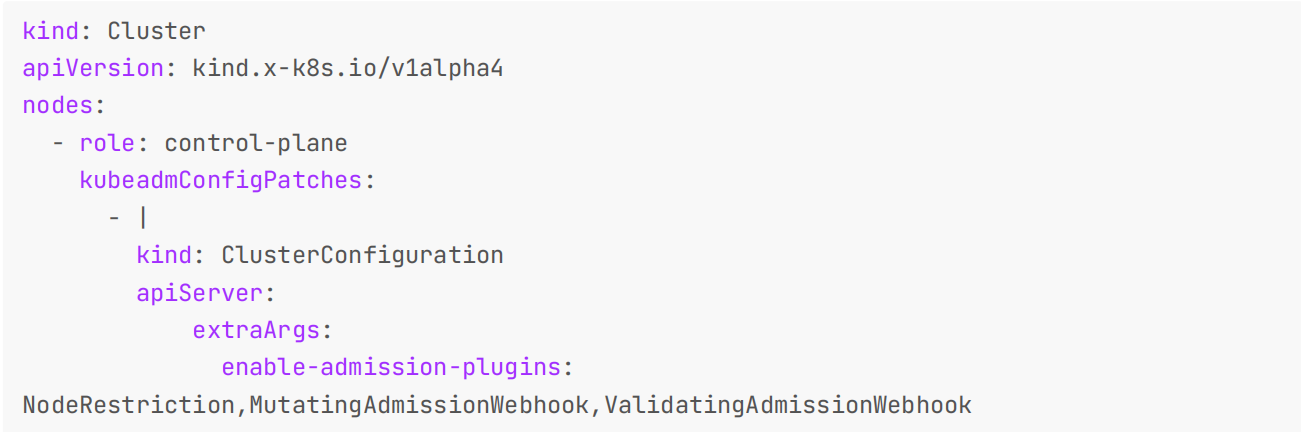
如果你想进行更多的定制,那么在 kubeadm init 期间有四种配置类型可用: InitConfiguration 、ClusterConfiguration 、 KubeProxyConfiguration、 KubeletConfiguration。例如,我们可以使用kubeadm ClusterConfiguration 来覆盖 apiserver 标志:
 1kind: Cluster
 2apiVersion: kind.x-k8s.io/v1alpha4
 3nodes:
 4 - role: control-plane
 5 kubeadmConfigPatches:
 6 - |
 7 kind: ClusterConfiguration
 8 apiServer:
 9 extraArgs:
10 enable-admission-plugins:
11NodeRestriction,MutatingAdmissionWebhook,ValidatingAdmissionWebhook
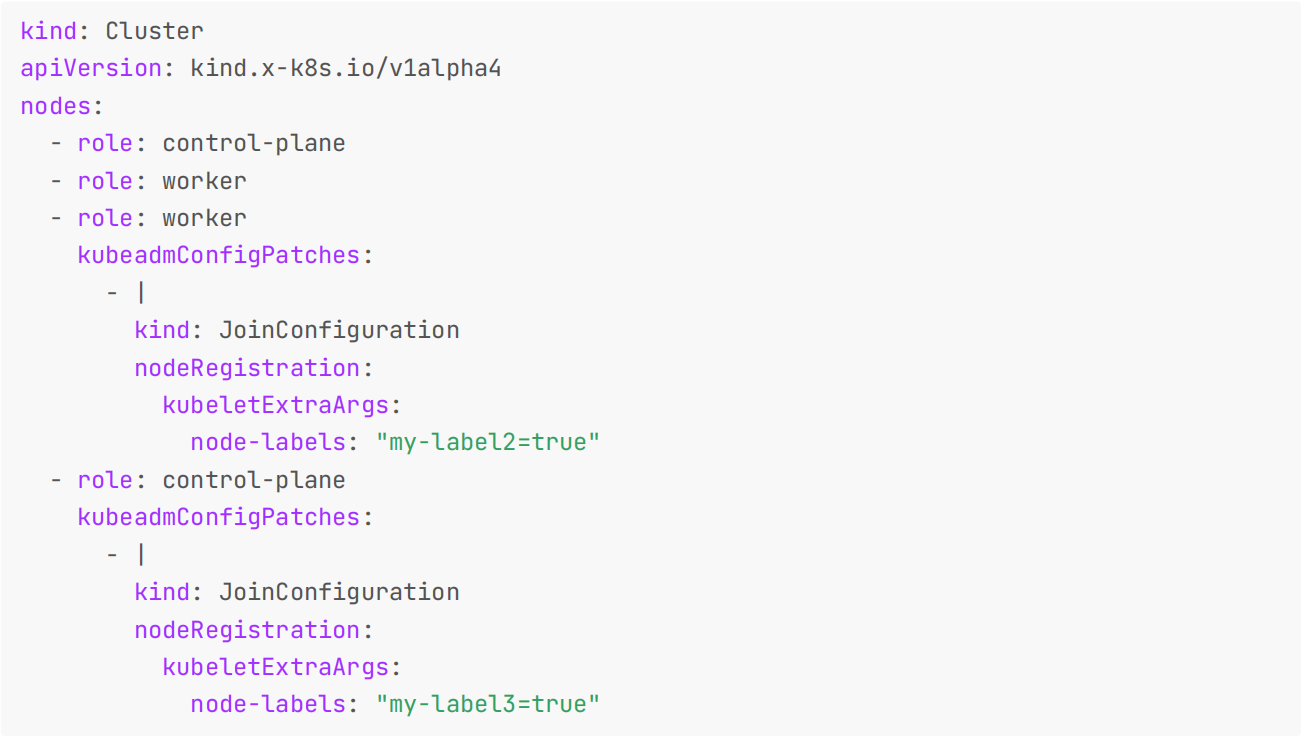
在 Kind 集群中的 worker 或控制平面(在 HA 模式下)节点上,Kind 会执行 kubeadm join 命令,我们也可以使用JoinConfiguration (spec) 来进行定制:
 1kind: Cluster
 2apiVersion: kind.x-k8s.io/v1alpha4
 3nodes:
 4 - role: control-plane
 5 - role: worker
 6 - role: worker
 7 kubeadmConfigPatches:
 8 - |
 9 kind: JoinConfiguration
10 nodeRegistration:
11 kubeletExtraArgs:
12 node-labels: "my-label2=true"
13 - role: control-plane
14 kubeadmConfigPatches:
15 - |
16 kind: JoinConfiguration
17 nodeRegistration:
18 kubeletExtraArgs:
19 node-labels: "my-label3=true"
此外 Kind 还有很多其他的实践方式,在后续课程中我们也会慢慢接触到。
FAQ
- Kind 搭建的集群会自动提供一个 local-path-provisioner 组件,该组件会自动生成 PV。
 1[root@docker ~]#kubectl get node
 2NAME                 STATUS   ROLES           AGE   VERSION
 3demo-control-plane   Ready    control-plane   12d   v1.25.3
 4demo-worker          Ready    <none>          12d   v1.25.3
 5demo-worker2         Ready    <none>          12d   v1.25.3
 6[root@docker ~]#kind get clusters
 7demo
 8kind
 9
10[root@docker ~]#kubectl get sc
11NAME                 PROVISIONER             RECLAIMPOLICY   VOLUMEBINDINGMODE      ALLOWVOLUMEEXPANSION   AGE
12standard (default)   rancher.io/local-path   Delete          WaitForFirstConsumer   false                  12d
13[root@docker ~]#kubectl get po -nlocal-path-storage
14NAME                                      READY   STATUS    RESTARTS   AGE
15local-path-provisioner-684f458cdd-x97z8   1/1     Running   0          12d
关于我
我的博客主旨:
- 排版美观,语言精炼;
- 文档即手册,步骤明细,拒绝埋坑,提供源码;
- 本人实战文档都是亲测成功的,各位小伙伴在实际操作过程中如有什么疑问,可随时联系本人帮您解决问题,让我们一起进步!
🍀 微信二维码
x2675263825 (舍得), qq:2675263825。

🍀 微信公众号
《云原生架构师实战》

🍀 语雀
https://www.yuque.com/xyy-onlyone
https://www.yuque.com/xyy-onlyone/exkgza?# 《语雀博客》
🍀 博客
🍀 csdn
https://blog.csdn.net/weixin_39246554?spm=1010.2135.3001.5421
🍀 知乎
https://www.zhihu.com/people/foryouone

最后
好了,关于本次就到这里了,感谢大家阅读,最后祝大家生活快乐,每天都过的有意义哦,我们下期见!

📡
推荐使用微信支付
推荐使用支付宝